Rim blues – the end of the story

A week after receiving the rim, I finally found some time over the weekend to get down to it – it was final exams week at work and those days are always hectic.

I had to remove the brake discs from the damaged rim and install the onto the new one, which I expected would not be an easy task, since the five bolts holding each disk were glued to prevent them from coming loose. Then, there were the bearings. The rim I had bought had them fitted, but I did not know whether they would be in better or worse condition than the ones in the old rim.

So, the plan was to paint the rim over the weekend (it was silver, remember), as it required a coat of primer and 24 hours later at least one coat of matt black paint, and then on Monday take both rims and the tire to the shop and have the brake discs transferred, the bearings checked and swapped if necessary and the tire fitted.

Once I got to my parent’s place, however, my father, a retired mechanic, engineer and all-round DIY genius, checked the bearings and found that the ones in the new rim were in much better condition, so they did not need swapping, and he also said he felt confident that we could remove the bolts in the disks ourselves. Seeing a chance to get all the work done in one day, I started to have doubts about paining the rim and delaying things a further couple of days. On top of that, several people had told me that I should keep the rim in silver, as the V-Strom had had a long life and it was a fighter, so having mismatched rims would only add to its charm. The front left indicator is still held together with duct tape since the wind toppled the bike in a fjord in 2013, so I thought they had a point.

We set about removing the bolts, which required a long enough lever and a determined hand. Then I removed the ABS sensor disc, and when we were going to fit it on the new rim, we got an unpleasant surprise.

Even though the rim was for the 2007 to 2010 model, had the exact same codes as the one on my bike, had the disc brakes mounting points in the right place to make room for the ABS sensor disc, and the disc fitted snugly in the space provide for it… there were no mounting holes for the bolts that held it in place!

I could not believe it… Suzuki modified the rim then ABS became available in 2007, but apparently only drilled those holes on models equipped with it, which I personally think is an extra complication in the production line. Why not make all rims the same?

We were not going to let that drawback stop us now, so out came the tool collection that my father had built over decades and we tackled the problem.

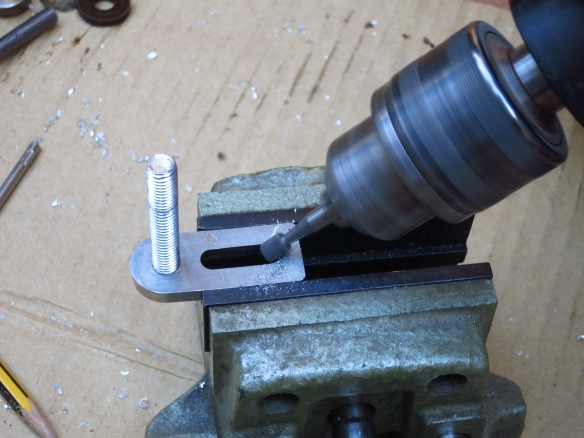
We drilled three holes and, with a specialised tool, cut the thread for the bolts in them. The ABS sensor disc was perfectly secured in position and then we mounted the brake discs.

I managed to find a tire shop that was open on a Saturday afternoon and got the tire fitted at the moment for 20€, and the whole wheel finally went back onto the motorbike! All in all, it has taken almost a month, but my pockets are much happier than if I had had to pay for a new rim!

Rim repair – Barcelona vs. Astrakhan

So, time to get the rim repaired! I thought it would be a good opportunity for some Top Gear-style useful consumer advice. Where is it easier to have a rim fixed? In Astrakhan, a 500,000-inhabitant city in the Volga delta I was completely unfamiliar with and with a language I did not speak, or in Barcelona, my hometown? Let’s compare experiences!

Finding a workshop that would repair the rim proved to be a lot easier than in Astrakhan. I just had to Google it, check out some opinions on bikers forums and choose one. In Astrakhan I had to wander round the centre until I found a biker gang, enlist the help of one of its members, Arkan, and trust he would know what he was doing because he did not speak a single word of English. So, the first point goes to Barcelona.

I contacted XR Llantas, which build and repair wheels of all kinds, both for individuals and competition teams. They have a very good reputation and trusted they could do a proper job.

I sent them pictures of the damage to the rim to see whether it was repairable or not. They said that they needed to see the rim to confirm, but it looked possible. Once I had removed the tire from the rim, I took it to their workshop in Barcelona on a Monday morning.

The place was smaller than I expected,there were rims of all kinds in every available inch of space in the shop, but it seemed they clearly knew their business. I gave the rim to a guy who inspected it carefully and said that they would need to carry out some tests (he mentioned infrared light and ultrasound) to see if they could repair it. Compared to the junkyard Arkan took me to in Astrakhan, this looked like a NASA lab, so Barcelona 2 – Astrakhan 0.

They said that they were very busy and would not be able to get it done until at least Thursday.  I was using the AT in the meantime, so it sounded reasonable to me. At least I was not stuck in the stifling heat of summer in Astrakhan.

A  week later I still had not had any news from them, so I called. They mentioned that they had started looking at it, but had had to stop because they had more urgent business. The guy I talked to on the phone was not the one in the workshop apparently, but he said that he thought that the wheel would be ready the following day, and that they would call to confirm. That was eight days, while in Astrakhan it only took from Monday to Friday morning. Barcelona 2 – Astrakhan 1.

Tuesday came and went with no news, and I was too busy with classes to call. Back in Astrakhan Arkan had called when we said he would. Barcelona 2 – Astrakhan 2.

I called the shop on Wednesday morning and the guy on the phone sounded surprised that they had not called me the day before, as he thought the rim was already repaired. He promised to talk to the workshop and call me later.

Half an hour later I got the promised phone call, but not with the news I was expecting. They had run their tests and determined that he wheel was too badly dented and bending it back into shape would weaken the aluminium too much and there was a risk that it might crack and cause an accident. So, it was not repairable. In Astrakhan they took a wheel in much worse shape than this one, fixed it with no objections in four days and it remained usable for two more years and thousands of kilometres, after which it developed a microscopic leak and I had to have replaced. Barcelona 2 – Astrakhan 3.

There you go, then – if you want something fixed, get a Russian mechanic to do it.

Back in Black

Almost 20,000km in 8 months. That has been the result of commuting daily, going away at weekends and one long summer trip since I took delivery of my AT at the end of March.

It hasn’t taken me long to work out that, at this rate, I will have put 100,000km on it in four years, and I can’t afford to change bikes so fast (I still don’t have a YouTube channel popular enough for BMW to give me free bikes…), so I have decided to use the AT at weekends and for adventure trips and put the V-Strom back in daily commuting service.

The bike had been stored for the 8 months I had had the AT, and this time I didn’t even bother unplugging the battery because I wanted to take it out every now and then at weekends to keep it running, but didn’t really have the time. In spite of this, the engine started first time and the bike went straight back into daily use a couple of weeks ago.

This weekend I finally had some time, so I gave it a major service to keep it running smoothly. I changed the oil and filter and the spark plugs, and poured some Metal Lube into the tank. Maybe it’s just psychological, but I would swear the bike is already running smoother. I also lubricated the clutch cable with this contraption I had bought for 4€ and some WD40.

I didn’t know how effective it would be, but I have to say I’m pleasantly surprised – the clutch is now much easier to operate, which makes a welcome difference in everyday traffic.

Here’s a video (not mine) showing how it works.

Having clocked over 150,000km, I am now just curious to see how many more this bike can take with daily use and regular servicing.

Yamaha T7 Ténéré Concept

Yamaha unveiled this long-awaited bike – albeit still in concept form only – yesterday at EICMA and it pretty much stole the show, at least for us adventure riders.

01-t7_tenere

When the Iwata firm first introduced its 900cc three-cylinder engine in the best-selling MT-09 we were all hoping that among the bikes that would eventually spawn off that cpowerplant there would be a mid-size adventure bike to fill the gap between the XT660 Ténéré and the XT1200Z Super Ténéré, something that would be powerful enough for long distance riding with luggage and maybe a passenger, but light enough to venture offroad beyond easy dirt tracks.

02-t7_tenere

With all adventure bikes having grown bigger and fatter, there were only two 800cc bikes covering that gap in the market – BMW’s GS and Triumph’s Tiger. A year later, when Honda took the wraps off their True Adventure prototype, with a 1000cc engine, it became glaringly obvious that Yamaha had to do something with their 900cc triple to get a foot on that market.

Well, it seems that it was not so obvious to them, as what we got was the Tracer 900, a bike that was more a replacement for the ancient TDM900 than a trail with any offroad pretensions. I was disappointed and got a second-hand Super Ténéré.

It seems though, that Yamaha has finally to take up the fight, and having made truck loads of money from their MT-09 and Tracer they have finally come up with a proper adventure bike.

05-t7_tenere

The T7 concept does not use the 900cc engine, which in the end might turn out to be a good thing, as it would make the bike heavy and its power delivery would not be suitable for technical riding (that is precisely what I did not like about the Triumph Tiger). Instead, they have gone for the smaller 700cc engine from the MT-07, another best-seller.

Like Honda did, they seem to have been doing their homework and studied all the relevant adventure riding internet forums wish lists. The T7 prototype has 21 and 18-inch wire wheels, KYB suspension and is estimated to weight about 180kg and have 74bhp.

Those two last figures need to be officially confirmed, but if the end result is near, this might turn out to be a serious offroad rival for Honda’s AT.

yamaha-t7-concept-action-05

Like the True Adventure concept, the T7 looks pretty much a finished bike, so by the time it reaches production in 2018 not much should change. My guess is that it will get a less radical seat, the front fairing will incorporate a regular headlight and the Dakar-style instrument panel will be replace by a regular one, most likely the one already seen in the Tracer and facelifted Super Ténéré.

The market is getting interesting… Your move now, BMW.

Pictures: Yamaha

Puig wind deflector

The OEM tall screen that I ordered when I took the bike to the dealer for the 1,000km service is noticeably better than the standard one, but it was still not enough to stop the buffeting on my forehead. I guess it might be comfortable enough for most people, but I was spoiled by my V-Strom, which with a GIVI tall screen and more plastic in front of me has excellent wind management. To solve my issues once and for all, I ordered a wind deflector like the one I had on the ST.

img_7971Puig makes two versions of this wind deflector, one that requires drilling holes on the screen to fix it with bolts and another one that has clamps and does not require any drilling. If you plan on selling on the bike and keep the deflector and do not want to leave holes on the screen, or if it is too much of a hassle, the later one is the option to go for, although it does cost almost twice as much – 90€ vs. 50€ (approximate prices averaged from several sources).

img_7974I went for the clip-on one in spite of the price because I will pass it on to other bikes in the future and did not want to drill the screen, so fitting it is a really simple process.

Instructions

Before fitting it to the bike, it is necessary to mount the supports to the deflector itself.

img_7976Remove the black plastic caps that cover the Allen screws, remove the screws, separate the front plastic part, line the supports with the holes in the deflector from the back and the front plastic part from the front, re-insert the screws and tighten them. Make sure that the clamps are facing the correct way (down).

img_7979Put the black plastic caps back on and you are ready to go fit it to the bike.

Loosen the screws that hold the clamps together. Do not remove them completely, just enough so that the clamps open and you can slide them on top of the screen.

img_7980Make sure the legs are parallel to one another, not in a “V” position, center the whole assembly on the windscreen and tighten the clamps. Ready to go!

img_7982 img_7981The deflector can be adjusted in multiple positions and heights, so now you need to ride and find the best one for you. I keep it mid-height for my day-to-day commute, it keeps the air away from my helmet at most speeds and does not get in my line of sight. For offroading I put it on its lowest position and for the motorway I raise it a notch.

Do not try to move it while riding!

Final touches to the AT

As I explained when I fitted the fuse box to the AT, I still had to install a few last things, most of which requiered routing wires from the handlebars and front part of the bike, under the fuel tank, and to the box under the seat. Space is tight, the fuel tank had to come out and I did not want to have to do it every time I was going to fit something, so I waited patiently until all parts had been delivered and got down to it with only a week to spare before the AT’s first big trip. I was going to fit:

  • Front fog lamps
  • Heated grips
  • 12V socket
  • Chain oiler system
  • Pre-wiring for rear fog lamp (I still have not received the Holan top case)

I needed the bike to go work, so I only had one afternoon to get everything done. In the days before I did all my homework, drawing the electrical schemes, cutting the wires, fitting the connector plugs, protecting them with heat shrink tubing, and generally pre fitting everything I could before the wiriing.

The chosen chain oiler was a PDoiler system, which is cheaper than a Scottoiler electronic system but still provides instant control of the amount of oil delivered to the chain. I was not convinced by the wicker system, though, so I replaced that with a Scottoiler dual injector.

DSC_0006I put the oil reservoir/pump combo on the right side of the subframe, behind the passenger footpeg. It does not stand out and it is the optimal position to route the wire to the fuse box and the oil tube to the swingarm and to the chain.

DSC_0017DSC_0075The dual injector is suposed to be mounted on the swingarm with zip ties or with special adhesive tape, but I went for a more elegant solution and bolted it to the chain guide under the swingarm, which is in the perfect position in the AT.

DSC_0008The injector is covered, so it is virtually invisible, and it is more securely mounted. This only requieres measuring the position, removing the chain guide and drilling a hole in it of the same diametre of the bolt included with the injector.

DSC_0011To fit the injector in the correct position you can then use the plastic spacers provided with it or a few washers for more precise adjustment.

DSC_0014I used the provided adhesive plastic clips to route the oil tube  and I fabricated a support to fit the the oiler control knob on the handlebars using the mounting that came with the 12V socket.

DSC_0019IMG_0290Then the day came. Right after lunch I started removing the fairings on the bike. The first time I did that I complained that it took too long, but as I learnt this second time, if you have the right tools and know what you are doing, you can remove everything reasonably fast. One thing I was worried about were the crash bars. I did not know whether it would be possible to remove the fairings with them on, as it was on the V-Strom.

It is not. At least with the Holan crash bars. The good news is that you don’t really need to remove them – if you loosen the bottom mounting point and remove the two bolts under the headlight, the whole assembly pivots forward and out of the way. I assume that with the PRO model four more bolts need to be removed from the radiatiors mounting points.

IMG_0285Removing the tank is also a fairly straightforward process – there is only one bolt to be undone (under the seat), even though you need to remove the seat lock assembly to access it, and you pull it up and back to detach it from the front mounting points, which are two rubber pegs. With the help of a friend who lifts the tank a bit, unplug the fuel line, two electrical connectors and the rubber tubes for the breathing and the overflow and you are done. It is much easier if the tank is empty or close to it, as it is much lighter.

I installed an aftermarket waterproof 12V socket which fit perfectly into the hole on the dashboard.

DSC_0076

The heated grips proved to be a bit trickier. It took some swearing and sweating to pull the OEM grips off the handlebars, and while the heated left one slid in without problems (I had to put a couple of drops of glue to stop it form rotating afterwards), the right one refused to slid more than halfway in. In the end we used a big screw clamp to push it in. They do not have a separate control unit, it is integrated in the left grip, like the Honda OEM ones. This looks great, but I found that I kept turning them on accidentally every time I used the indicators, so I had to rotate it down a bit to make sure the button is out of the way.

The oiler control unit went on the right handlebar and the fog lamp switches on the left one, in a position I can easily reach with my thumb. I mounted them on a PMR bar switch that replaces the clutch clamp. It looks great, but the bolts did not align exactly with the holes in the clamps, we had to file them off a bit.

IMG_0289After fitting the fog lamps to the crash bars – very easy on the Holan ones, as they include two mounting points – all that was left was route all the wires along existing ones, secure them with zip ties and plug all the connectors. I strongly recommend fitting a fuse box on this bike, as the battery is difficult to access and it simplifies electrical work considerably.

We checked that everything worked and we put the bike back together.

Other last minute additions before the big trip have been a pair of Heidenau K60 tires and two custom made bags for the Holan crash bars to carry a pair of spare tubes and the tools to change them.

How to fit Holan crash bars

After a long wait (almost two months), I finally got the Holan crash bars for the AT. I have already fitted handguards, so all that remains now before I can offroad with peace of mind is a pair of knobbly tires.

I picked up the bars from the shipping company and as I was taking the tools out to the front yard I was readying my mind for whatever challenges Holan was going to throw at me this time – missing bolts, nuts or washers? misaligned mountings? – both from personal experience with the panniers and from what I usually read on forums, I was sure something was not going to go as planned. And I wasn’t wrong.

The surprise came as soon as I unpacked the upper crash bars. Holan makes two models, the ‘standard’ one and the ‘Pro’ one. The main difference, other than a slight difference in shape and the position of the bar that crosses under the headlight, is that the ‘Pro’ one has two additional mounting points that fit in the radiator mounts of the motorbike. Whether you want them or not, if you are buying them through the Spanish distributor, these are the only available option, but surprise motherf***er! Mine did not have the extra mounting points. They sure were shaped like the ‘Pro’ ones, but that bit was missing.

I had chosen Holan because I liked the fact that they covered as much of the fairing as the products from Honda, Touratech and Hepco & Becker for considerably less money, but also because they already included mounting points for the fog lamps. As for how sturdy they are, only time and crashes will tell. None of the alternatives (except for the Motortek ones) have the mounting points to the radiators, and having waited two months, I was not very keen on sending them back and face another two months wait, particularly when my holidays are coming up and I need the bike equipped for the trip, so I decided to keep them and ask for the difference to be reimbursed (the ‘Pro’ ones are 25€ more expensive). Time to fit them and see if there were other ‘surprises’ in store (other than the known fact that Holan does not include instructions).

crash-bars-for-honda-crf1000l-africa-twin (1) crash-bars-for-honda-crf1000l-africa-twin

Instructions

The good news about both the upper and lower Holan crash bars is that they do not require the exhaust manifold to be removed, as they do not attach to the upper bolt in the engine mount, making things a lot easier.

IMG_9564

I decided to start with the engine crash bars, as they only have two mounting points each and the process is very straightforward. At the back both use the mounting point for the piece of plastic that keeps your boots from scratching against the frame. Remove the Allen bolt and pull the plastic out on both sides of the bike.

IMG_9548Holan provides two longer Allen bolts with a washer to replace the OEM ones. (I like the fact that they seem to be of considerably better quality). Nothing missing so far.

IMG_9550

At the front, the right one uses one of the bolts that connect the cradle frame coming from the bottom of the engine to the vertical beam between the radiators.

IMG_9551The OEM bolt is long enough, so no replacement bolt is provided. It is a bit tricky to remove with your fingers and to put back in place with the crash bar, but both to loosen it first and then to tighten it again there is enough space to work with a spanner without any problems.

IMG_9554

There have been reports of problems with the plate at the back end of the right engine crash bar touching and bending a bit the plastic that protects the clutch housing. Some people have just left it that way, others have filed off a bit of plastic (number 2 on this picture, which is from a DCT model). I had no such problems.

246s3d2

dsc_00031

dsc_00021

The left crash bar mounts on the lower bolt of the front engine mount, and this is shared with the upper left crash bar, so you need to fit both at the same time.

IMG_9563

At this point, the easiest way to proceed is to line up both upper crash bars, insert all bolts, nuts, spacers, and washers without tightening them and then tighten them one by one. It is much, much easier if you have a friend to help you hold the bars while putting everything in place.

Here was where I had the second and only other problem. The upper and lower crash bars are sold as separate products; you can buy and fit one or the other independently or both at the same time. The thing is, Holan does not make any special provisions for those who are going to fit both, which means that when it comes to the lower bolt on the front engine mount, they provide a longer bolt with the lower crash bars to accommodate the flange at the front of the bar, and another bolt of the exact same length with the upper crash bars to accommodate the flange at the bottom of those bars. See where this is going? When you put both flanges together in the same point, neither of the bolts provided separately is long enough.

IMG_9572

I had to leave things half mounted and go try to find the right bolt. More than an hour and three specialised shops later, I got one.

IMG_9577

At the top, the two halves of the upper crash bars are held together with two Allen bolts which are colour silver and stand out quite a lot against the black bar. It might be a good idea to either paint them or replace them with black ones.

IMG_9574

The other mounting point for the upper crash bars (unless they are the ‘Pro’ ones) is under the headlight. Two plastic spacers and two bolts and nuts are provided. In my case, everything lined up without any problems and did not have to modify or bend anything.

IMG_9575

Now we only have to wait and see how they fare when I start dropping the bike.

IMG_9579

How to fit a Holan Nomada Pro II pannier system to the AT

If you are only looking for instructions on how to install the pannier system on your bike, scroll down until you find the INSTRUCTIONS section. If you are bored at the office and fancy reading the whole story, read on.

This Polish pannier system costs about 200€ less than the equivalent offering from Touratech and includes a right pannier with an exhaust cut, something that the German manufacturer seems to refuse to make for any bike other than BMWs. They are mostly (more on that later) a match for the German quality, so taking into account the added benefit of the exhaust cut, where does the difference in price come from?
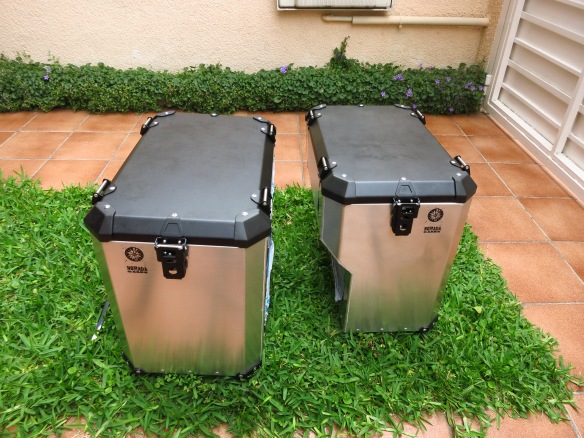
IMG_8036

Instructions, apparently. The Poles do not include a single piece of instructions for their products. You get the panniers, the support hoops, a few metal tubes bent in different shapes and a bag of bolts, nuts, washers and spacers and are left to do your best to guess how it all fits together onto your bike. Not that Holan is trying to save the Amazon by eliminating the need for printed instructions, mind you, there is not even a PDF on their website. Really Holan? Really? Is it that hard?
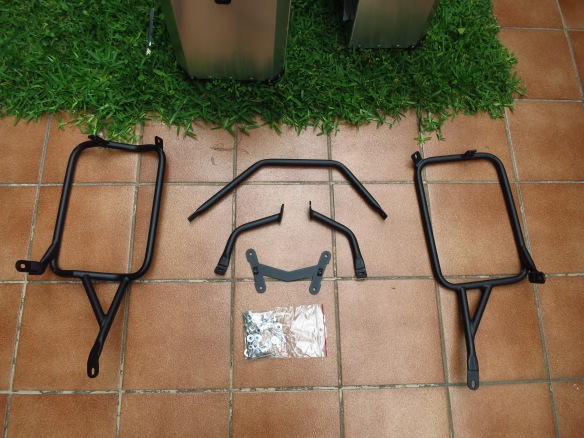
IMG_8035

Better be a Meccano fan, then.

Holan panniers usually come with the mounting points already fitted at no extra cost, which is another advantage over Touratech, but in my case I got a pair that the Spanish dealer had in stock to avoid the long wait for the panniers to be shipped from Poland, and I was aware that I would have to fit the mountings myself. That was not a problem, though, as I had experience on my old Touratech panniers, the only drawback was that it is a time consuming process.

The first racks that Holan made did not have any mounting points to the back of the subframe to avoid the need to drill through the fender, but they flexed too much and the design was modified to include an extra mounting point. This single picture of the new rack had made its way to the web, but that was all the information I had:

IMG_4001-1

I assumed that it would require the same process as the Touratech, GIVI and Globescout systems, drilling a couple of holes through the rear fender to attach it to the end of the subframe. Two things did not look quite right, though.

First, looking at the picture above, those two bolts seemed to be too far back to fit through the fender at the end of the subframe, they were more like under the rear light or license plate.

Second, with the bits and pieces already scattered in front of me, the H-shaped plate where those bolts mount was too wide and too flat to fit under the fender, which has a pronounced inverted U shape. Maybe it fit on the other side of it, under the seat?

I decided to loosely mount the hoops on the attachment points on the passenger footpegs and the front of the subframe to try to figure out how the new parts fit together, and after a few minutes of fiddling it dawned on me. They attach under the rear luggage rack, not the subframe! So the good news is, the Holan system still requires no drilling.
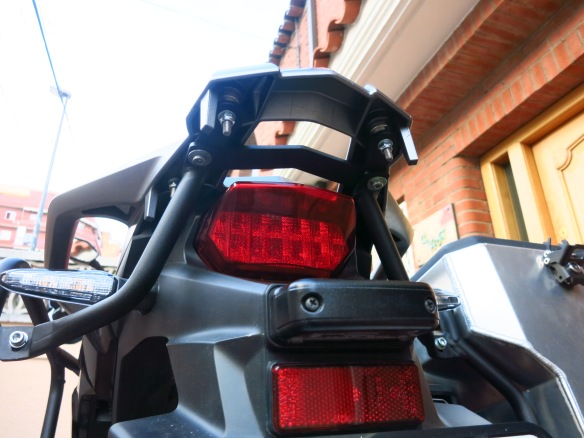
IMG_8106

From that moment on, it was only a matter of figuring out where all the bolts, nuts, washers and spacers went. Here is how to fit it:

INSTRUCTIONS

Remove the seat. It is not necessary to remove the pillion seat, although it is advisable to avoid getting it dirty by accident, particularly if you have the red one.

Remove the two bolts that hold the luggage rack and passenger handles to the subframe that are closer to the front of the bike. The Holan rack attaches directly to these points, a solution which I prefer to them hanging from the existing points for the OEM luggage.
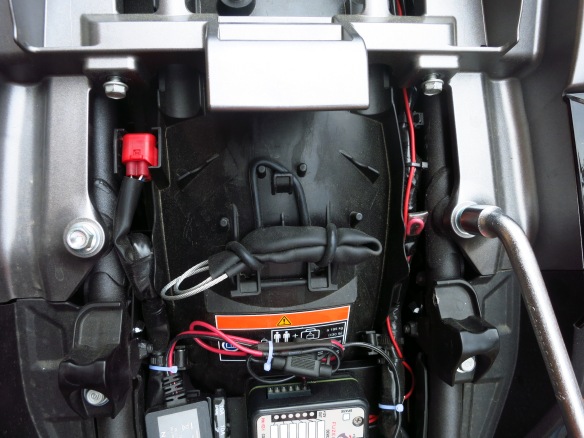
IMG_8053

Remove the passenger footpegs. You will need to completely remove them, as one bolt will hold the rack mounting point and the other requires a spacer.

If you have a top case or luggage rack, you will also need to remove it (not my case yet).

Important! If your panniers come with the mounting system already fitted, you can start installing the rack on the bike now. If you need to drill the holes to mount them, do not mount it on the bike yet, you need the hoops to take measurements to mark the drilling points on the panniers. I explain this process further below, so read that now if you need to, then come back here once your mounting system is fitted to the panniers and you are ready to fit the rack on the bike.

The easiest way to make sure that everything lines up as it should before you start tightening bolts is to mount all the parts onto the bike and fit all the bolts and nuts loosely, then start progressively tightening them. More often than not, something will not line up and it will require pulling, pushing or bending.

In my case, and at least one other member of the Spanish forum, the mounting point to the subframe for the exhaust side hoop required extreme force to line up with the hole. Not wanting the bolt’s thread to get damaged later, I put it on a bench vise and bent the mounting point slightly backwards with a precision correction tool (also known as ‘hammer’). After that everthing fit without any problems.

The lower mounting point attaches to the upper bolt of the passenger footpeg. Because this will cause the footpeg to be slightly further outwards than before, you need to use the provided spacers in the lower bolt. Don’t remove the washers that come with the footpegs.
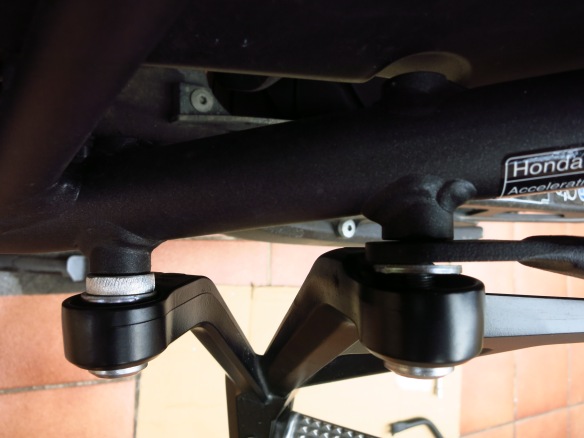
IMG_8062

At the back, mount the lower bracing bar that connects the bottom of the hoops together with a washer on both sides of the bolt. The side with the more open angle is the exhaust side.
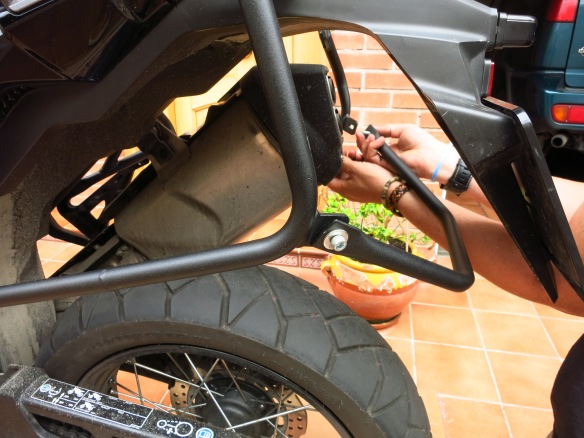
IMG_8071

To fit the extra mounting point under the luggage rack you need to use the eight special spacers. Put four on the holes on the luggage rack from the top (narrow side down) and drop the long Allen bolts with the rounded head into them.
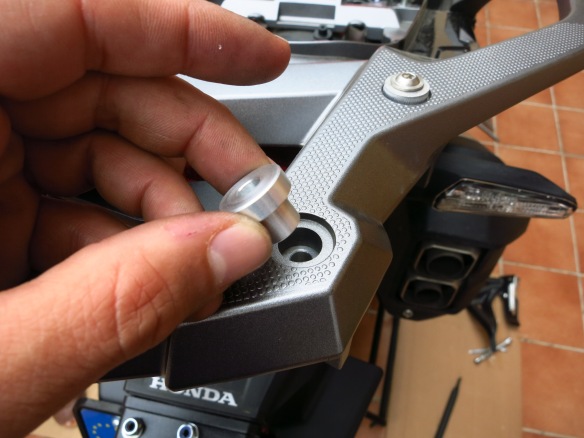
IMG_8058

Now comes the tricky part – you need to fit the other four washers (wide side up) up the bolts, fit the H plate without them falling (and with the welded threads facing up) and start screwing the self locking nuts. Do not tighten them completely.
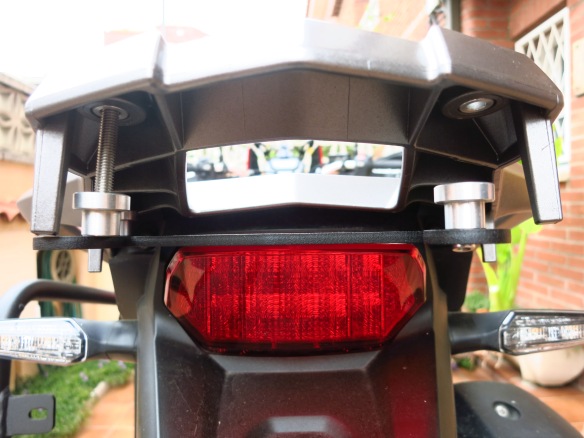
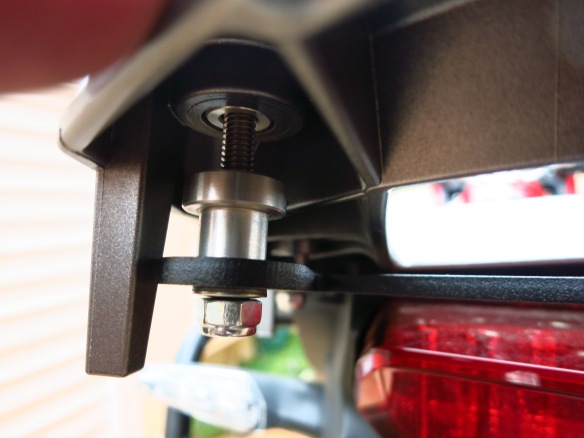
IMG_8059

IMG_8055

To finish, attach the L shaped mountings from the top of the hops to the H plate under the luggage rack.
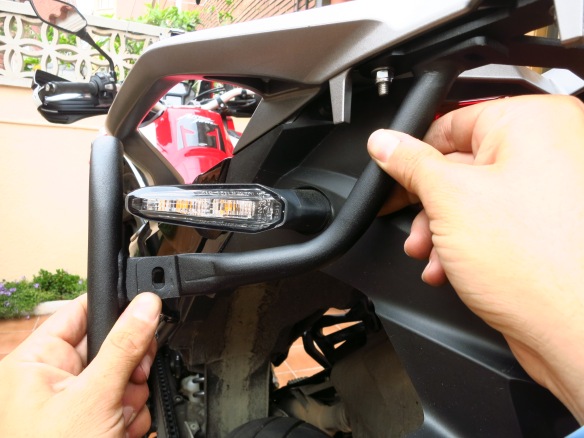
IMG_8068

They fit with the angle facing to the ground so that they clear the indicators. In my case, Holan had not included the two bolts needed to fit them to the H plate, so I had to find a pair from my personal stock.
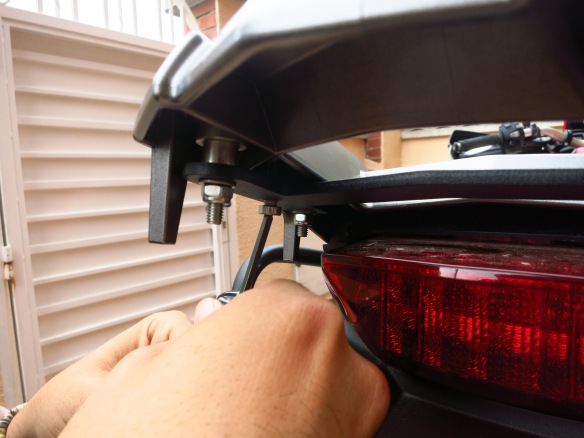
IMG_8064

The only thing left to do now is to go around the rack and progressively tighten all the bolts and nuts. All the nuts provided are self locking, but it is always advisable to check everything has settled in properly after a few days riding and to put a drop of thread locking glue in them to make sure that nothing comes loose.

FITTING THE PANNIER MOUNTS

For those of you unlucky enough to get the panniers without their mounts already fitted, here is how to do it.

With the old Touratech Zega panniers, or any others that do not have rounded or cut corners, nor an exhaust cut, it was possible to play a bit with the mounting points to find the best position – a bit further back, or closer to the front, higher or lower… in order to do this properly the best method was to mount the racks on the bike, check exactly where you wanted them (usually with a passenger) and then remove the panniers to use the hoops to mark the exact drilling points with the panniers lying on their side on the floor. In this case there is not much room for lateral movement, and you can’t choose the height as that is determined by the exhaust cut, so you can take all the measurements to drill the holes without the need to mount the rack on the bike before.

Take the pannier with the exhaust cut, lay it on its side, place the hoop on it and measure the distance across to both edges.
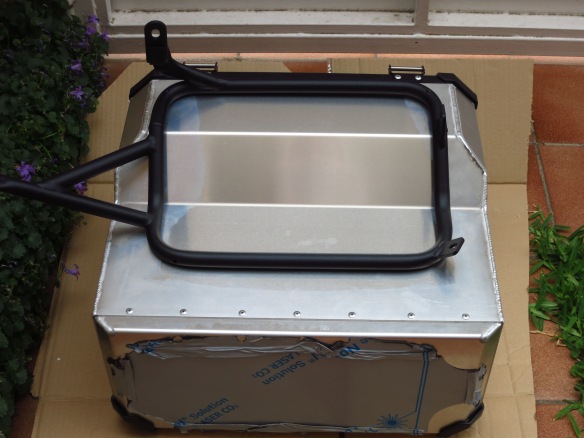
IMG_8073

There is a bit of room to mount it slightly forward or backward, but not much, and mounting it in the middle means that you minimize the risk of making a mistake then transferring these measurements to the other pannier (see my previous post about that) and that you will be able to swap left and right if in the future you buy a bike with the exhaust on the other side (providing Holan makes a rack for that one, that is).

Then measure the distance from the top of the hoop to the lid. And write all these numbers down.
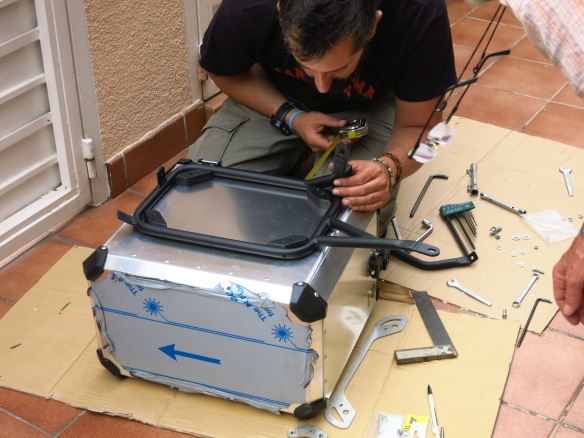
IMG_8074

With the hoop in the exact position you want, place the plastic pucks on their correct position on the inside of the hoop (you will need a friend to hold it down in position for you to make sure it does not move a millimeter, or alternatively, put some weight on it). Take a long thin pencil or even better, a metal punch, and mark the position of holes of the plastic pucks on the pannier.
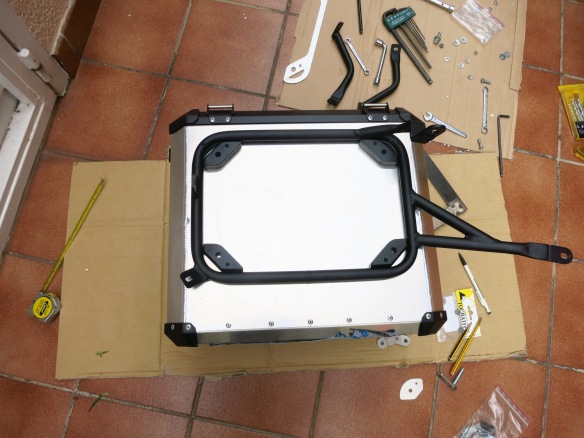
IMG_8072

Remove everything and drill the holes (5mm for the small bolts, 8mm for the big ones).

IMG_8079

Clean the metal shavings with a bigger diameter drill and mount everything in the following order: from the inside – the reinforcement plates (small) and the bolts; from the outside – the reinforcement plates (long) the plastic pucks, the metal plates (at the bottom) and the rotating locking plates (at the top). Make sure the 8mm holes at the top are wide enough for the rotating locking plates to turn freely.
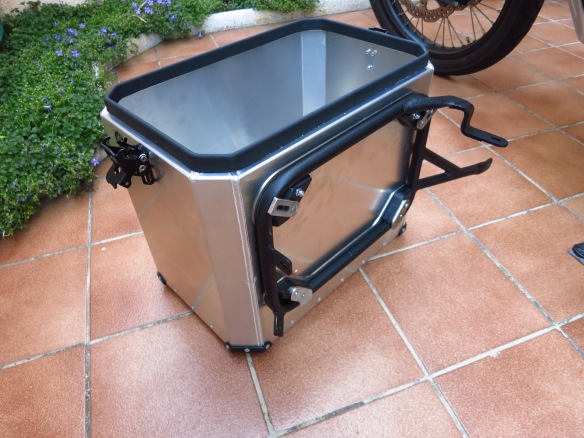
IMG_8080

In my case, I had to add a spacer for the locking knobs inside the pannier, as they are too close to the head of the small bolt, and no spacers were included in the kit.
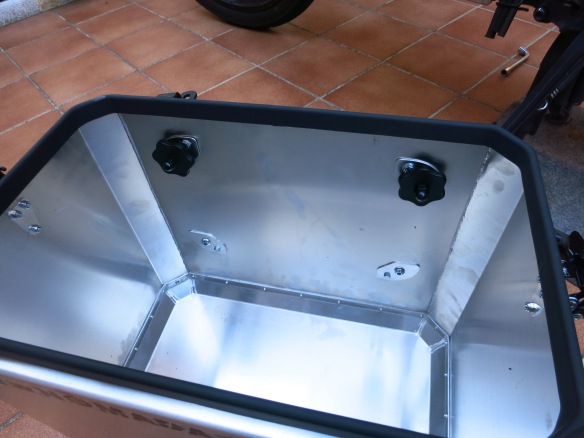
IMG_8082

The hoops have a small metal bump onto which the rotating locking plate fits to make sure they do not turn as you are tightening them. One of them did not fit (the cut on the plate seemed to be too short) so I had to lengthen the cut a bit.
IMG_8090

All in all, two bolts and four spacers missing, a mounting point on the rack that required some “aligning”, a cut on a locking plate that needed lengthening and no instructions. If you like DIY, have access to tools and want panniers with an exhaust cut, these are a very good choice. For 200€ more, and if you forego the exhaust cut, the Touratech ones come with instructions. I don’t know about the latest models, but my old Zega ones (first generation) still required drilling (more holes, actually) and the rack also needed bending. No missing bolts or spacers, though. If you want the full GSA look, try Globescout. Instructions, anodized ,no drilling and supposedly excellent quality. They are 300€ more. Oh, and Holan prices include shipping.

Time to load up the beast – which luggage system to choose?

Soft luggage or hard luggage? The debate has been going on and on forever, and I am not going to further it here. To cut to the chase – both.

The AT is supposed to be a decent offroad machine, so the choice should have been clear – soft luggage, but I will also use mine as a long distance, 2 up, touring machine with the occasional excursion into unpaved roads, which requires the extra capacity and added security of hard cases. So the decision was made to buy a set of aluminum panniers for the upcoming trip this summer and use my Ortlieb bag for solo excursions into the dirt. If I do another long solo trip I might buy a pair of saddlebags and strap them to the racks of the aluminum panniers.

With that settled, the question was – which ones?

I had a Touratech system on the V-Strom and was very happy with it – those boxes had withstood countless falls and drops and I had always been able to bang them into shape. The V-Strom and the AT have the exhaust on the same side, which means that I could simply buy the rack and keep using the old boxes, but a few things stopped me from doing so.

IMG_6520Firstly, when drilling the holes for the mounting points on the panniers for the old bike I made a measuring mistake that meant that one of them was mounted further back than the other. Not by a big margin, mind you, but it is noticeable and something that still annoys me to this day.

Secondly, having the exhaust on one side only meant that one of the boxes had to be smaller than the other, and the rather fat ass of the V-Strom meant that I had to go for the smallest combo that Touratech sold to keep things as narrow as possible. For the AT I wanted a system with a cut on the exhaust side, GS-style, to maximize luggage space and keep the boxes close to the bike.

IMG_6700Last but not least, the old boxes had all the ‘medals’ (i.e. country stickers) that the other bike had rightfully earned, and it seemed plain wrong to have them on the new, yet unproven bike. I know this sounds stupid to a lot of people, but I believe that the AT has to earn its wings.

2013-09-02 20.40.19It was time to do some market research, then.

The only two companies I found that manufactured a system with an exhaust side cut were Holan, based in Poland, and Globescout, from Turkey.

Both offer excellent products of the best quality, but I went for Holan because they are a bit cheaper and have a dealer near Barcelona. Unfortunately, things were not going to be so easy.

The moment I got my new bike I ordered a top case from them because I need a minimum of luggage capacity to go to work every day, and I thought I would save the money for the panniers and buy them a month or so before the summer trip. However, it seems that Holan, having been one of the very first companies to put luggage systems for the new AT in the market, have been flooded with orders and have a huge backlog. At the time of writing these lines I still have not received the top case or the crash bars I ordered. This made me fear that the panniers would not make it in time for the summer.

To make things worse, another AT owner and member of the Spanish forum who had placed an order earlier than me received his luggage system and his impressions were not good at all.

The AT is a tricky bike to mount luggage racks on. It is designed for the OEM plastic cases and that’s it, no easily accessible mounting points have been designed for anything else, meaning that luggage manufacturers have had to get creative. It is easy to attach a rack to classic points on the passenger footpegs and the front of the subframe, but not to the back of it. The solution that Touratech and GIVI have found is to drill through the plastic fender to access two mounting points at the end of the subframe and attach the back of the rack there from below.

GIVI instructions

Touratech instructions

Holan decided to add a reinforcement bar from the top of the loops to the passenger footpeg and forego the rear mounting points. According to them they had tested the system with the technical department of a Polish university and it worked fine. However, with the system on his bike, the forum member I mentioned above was far from happy. He reported that the setup had a lot of flex, even unloaded, and that he would not dare take his bike offroad for fear of the whole thing coming off the bike.

That was not looking good, so I started looking into the Globescout option. I got on the phone with them and they confirmed that their system also required drilling to access the subframe, which was reassuring, but it was noticeably more expensive than Holan, and if I wanted to have a matching top box I would have to cancel my order and get one from them, which was twice the price of a Holan one.

I was starting to consider forgetting about the exhaust cut and get a GIVI system when I saw a link posted on the forum to a French blog that said that Holan had admitted the design flaw and modified the system with an additional mounting point at the back and posted a picture of the supposedly new system. The people on the forum said that they had got in touch with Holan’s dealer in Spain, but they could not confirm whether or when that modification would be available.

IMG_4001-1After a lot of unanswered phone calls to Twin Trails, the Spanish dealer, I finally managed to get someone on the phone who told me that the racks were already shipping with the additional mounting point. Not only that, he already had some in stock, and if I wanted the 45L panniers with black lids, he also had a pair. It was the size I wanted and I did not mind the black lids instead of aluminum ones, so I jumped at the chance. A week later, they were delivered to my doorstep.

More on fitting the system to the bike soon.

Acerbis X-Factor handguards

Most OEM handguards tend to do a very good job protecting from the wind and the rain, but do not usually offer much protection if any at all in the event of a fall, so you are more than likely to end up with a broken gear or clutch lever even if you drop the bike while moving it around (years ago some idiot knocked my V-Strom off while parking and the brake lever snapped).

The handguards on the AT look great, but offer the same level of crash protection as the ones on the V-Strom or the ST. The problem is that those ones were good at keeping your hand relatively dry and warm, but the ones on the AT are too small for that, so they are merely cosmetic additions to make the bike look more rugged.

Even before taking delivery of the AT I knew that I was going to fit it with a pair of Barkbusters like the ones I had on my V-Strom, which had proven themselves to be very efficient in a number of falls/drops. However, as I was comparing prices and trying to find a shop that had a specific kit for the AT, I saw some people on Adventure Rider and the Spanish AT forum that had fitted the Acerbis X-Factor ones.

I thought they would be more expensive, as the aluminum back bone they use is huge, but it turned out that not only were they cheaper than the Barkbusters, but they were available immediately, as no specific mounting kit is required for the AT.

I may not have considered Acerbis handguards for the V-Strom, as they look too ‘enduro’ for that bike, but on the pictures I had seen, they seem to suit the AT fine, so I got a pair.

IMG_8008I went for the black and white combination, as the OEM were also black and I was afraid the red ones might not match the shade of the bike. I got them in a week, and today I got down to fitting them, which is a very straightforward process.

Here it is:

First step is to remove the OEM handguards, including the weights both at the ends of the handlebars and the long ones inside.

Loosen the 5mm Allen bolts that hold the handlebar weights and pull the handguards mounts away from the weights.

IMG_8011Remove the bolts that hold the handguards to the brake and clutch lever mounts. Both nuts and bolts are 10mm, except the brake bolt, which is 12mm, annoyingly.

IMG_8009Remove the OEM handguards and put the lever bolts back in place. With the handguards removed they are a bit too long, but you can use the spacers that came with the handguards.

Now comes the difficult part – pulling out the inner weights. They are very long and have a couple of rubber rings, so they do not slide out easily. There is a small cylindrical plate that holds them to the handlebar weights bolts, but it is very easy for those to come apart. In fact, I pulled out the first one and then saw that the plate and the weight were still about 1cm inside the handlebar.

IMG_8016IMG_8017These cylindrical plates are fragile and can come out easily, be careful with them because of they do come out it is practically impossible to grab hold of the inner weight to pull it out. Having suffered this, when I removed the second one I unscrewed the handlebar weight bolt, then pulled gently but firmly until about 1cm of the inner weight emerged and then pulled it out with a pair of pliers.

To get the first one out, I used a pair of long thin pliers to hold the plate and pressed it with a screwdriver to prevent it from opening and coming apart from the weight.

With the most difficult part out of the way, it is time to fit the new handguards.

IMG_8020Do not try to put the expansion shell directly into the handlebars first, as there is a risk that the nut at the end comes loose from the shell and then you might push it further inside when inserting the bolt, making it very difficult to recover. Fit the shell to the aluminum backbone and then insert it in the handlebar.

IMG_8021Then fit the support arms to the handlebar but do not tighten, as you’ll need to adjust the levers. It is necessary to move both brake and clutch lever assembly about 1.5cm to the inside to prevent them from touching the backbone when released. Be careful with the clutch lever, too far in and it will touch the switch assembly, too far out and it will touch the backbone. You need to find the sweet spot.

IMG_8025IMG_8029Once everything is in the position and angle you want, start tightening first the mounting arms and then the expansion shells. The mounting arms come with two sets of brackets to fit handlebars of different diameters. In my case I did not need to use either of them.

IMG_8023IMG_8026IMG_8027IMG_8028The bike looks great with the backbones only and it is tempting to keep that look, but I want more protection, not less, so the last touch is to fit the plastic covers, which are attached with three Allen bolts each. Done!

IMG_8030I know this is a matter of personal opinion, but I think the X-Factor handguards look great on the AT, particularly in black:

IMG_8032IMG_8033IMG_8031