
First purchase!
My very first purchase for the trip arrived last October: a portable toolkit, a brush to clean the chain and a small adapter to lubricate the throttle and clutch cables more easily.
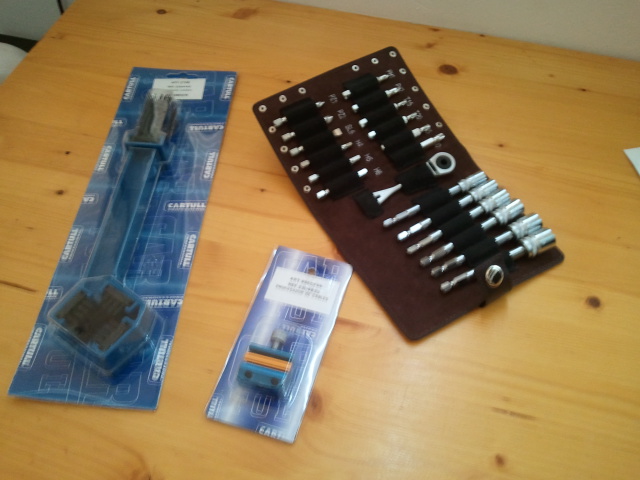 The one-year warranty on my bike expired shortly before I started planning this trip in September last year, so I decided that I needed to become familiar with the mechanics as quickly as possible and started doing the servicing myself. So far the toolkit has proven to be enough to perform basic servicing on the bike.
First full service
Wanting to learn as much as possible about mechanics before setting off this summer, last October I decided to do a full service to the bike, that is, changing the oil, oil filter, spark plugs and air filter.
The idea was to lear how to take apart and but back together the basic parts to access the mechanicals and be able to service the bike with a minimum of tools. Not easy, since the bike has quite a lot of plastic fairings (there’s some joking on the internet about how it floats if try to cross a river), but I had downloaded the workshop manuals and there is a lot of information on the net, especially on the Spanish and international owner’s websites, as well as several very useful videos on YouTube such as this one.
I discovered I would need to add a few things to the tiny toolkit I had purchased – I needed a small allen key (3mm) to remove some screws on the front fairing and a 14mm socket to remove the fuel tank, as well as a tool to remove the oil filter (impossible to loosen it by hand).

Aside from these few tools, the kit I had and the tools that came with the bike were enough to change the oil, the oil and air filters, and all four spark plugs – including having to loosen the radiator from its lower mounting points to access the front spark plug.

I am quite happy to report that a regular service would present no big problems on the road. But some issues still need to be solved, such as how to properly dispose of the used oil. I would not want to just throw it away in the middle of the Mongolian countryside!
Coleman Feather 442 Dual Fuel
This little champ arrived today, straight from an army surplus shop in the UK.

My plan is to travel as cheap as possible, so in Europe I’ll be staying at campsites and once I’m in cheapest areas, I’ll use hostels from time to time or just camp out in the countryside. I’ll be doing some outdoor cooking, so I wanted to find a stove that could burn fuel from the bike, as I imagine it is not possible to find gas canisters outside Europe and I don’t want to be carrying the extra weight and space of fuel canisters or a dedicated fuel bottle. With that in mind, I checked what options I had.
The Optimus Nova looked great – lightweight and compact, but it was too expensive, I have to seriously try and keep things within budget.
The MSR WhisperLite was another option, but again, same drawbacks – too expensive, and I didn’t like the hassle of having a separate fuel bottle that I’d have to attach ever time I wanted to cook.
So in the end I settled for Coleman. They have a solid reputation for durability and reliability – the army uses them and some people have had their stove for decades, and they have a model with a built-in fuel canister and pump. Reviews were really good, and I liked the compactness and apparent ease of use, so I settled for this one. Mind you, it was still quite an expensive purchase, so I went off in search of a good bargain and finally found this one (used) from an army surplus store. It looks great, used but in good condition. I’ll test it as soon as I have a moment and report back.
Barkbuster handguards and an inconsiderate driver
About a year ago, coming back from a short holiday in France, I found that some idiot had clipped the back of my bike while parking his/her car and thrown it on the floor. Somebody had been kind enough to lift it and put it back on the sidestand, but no contact details were left… If it was lifted by some passer-by or the guys in any of the shops in that bit of the street, I hope they didn’t struggle too much with its weight and I am grateful for their bit help. If it was lifted by the idiot who knocked it over and left without leaving any contact details, I sincerely hope he strained his back and still feels the pain to this day.
Anyway, the resulting damage was a scratched engine guard bar (I was glad to have them, as bodywork replacement parts are terribly expensive), a smashed indicator, a cracked mudguard and a broken brake lever.
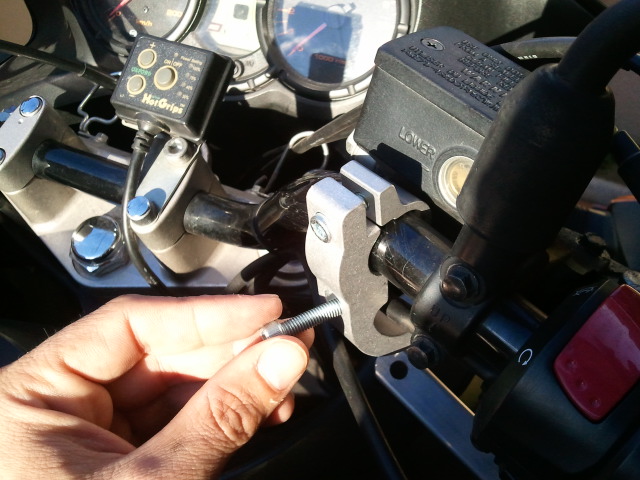
As I was doing research for this trip I soon came to the realisation that my off-road riding skills are pretty much non-existent. I have ridden the bike fully loaded on dirt roads that were in good condition without any problem, but only for about 30 miles, and that’s it. Knowing that I would be dropping the bike more than I would like to once I get to the roughest parts of the trip (Kazakhstan and Mongolia) and not wanting to repeat the broken brake (or clutch) lever experience, I decided to replace the handguards on the bike.
The ones that came with the bike were the original Suzuki items, which are wonderful for weather protection – they effectively keep the wind and rain away from your hands and work really well in combination with the heated grips. However, they are only a piece of plastic that clicks into the weight at the end of the handlebar, with no metal structure, so they offer no real protection in case of a fall.

I decided to replace them with something beefier, and after some research I settled on a pair of BarkBusters. They look great, and the thick aluminium backbone offers a good degree of protection should I drop the bike (or rather when I drop the bike!).
I got them online from Ubricar Motos at a reasonable price and they were delivered in just a couple of days. Great! If it were not for the fact that I was sent the mounting kit for a BMW GS… doh!
In their defence, I have to say that customer service was really nice and helpful and they dealt with the mistake efficiently. The wrong handguards were picked from my apartment and in a couple days more I had the right ones, all free of charge, obviously.
I sold the original ones through the owner’s club and got down to installing my new toys.

I rode for a few days without any handguards at all and I missed them much more than I thought I would… they do offer a lot of wind protection.

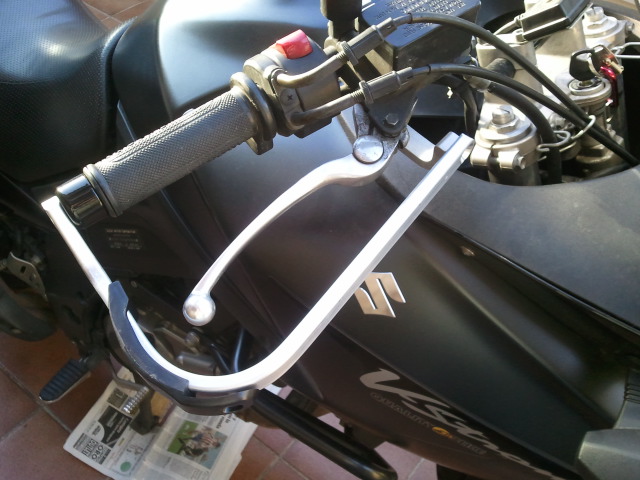
The right mounting kit for my V-Strom. Those aluminium backbones look solid enough to do a good job.

The kit includes a pair of extra “flaps” that can be mounted at two different heights for added wind protection. I placed mine in the highest one.
The whole process is really simple and does not take more than 20 minutes to complete. The handguards come with their own counterweights and two different sets of screws so they can be mounted on either steel or aluminium handlebars.


And this is how the whole thing looks now. It does improve the looks of the bike and I am sure they will offer good protection – but the longer it takes to find out, the better!
New springs, brake pads, tyres and rear brake disc
High on the long list of things to be done to the bike in preparation for the trip was upgrading the suspension, since it is one of the components that is going to suffer more due to the weight the bike will be carrying and the condition of the roads and dirt tracks I will be travelling through.
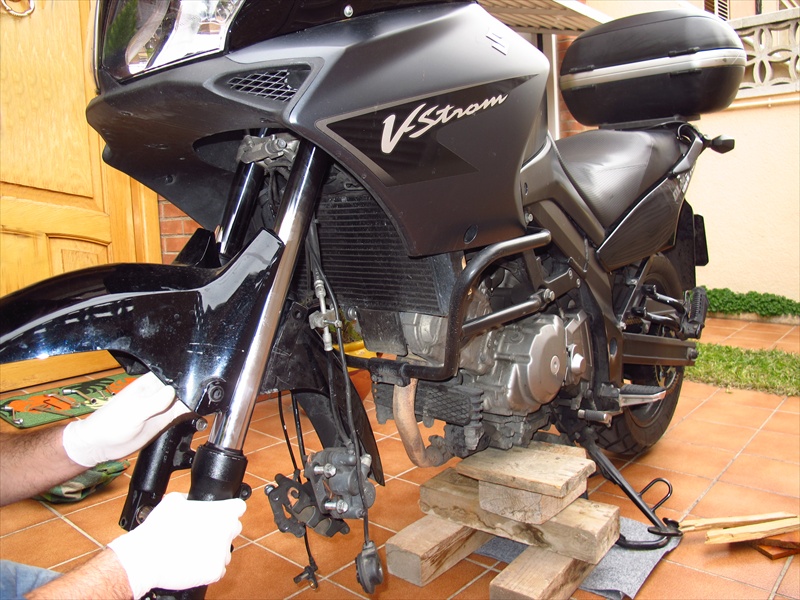
I had had a crash nine months ago and as a result of that the fork had bent. A friend of mine who had just opened a workshop managed to straighten it again and it was fine for on road riding, no vibration, no strange behaviour, but the repair was noticeable and I did not want to take the risk of putting a fork in such state to the test on the roads in Mongolia, so I decided to replace the bars, and since I was going to take the whole thing apart in the process, replace the springs as well.
I had originally intended to get all this suspension work done at the workshop, but I was lucky enough to find a pair of second-hand bars through the owner’s website in Spain, and then I thought that by doing the work myself I would save a lot of money, so I studied the service manuals and a good tutorial I found on the internet and got down to it.
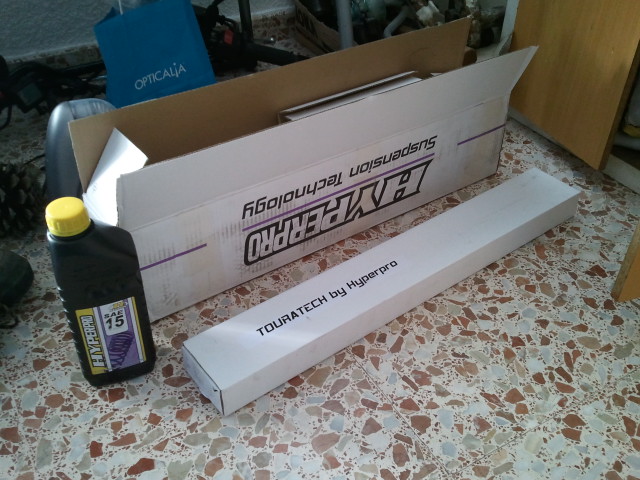
I got a set of stiffer, progressive springs made by HyperPro from Touratech. It included front and rear springs and fork oil. Annoyingly, it only included a litre of oil, and a V-Strom needs 538 ml of oil per tube, so a litre was not enough and I had to buy another litre… I also bought inner seals and dust seals.
Taking the fork out of the bike was quite a straightforward task. I put it on a few blocks of wood under the engine block to lift the front wheel off the ground and proceeded to remove all the necessary parts, which was easier than I expected. The front wheel comes off after loosening the bolt at the bottom of the right bottle and removing the axe/bolt, The brake calipers are held in place by four bolts that came off easily, leaving them hanging on the brake lines and then I just had to remove the rest of parts attached to the suspension bottles, which included brake lines, speed and ABS sensor cables and the mudguard.
The former were a matter of removing a few small screws, the latter took a bit more work. It is possible to remove the front mudguard of a V-Strom without removing the fork, but it is hard and you risk scratching or worse, cracking it. So the easier way (and the one recommended in the workshop manual) is to loosen one suspension arm and remove it while holding the mudguard to prevent it from falling on the floor, and then it comes out easily.
After that I removed the other arm and had them ready to be taken apart and rebuilt.
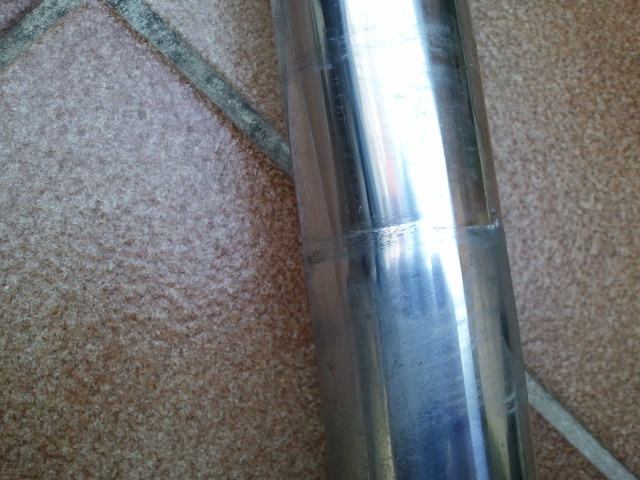
Once they were out I saw that the accident damage was very obvious and I was glad I had decided to change them.
I unscrewed the suspension preload assembly from the top of both arms, took the old springs out and poured the oil into a plastic tray.


Then I removed the dust seals with a couple of small screwdrivers and the rings that hold the inner seals in place.
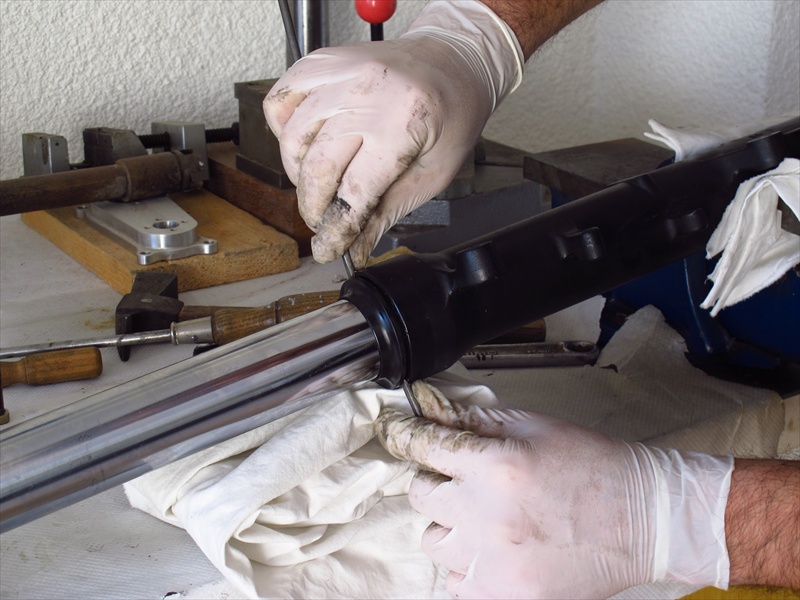

After that, the only thing left to do was to remove the bolts that hold the bottom of the suspension arms in place and prevent them from coming out. I had read that this was the hard part, as sometimes the arm might turn with the bolt, making it necessary to introduce a special tool into the bottle to hold everything in place (you can’t clamp the arm, as it is aluminium and therefore very easy to damage), but I had no problem and both bolts came out without offering any resistance.

Now the arms were ready to be taken out of the bottles. It is just a matter of pulling out hard and suddenly. I had previously taken apart the second-hand fork I had bought, so I just had to take the arms from that one, fit all the seals and put everything back together.


The other hard part is pushing the seals into place, and again, a specific tool is required, but I just manufactured one using a PVC pipe. It worked great!

Once everything was in place and well screwed together, I filled each tube with the required amount of fork oil, pumped the air out, dropped the new springs inside and put the preload assembly back on top of everything. Now they were ready to be put back on the bike!


However, since I had removed the brake callipers, I took the chance to replace the brake pads as well, as they were quite worn out and it was something I did not want to have to carry with me on the road, so I changed both front and back brake pads.
And as usual, one thing leads to another… Both tyres needed replacing as well, and trying to find a good deal on the internet, I ran into a guy from the owner’s club who had had a write-off with his almost new bike, and I got a pair of Michelin Anakee 2 with only 3,000 km on them. As I was also looking for a new rear brake disc and the guy didn’t feel like removing the tyres from the rims, I got the whole assembly thrown into the deal, which was great! I also bought a fuel pump from him, just in case, as it is not the kind of thing you can easily find in the middle of nowhere and they are quite expensive. I still have to find the time to fit it and test it. I’ll report when it’s done.

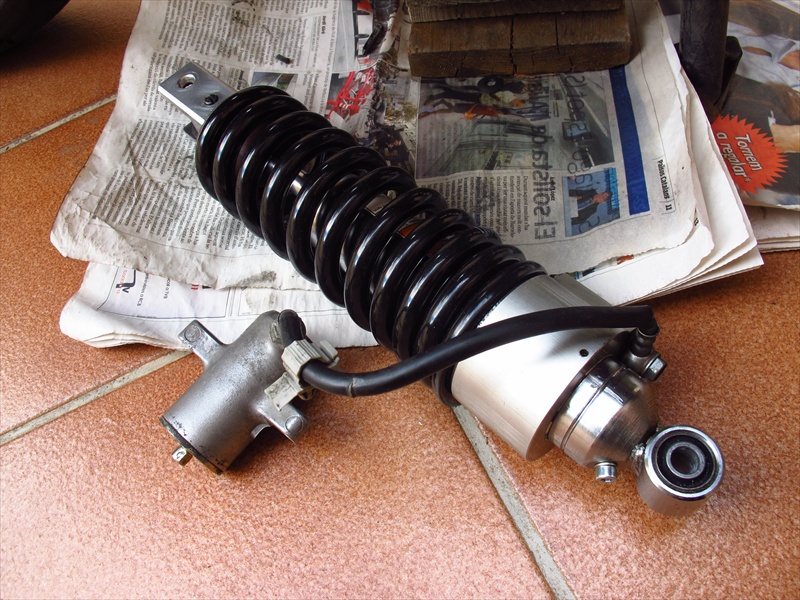
One last thing I needed to do was to replace the rear spring, but since my bike has quite high mileage, I also wanted to do something about the shock absorber. This is the part that will suffer more on a trip like this, so I started looking at what choices I had. Replacing it for a better one was horribly expensive, so I got a new spring and found a guy that rebuilt it for a fraction of the price. Now it is as good as new and with a stiffer spring. Removing the rear shock and preload adjust set from the bike was not an easy task though. To do this you’re supposed to remove the preload adjuster knob, but the bolt was in very bad condition and it was impossible, so I had to take half the bike apart and then twist, push, swear and swat to make it fit through the rear sub-frame.

Once it was out I was able to put it on a proper work surface and replace that bolt. Putting everything back in was a much easier task.

At this point the bike had been off the road for over a week and as you can imagine, I was itching to go for a ride and test it. It was bound to feel completely different with new tyres, suspension and brakes! It did not disappoint, it feels like a new bike.
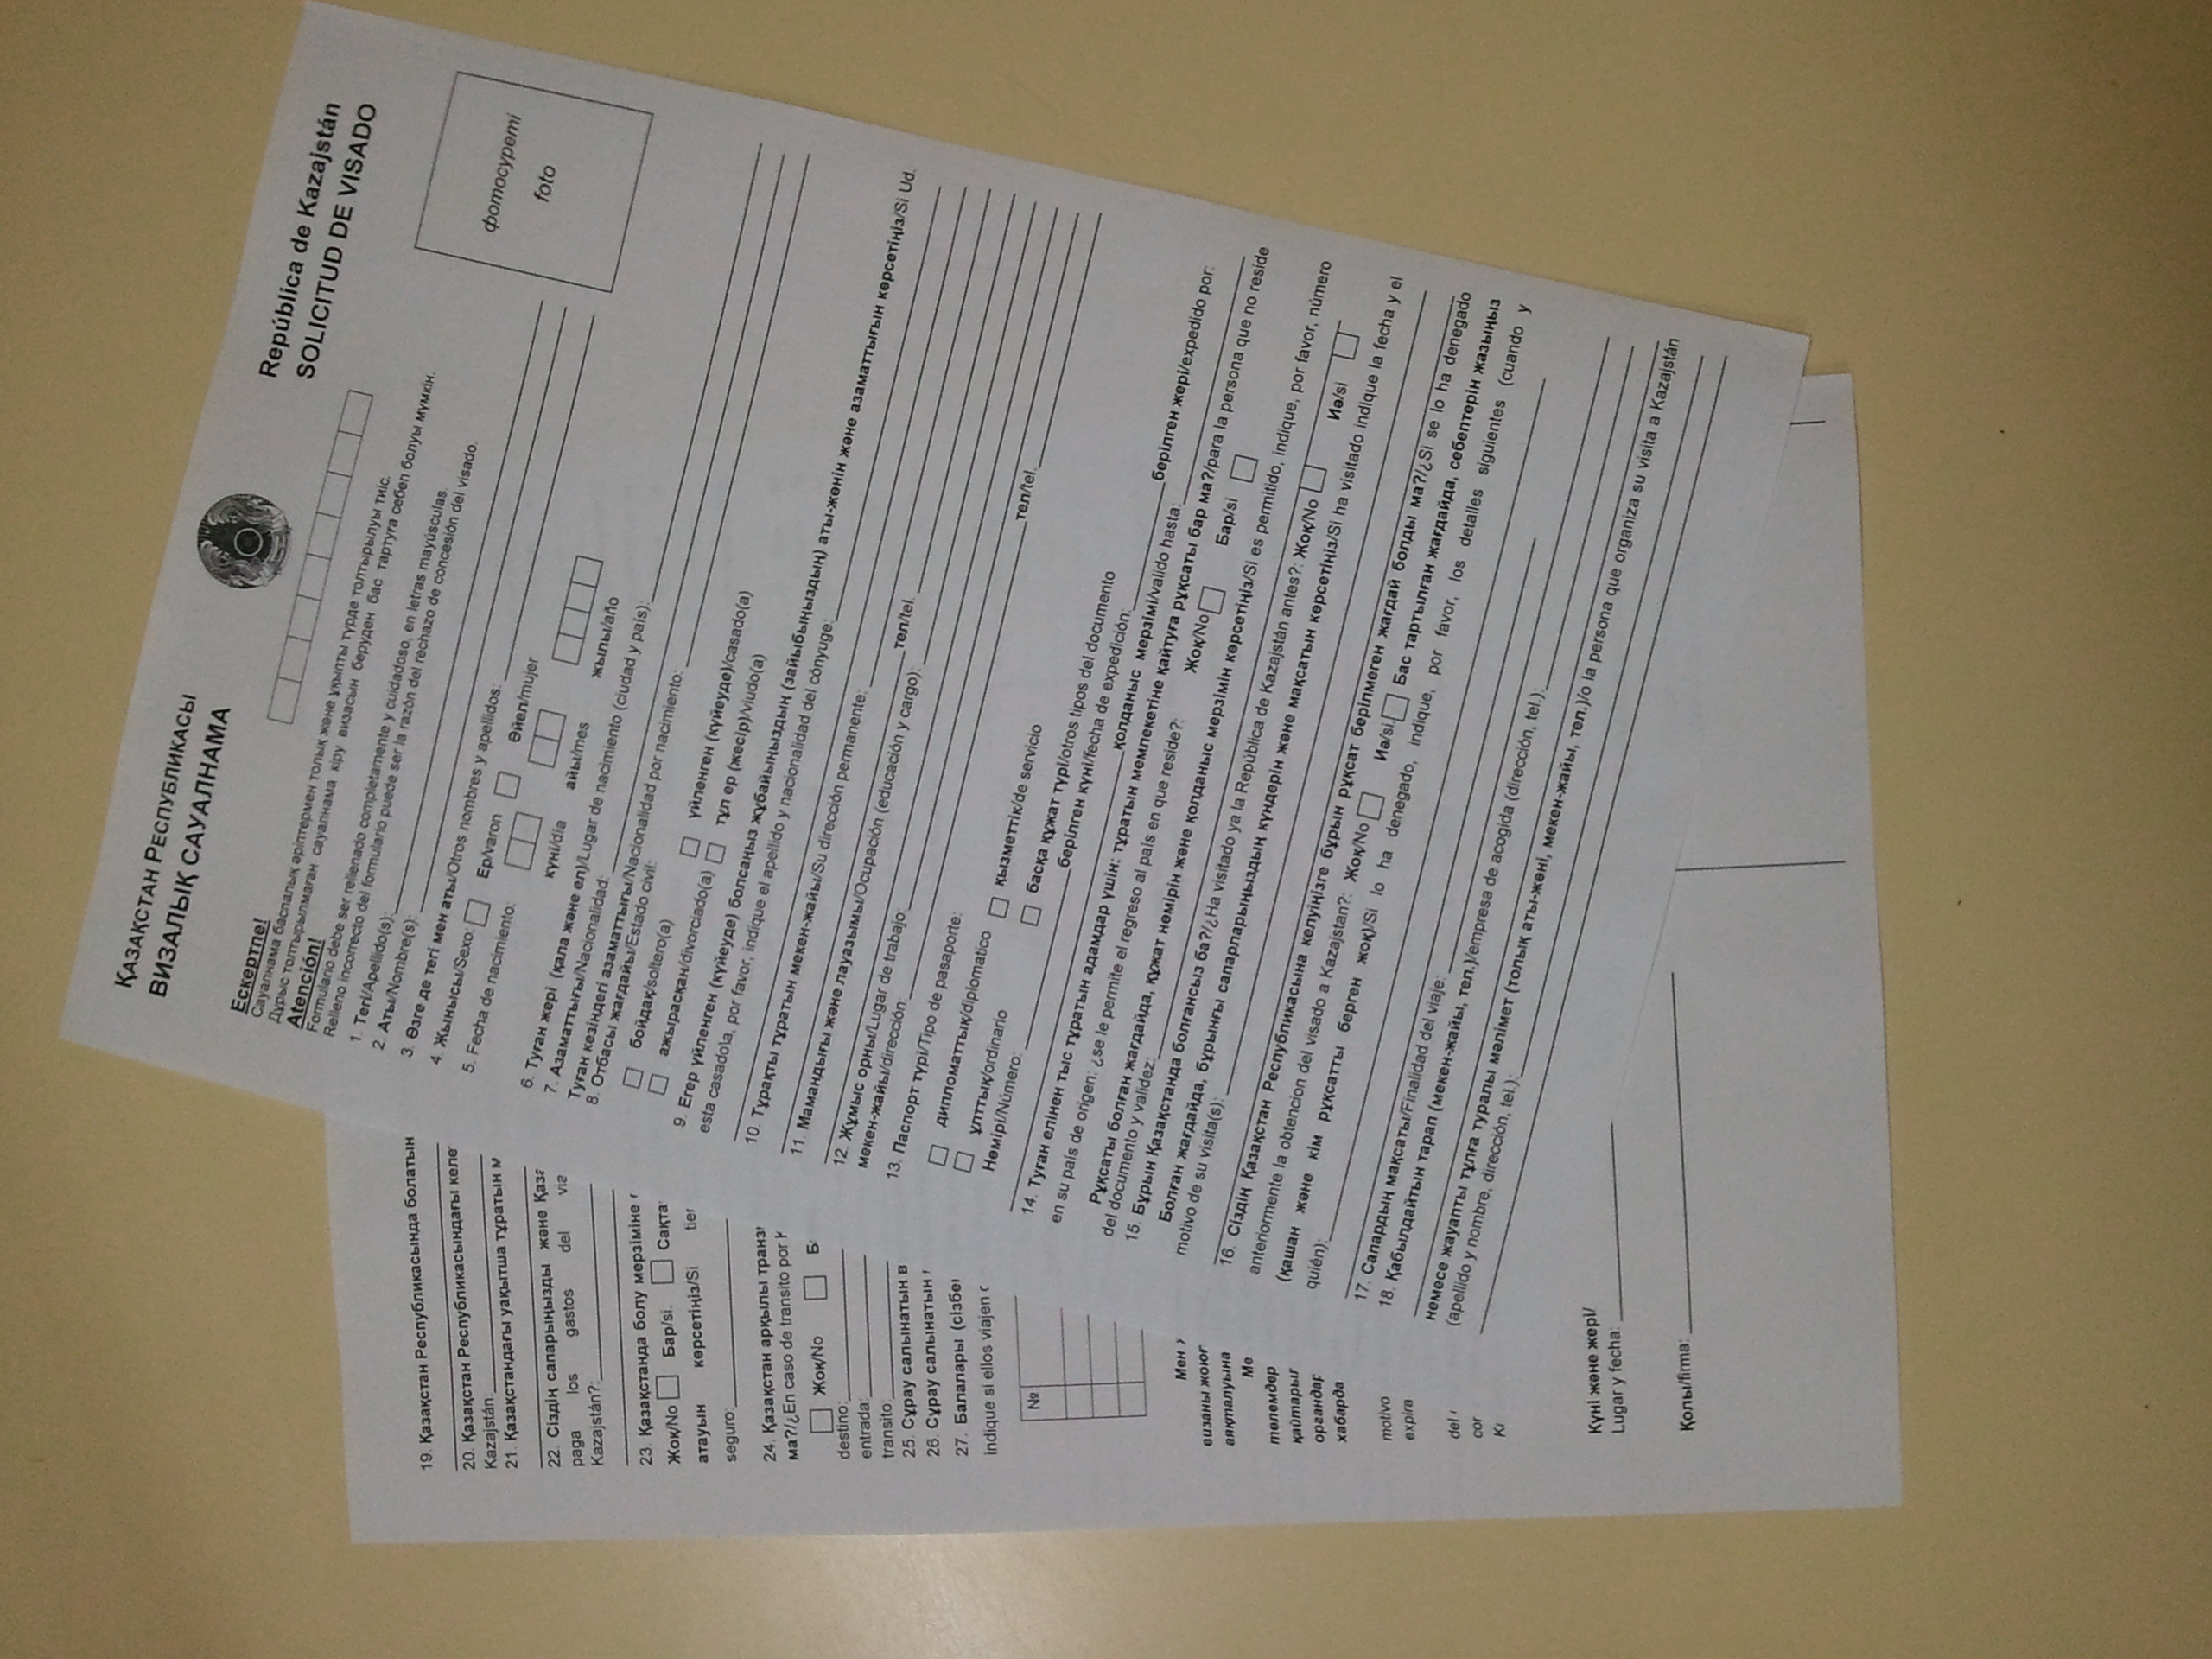
The Consulate of Kazakhstan in Barcelona exists!
A month ago I started gathering information about the visas and all the paperwork they would require and visited the consulates in Barcelona. I need visas for Russia, Kazakhstan and Mongolia. I got all the information I needed in the consulates of Russia and Mongolia (more on that on another post), but I went to the consulate of Kazakhstan on three separate occasions only to find it closed, no matter what time or day.
Fortunately, today has been a very productive day and I have found a phone number for the consulate. I called this morning and they are indeed in Barcelona, but only receive people by appointment. They can issue visas, but they do it through the consulate in Madrid, and charge 120€ for the service. If I get the paperwork to Madrid myself, it will only cost 35€, so I’ll take advantage of the fact that my sister lives there and I have friends regularly coming and going between Barcelona and Madrid and try to do it myself.
In the meantime, I have downloaded these very official-looking forms:
Hepco & Becker crash bars
A huge parcel arrived yesterday morning! It was early and I still hadn’t got dressed so I opened the door in my dressing gown, unshaven, with great bed hair and a mug of coffee in my hand… Must have made a great impression on the delivery guy.
Anyways, after opening the box and removing a looooooot of air bags,I found my new crash bars! I have the original Suzuki ones (still for sale, by the way), but they are too low and while they protect the plastic fairings in the event of a silly fall on tarmac – they have done their job well a couple of times – I’m afraid they won’t be enough if I drop the bike on rough terrain, so I wanted something beefier and that offers protection higher up than these ones.
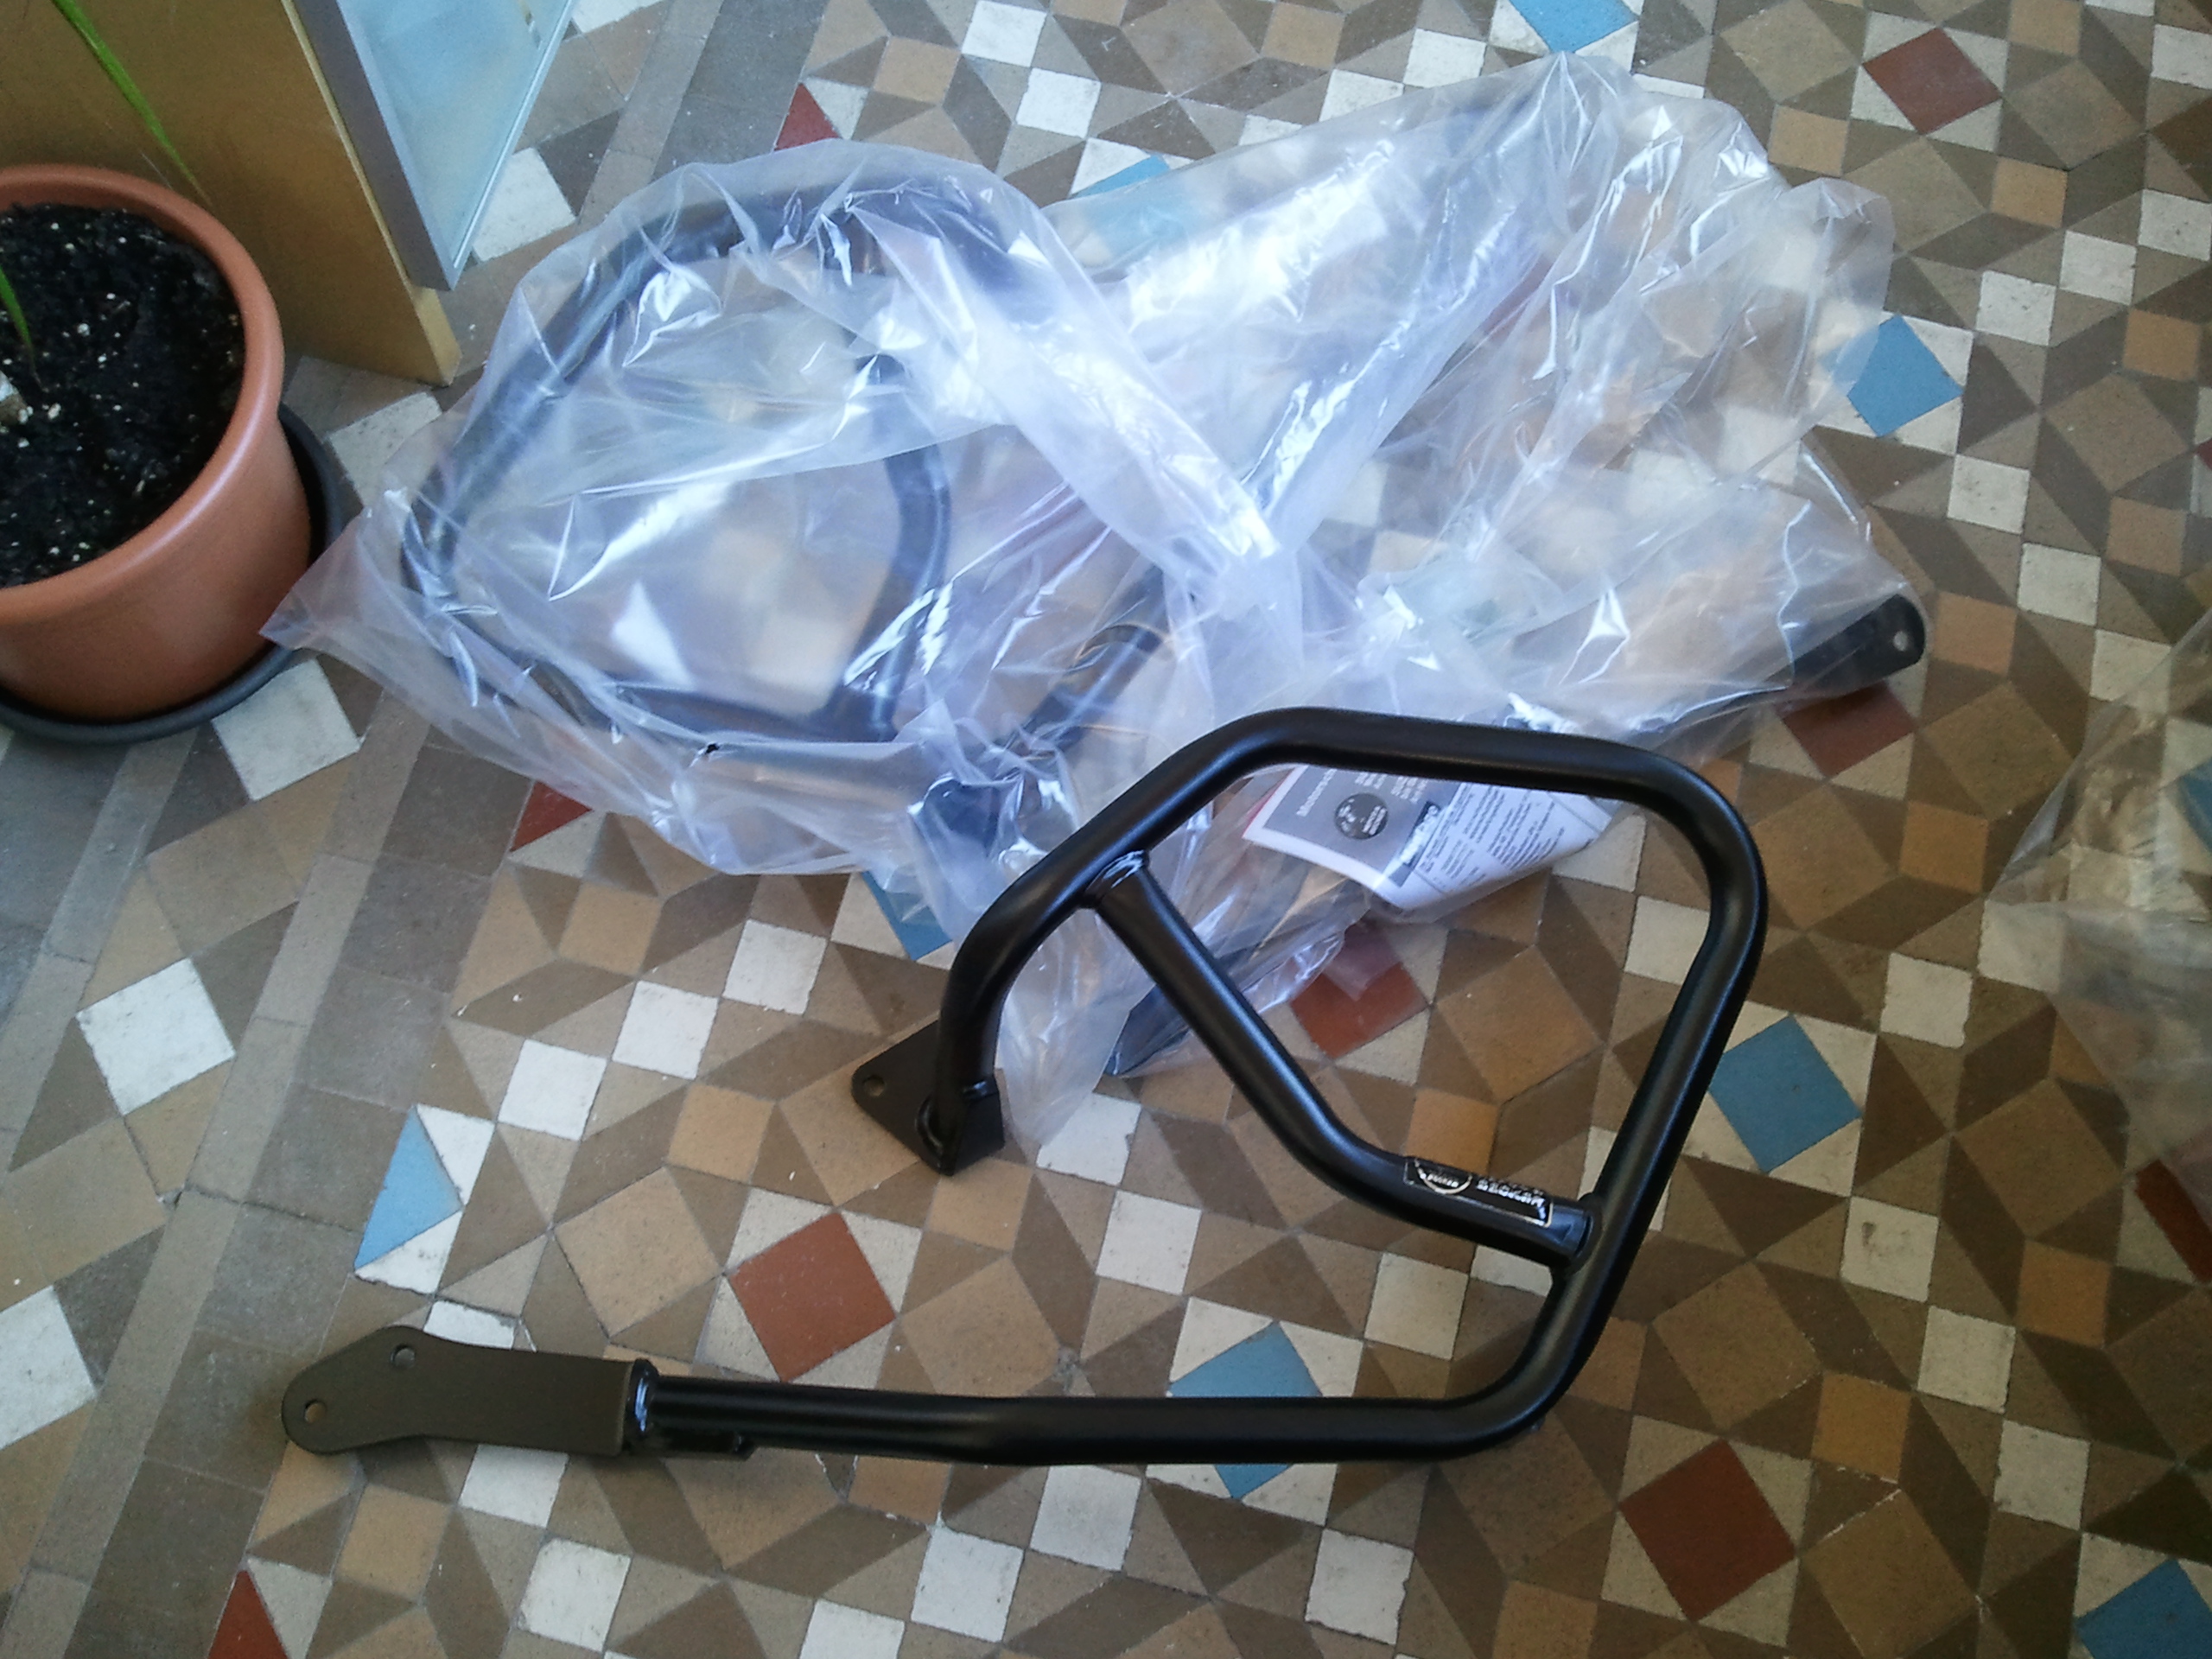
The Hepco & Becker crash bars look great, made from thick steel tubing and great attention to detail. They even have mounting points to install floodlights, nice detail. The only thing that worries me is that they fit both my bike and the later model (2011 onwards) and in the instructions pictures the bar that attaches one side to the other seems to be mounted lower on my model than on the new one – it seems to have slightly raised mounting points. In any case, neither of the bars pictured looks like the one that came with the set and the instructions make no difference between the two models, so it should be alright. I’ll report when I find a moment to install them.
Travel insurance
It’s now only three months to departure and this week I wanted to start sorting out the visas, since each application will take around 10 days and I want to make sure everything is ready on time.
I decided to start with the Russian one, the most difficult, as I need to get a business visa. Apparently, tourist visas only allow two entries to the country, and I need three over a period of three months, because I’ll be entering the country from Ukraine, Kazakhstan and Mongolia.
However, before I apply for any visa, I need to get travel insurance, since all consulates ask for a certificate to prove that I have travel insurance for the duration of the stay in their country. I checked out prices and coverage with different companies, and in the end settled for Europ Assistance because the price was fair, the coverage reasonable, it is on the list of insurance companies approved by the Russian consulate in Barcelona and last but not least, their offices are around the corner from my flat.

So now that I have my insurance and three separate certificates (one for each visa), I can start the process. I have already completet and downloaded the application form fo the Russian one, so if I have time tomorrow morning, I’ll get started on it.
Russian Visa and the Russian consulate
I have read a lot about Russian bureocracy in all the adventure travel discussion forums I have visited, so when I started looking for information on the kind of visa I would need to enter Russia multiple times on a motorbike, without exact dates of entry or exit, hotel reservations or letters of invitation, I already expected a certain degree of difficulty.
After reading about different types of visas, requierments and companies that do all the paperwork for you, I decided to try and do it myself in order to save a few euros, so I went to the Russian consulate on Barcelona.
As you would expect from such a country, the consulate is not an office on the second floor of a building in the center, but an impressive mansion in the high part of the city. Their web site clearly states that it is impossible to visit it without an appointment, so I logged in and filled in the necessary information to get one. The system turned out to be rigidly Russian: the only option available on the list of reasons to visit the consulate is ‘visas’. I guess you need to be somebody and know the right people to visit the consulate for any other business. I got an appointment for a Thursday morning, and when the day came, I went there hoping to get first hand information on exactly what kind of visa I needed for such a trip, and if whoever was there was nice enough, maybe some information on border crossings, state of the roads, etc. How wrong I was!
The entrance to the front court of the building consisted of a two-door cage system, with security cameras, an intercom and a burly security guard who was letting somebody out and quickly closed the door behind her as he saw me approaching. When I reached the first door he blurted out something in Russian and I told him I had an appointment (in Spanish, of course, my Russian is non-existent and if the guy is stationed in the Consulate in Barcelona, I expected him to understand the local language…) and he said ‘name?’ I gave him my name and ID number and he proceeded to check a printout he had on a folder. He nodded and pressed a button that let me through the first door and into the cage. I had to wait for the first door to close and then somebody opened the second one from somewhere else. He pointed at the main entrance to the mansion and said ‘left’.
The arched door opened into a roomy entarnce hall, where some people were sitting, apparently waiting to be called. The door leading from the hall into the building was open, and I caught a glimpse of some people on desks and guys in suits walking around. I was wondering whether they also had had to make an appointment through the web site and how they had managed to get some other option than ‘visas’ on the menu when the voice of the security guy saying ‘left’ again brought me back to real life. He was behind me, pointing at a smaller door to the left of the hall. I walked in and found a small room with a couple of tables to fill in forms on and a tiny window to the right. It was obvious that the rest of the mansion was not accessible to mere mortals.
There was nobody queuing at the window, so I walked to it. Behind bullet-proof glass was a bored looking soviet civil servant stamping visas. He raised his sight, saw me and said ‘papers?’ I started explaining my story – travelling on a bike, entering several times into the country, no invitation, blah, blah, and I think he was overwhelmed by the sheer number of words I was wasting; everyone I had met so far in the building seemed to use only one word at a time. He said ‘they’ll inform you’ and pointed behind me. I turned around hoping to find a smiling young Russian girl sitting behind an information desk, but there was no one else in the room. I looked at him and he pointed again. This time I realised he was pointing at a notice board on the wall where there was a poster advertising a company called Central de Visados Rusos which arranged visas. I had seen other companies online, and several people had recommended using Real Russia, but I wanted to avoid paying a company to do the paperwork if I could do it myself. However, it was clear that was all the information I was going to get in the consulate, and the offices of the company were near my home, so I decided to go and see if they could shed some light on how to get the visa I needed.
There was no security guard on my way out, so I approached the first door and pressed the button on the intercom. Someone barked a few words in Russian and I replied ‘I want to get out.’ The first door buzzed opened and I walk into the cage. Once the first door had closed, the second one buzzed. I pushed it, but it would not open. I waited for them to unlock it again, but it refused to move. There was nobody in the front court and I was stuck in between doors. Great. I pressed the intercom button and asked to be let out again. The same voice yelled something in Russian and the door buzzed again, but it refused to open, no matter how hard I pushed. I was starting to feel a bit stupid trapped between doors when a woman walked up to the door from the street, said something in Russian to the intercom and the door buzzed one more time. She pulled it effortlessly from the outside and walked in, as I took the chance to leave that charming building.
I did find the smiling young Russian girl I was hoping for in the visa company. She listened to what I wanted to do and explained that the only multy entry visa for Russia is a business one, the tourist visa only allows people to enter the country twice in a period of one month, a business one allows multiple trips over a period of three months. She said that it did not matter that I was not going to go there on business, I only needed a letter of invitation from a Russian company in order to obtain a visa. When I asked her how I would get one without contacts, she smiled, handed me a form and said ‘we provide them for 50€’.
It was becoming clear that I was not going to be able to do the whole application process myself, and on top of that, they were the only company that the Russian consulate in Barcelona had officially approved to handle visa applications, and I still had to apply for the visas for Kazakhstan and Mongolia, so I decided to save time and use their services.

After having my picture taken, taking out travel insurance in one of their approved companies, filling in a request for an invitation letter and the form downloaded from their website and making sure my passport didn’t expire in the next six months and had at least two consecutive blank pages, I finally handed in all the paperwork needed this week, and by Tuesday next week I should have a multy entry business visa for Russia.
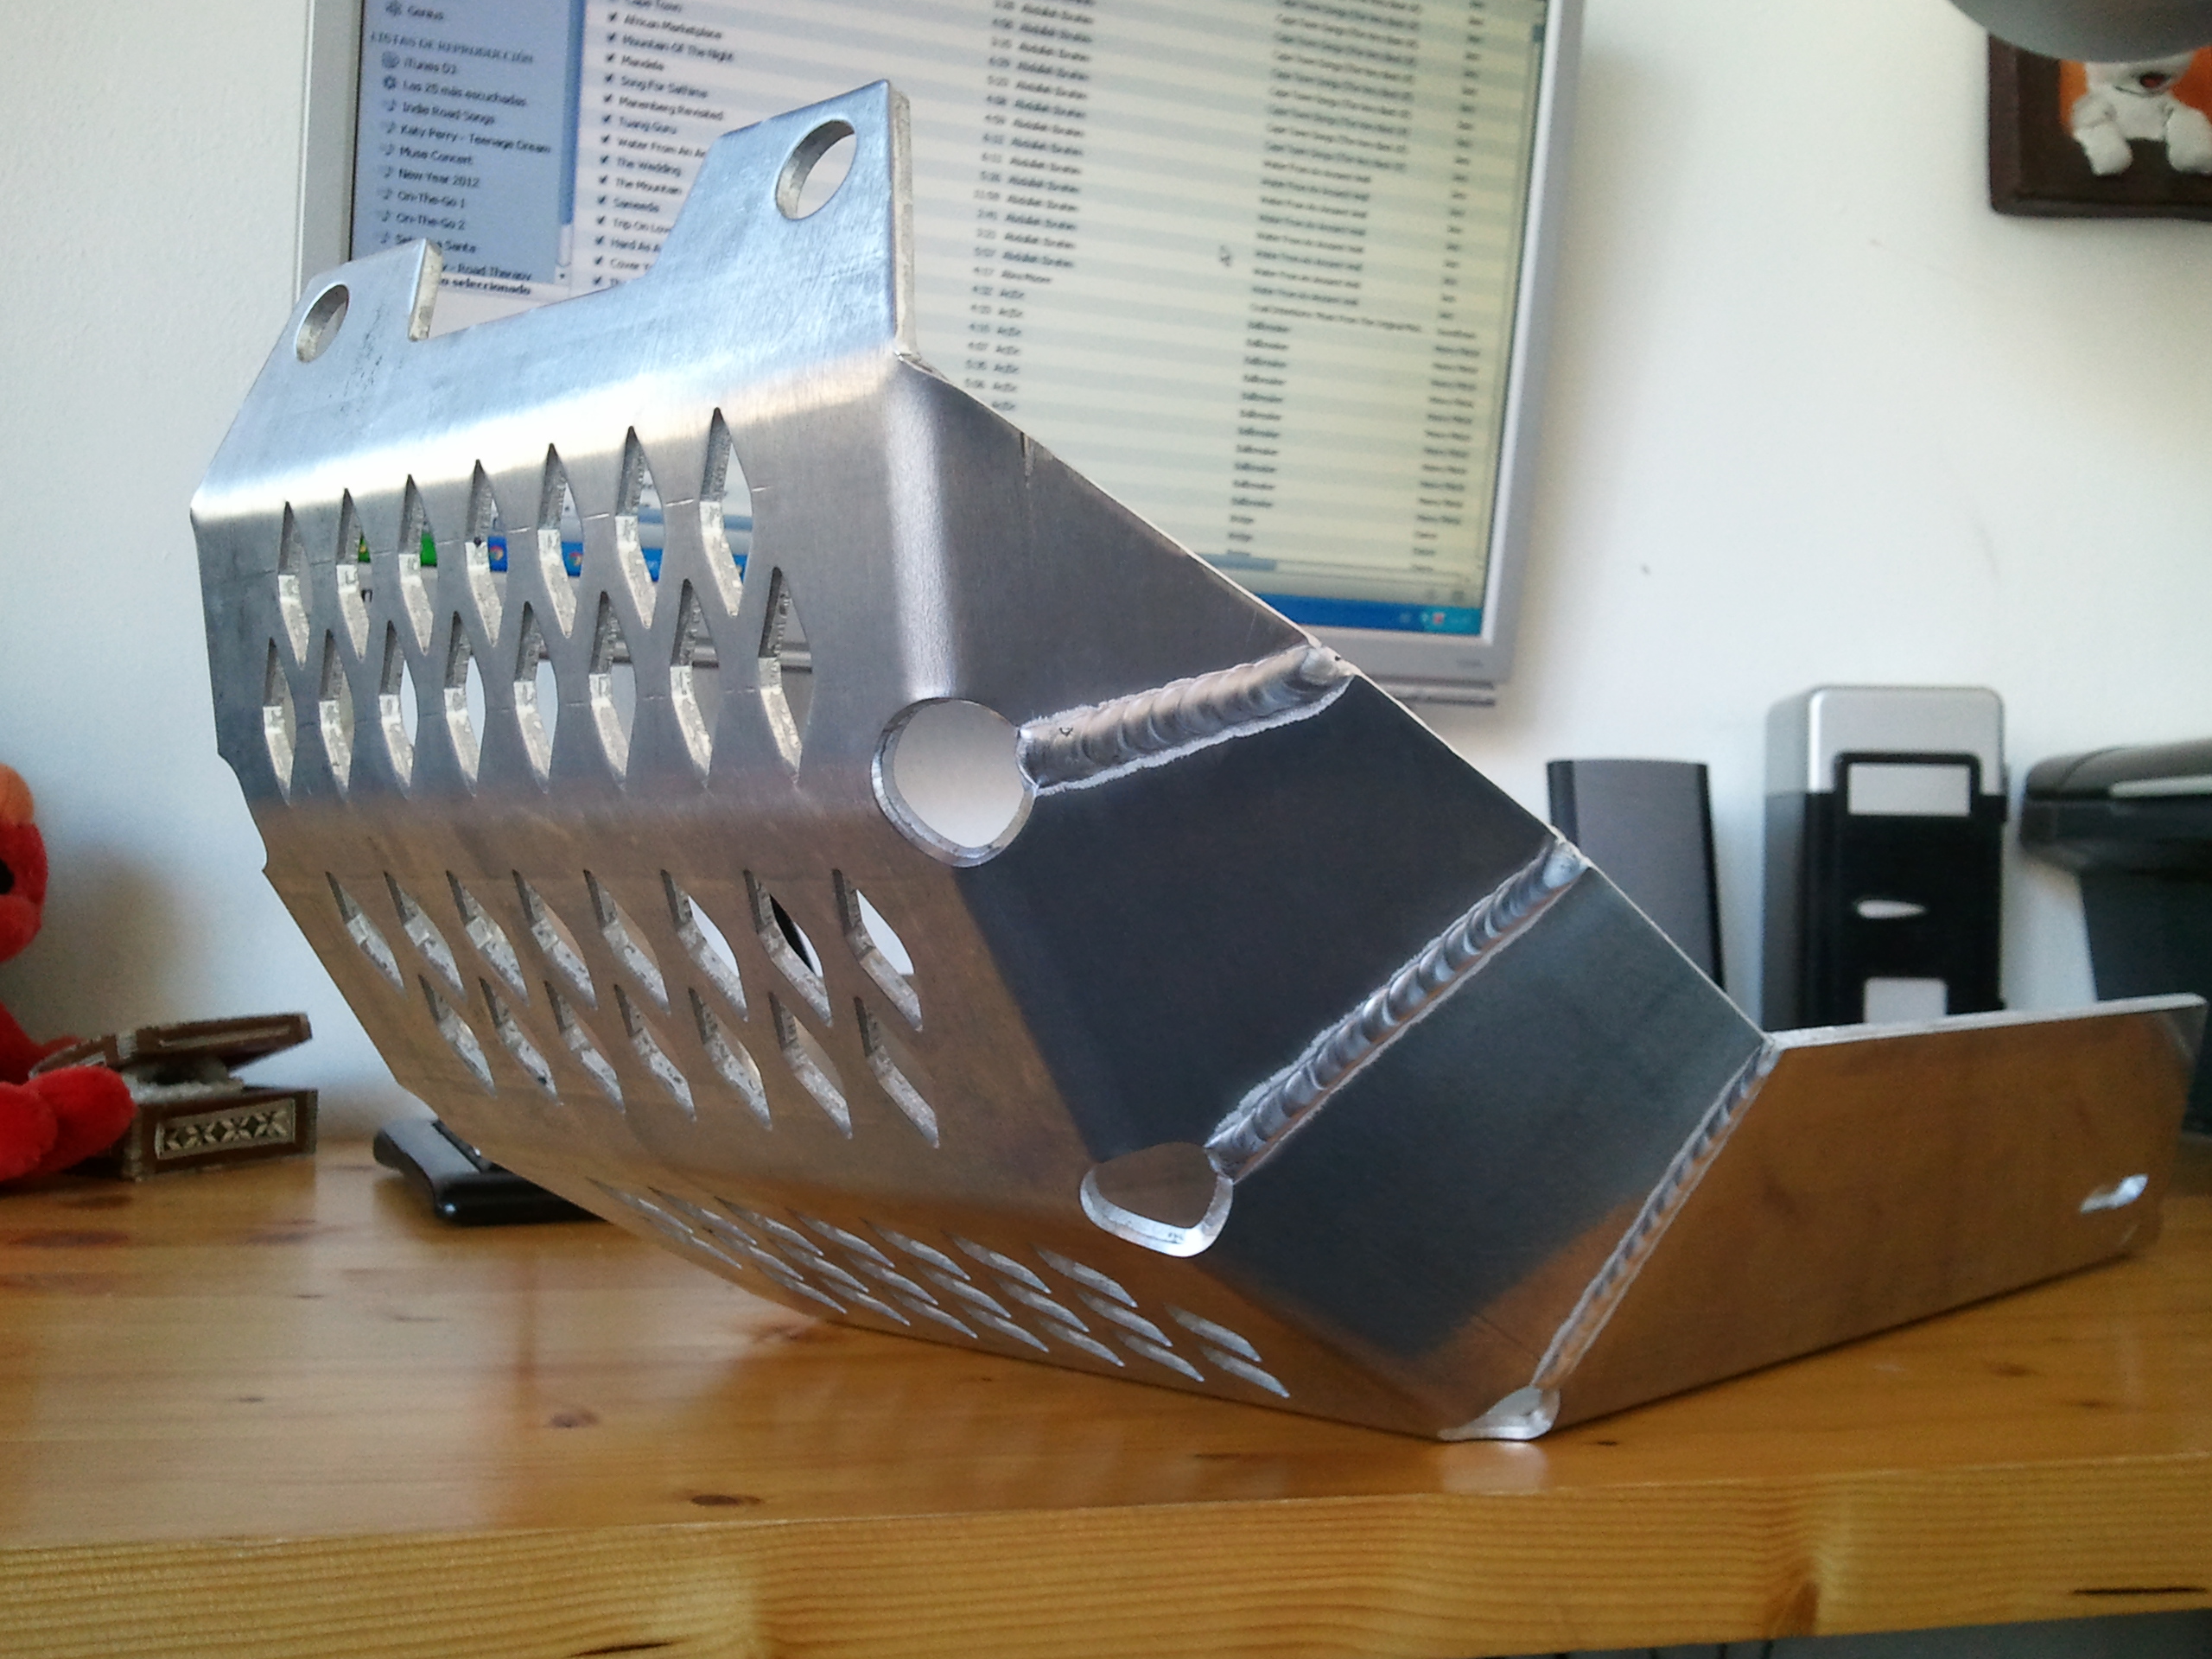
Adventure MotoStuff engine guard
I received my engine guard today! I had checked out a lot of different models (see this list – in Spanish) but in the end the only one that I found convincing was the one manufactured in the USA by Adventure MotoStuff.

All the other options had some shortcomings – they were too narrow at the top and exposed part of the oil radiator; they requiered the oil radiator to be moved to a higher position; they had exposed screws at the bottom; they had access holes at the bottom (handy for servicing the bike, but leaves some parts more exposed); they were build of different parts screwed or welded together, some of them being too thin; etc.
The Adventure MotoStuff one is made of one thick, solid piece of metal, it covers the oil radiator, can be attached to the Hepco & Becker crash bars I already have and has a perfectly clean underside, withouth protruding bolts or screws. The mounting bracket also looks very sturdy.

It took about a week and a half to arrive, and my only complaint is that I had to pay import VAT, which had never happened before with anything else I had ordered online. I guess this time I was unlucky and the parcel was inspected at the border.
Customer service at Adventure MotoStuff was great, I emailed them some questions and they replied promptly with clear and useful answers.
Got the Russian visa!
The most difficult one is done! In fact, it has been much easier than expected – money obviously helps… This one was supposed to be complicated, as I needed a multi-entry business visa, which meant I had to be invited by a Russian company, but I just paid for an invitation letter and to have all my paperwork done through Central de Visados Rusos, in Barcelona, and they sorted out everything with no fuss at all. In ten days I had my visa! Now I can enter and leave Russia as many times as I want from July to December.
Since I had got my passport back and still had an hour before going to work, I decided to start the process of getting my Mongol visa. The Mongol Consulate in Barcelona is not far from the offices where I got the Russian visa, so I took the bike and went down there.
They are located at the end of Rocafort street, near Paral·lel, and their premises could not be more different from the mansion in Pearson Avenue.

 You walk through a dark and damp entrance hall on the ground floor of a typical Eixample building to an inner court where there are a few small houses, among which is the consulate.
The girl there was much, much nicer than the staff at the Russian consulate and after going through the paperwork she told me that there would be no problem to issue a tourist visa, but that it was still too early, as I will not be reaching the border until late July or early August, so she advised me to get any other visas I needed and then go back.
So, on the the Kazakh visa, then!
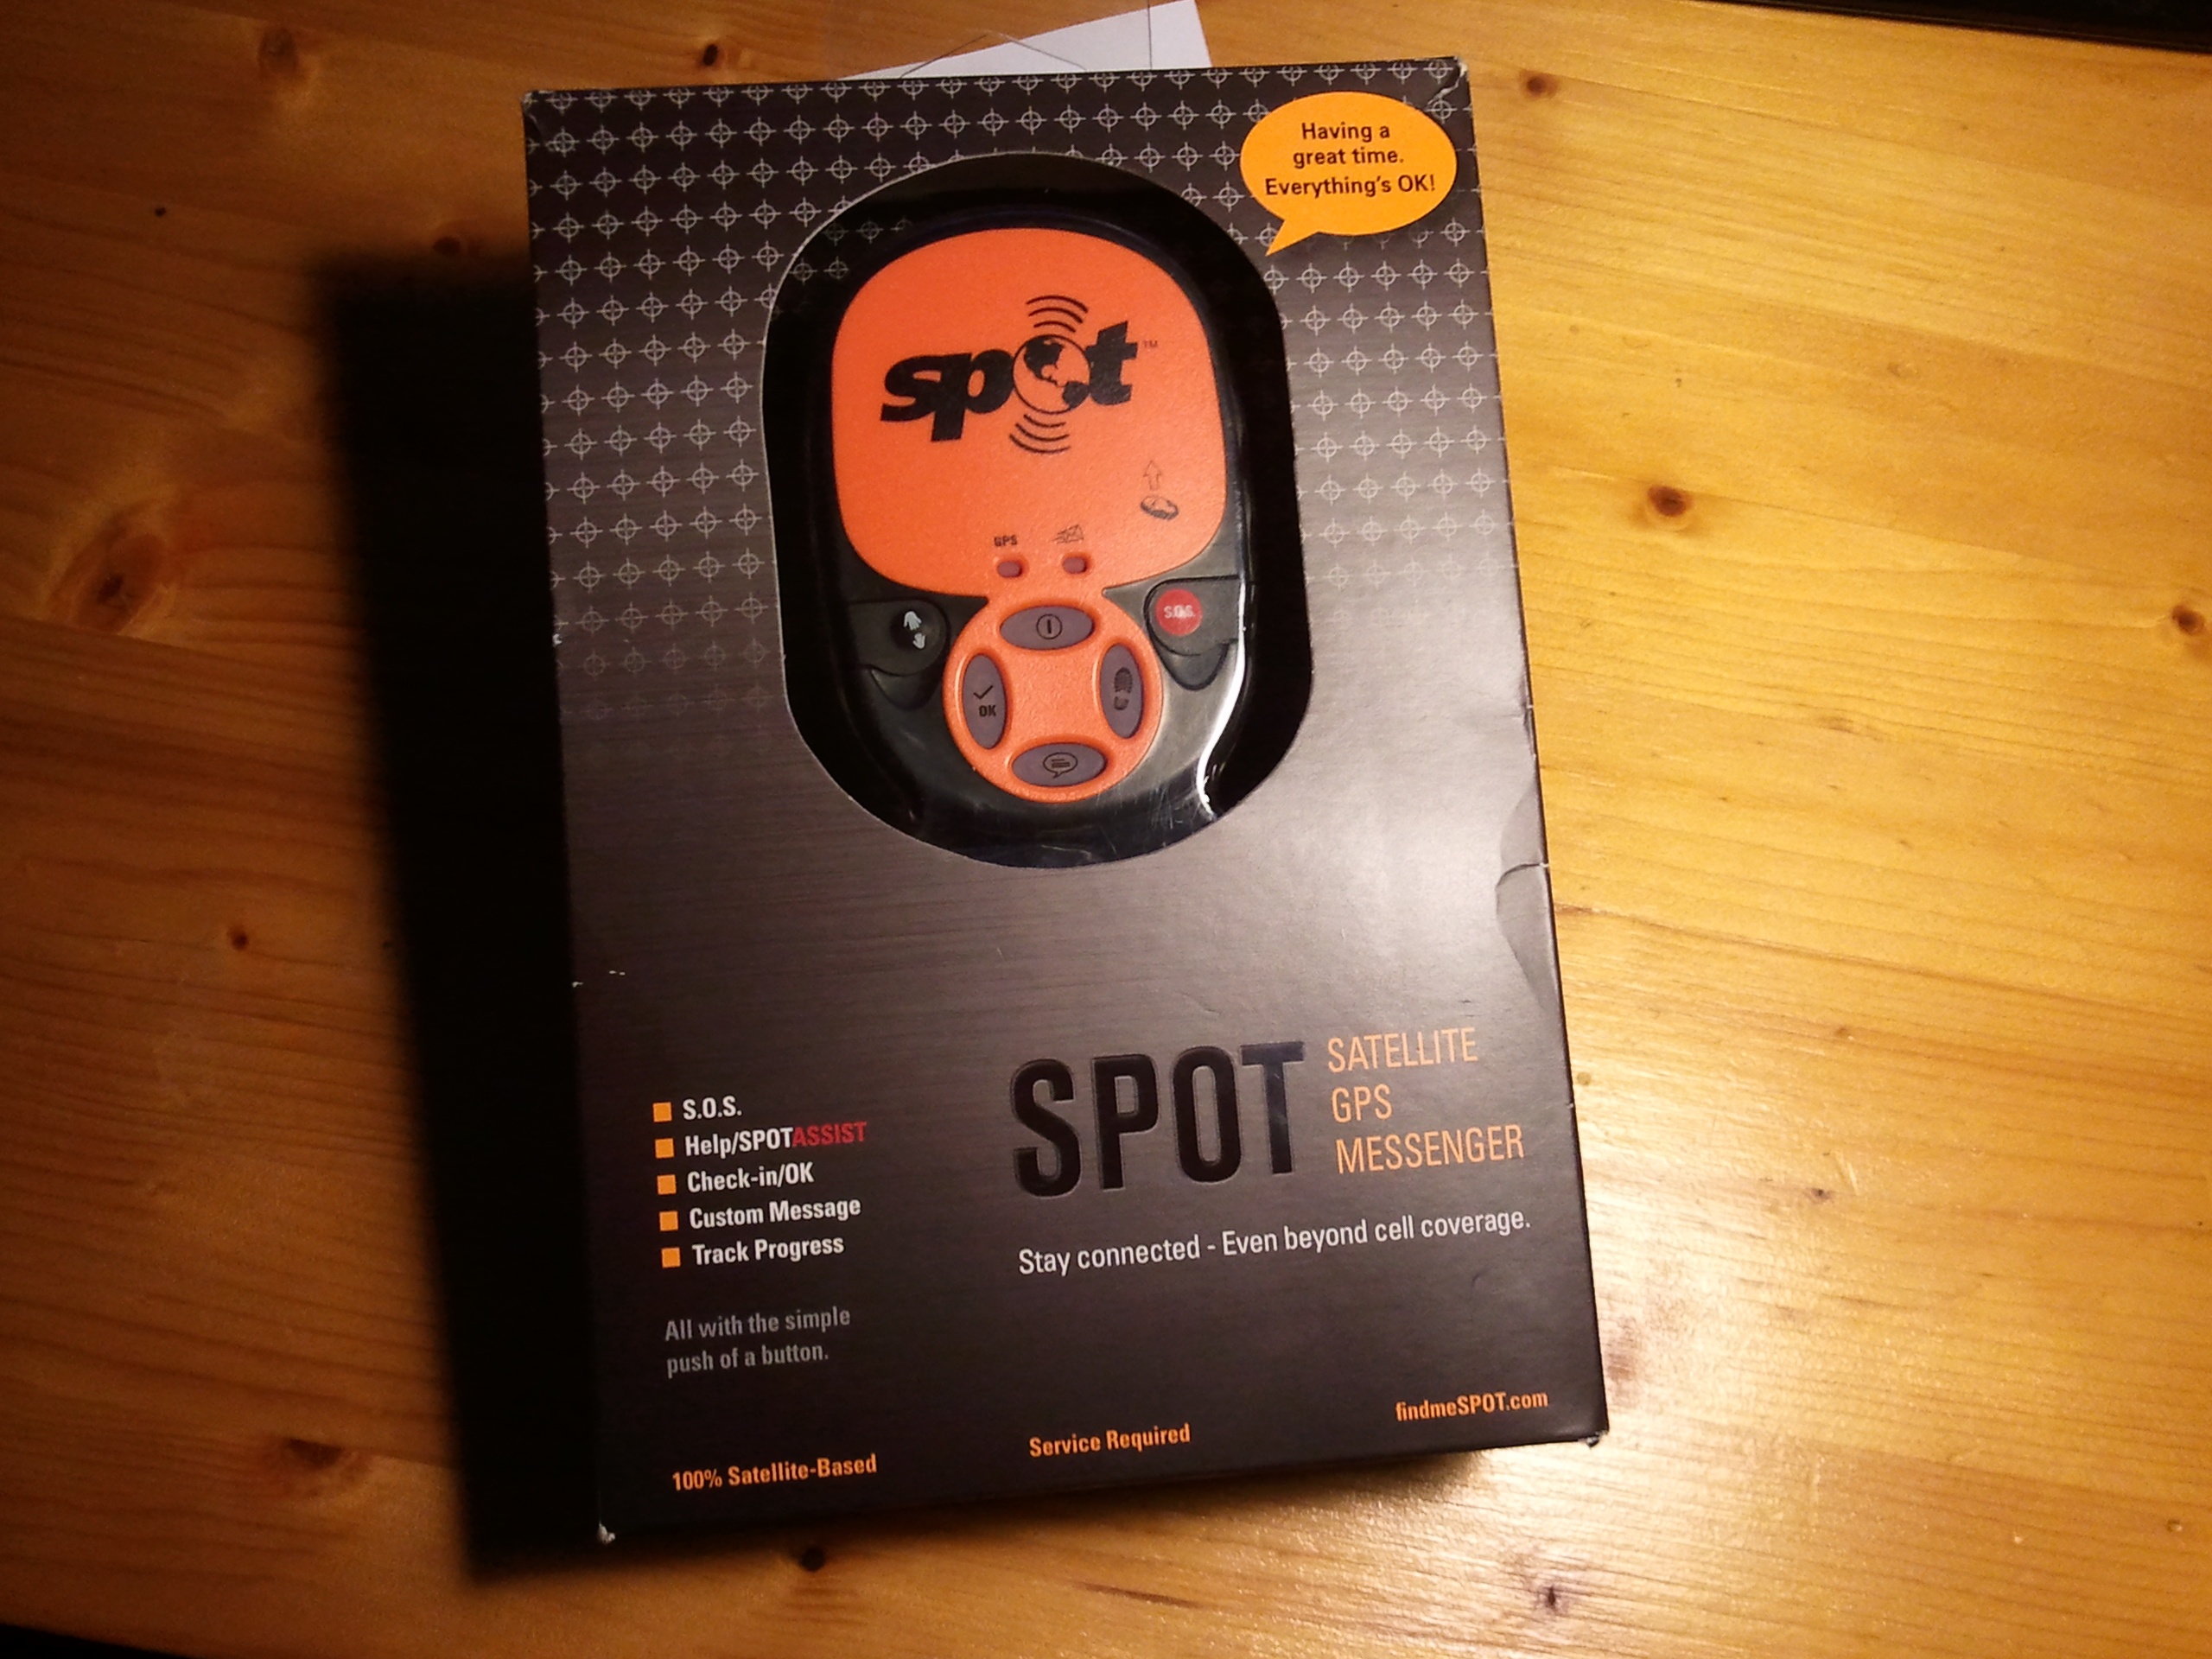
Spot Satellite GPS Messenger
This is one I have been having doubts over for a long time. To buy or not to buy. As with many other things involved in the preparation of a trip like this, there are scores of very well argued opinions for and against the SPOT tracker all over the Internet. Some say that it can save your life; some say if something really bad happens, it will not guarantee that help gets there on time and for anything less serious, there are other ways of getting help, so it is an unnecessary expense, not to mention one more item to carry and worry about.
After weighing pros and cons for my particular case, this was the conclusion I came to:
FOR:
– There might not be phone signal in most of Kazakhstan and Mongolia, so no way of getting help on the road.
– I can let people back at home know that I am OK and they can track my progress almost in real time on a map.
– My mum would be more than happy that I carry the thing.
AGAINST:
– I have been told that phone signal is surprisingly good around towns and anyway, I will not be far from populated areas for that long.
– Being rescued might incur in hidden expenses that can amount to a lot of money (but then again, it is much better than not being rescued at all…)
– It is expensive, at 159€ plus 99€ for one year’s subscription to the service (yes, you do have to subscribe).
I was not going to get one, but a week ago I thought I would check on eBay to see whether I could get a used one and I found a new one on the States for 90€ plus shipping, which was still considerably less than buying one here, so I decided to order it (and make my mum happy).
I went to pick it up from the post office this morning and when the guy behind the counter gave me the box, I though ‘well, it had to happen, a new one for so little money could not have been real… I’ve been conned’. And I had good reason to think so – the box I had been given was labelled ‘Phillips Headphone Set’. Panic.
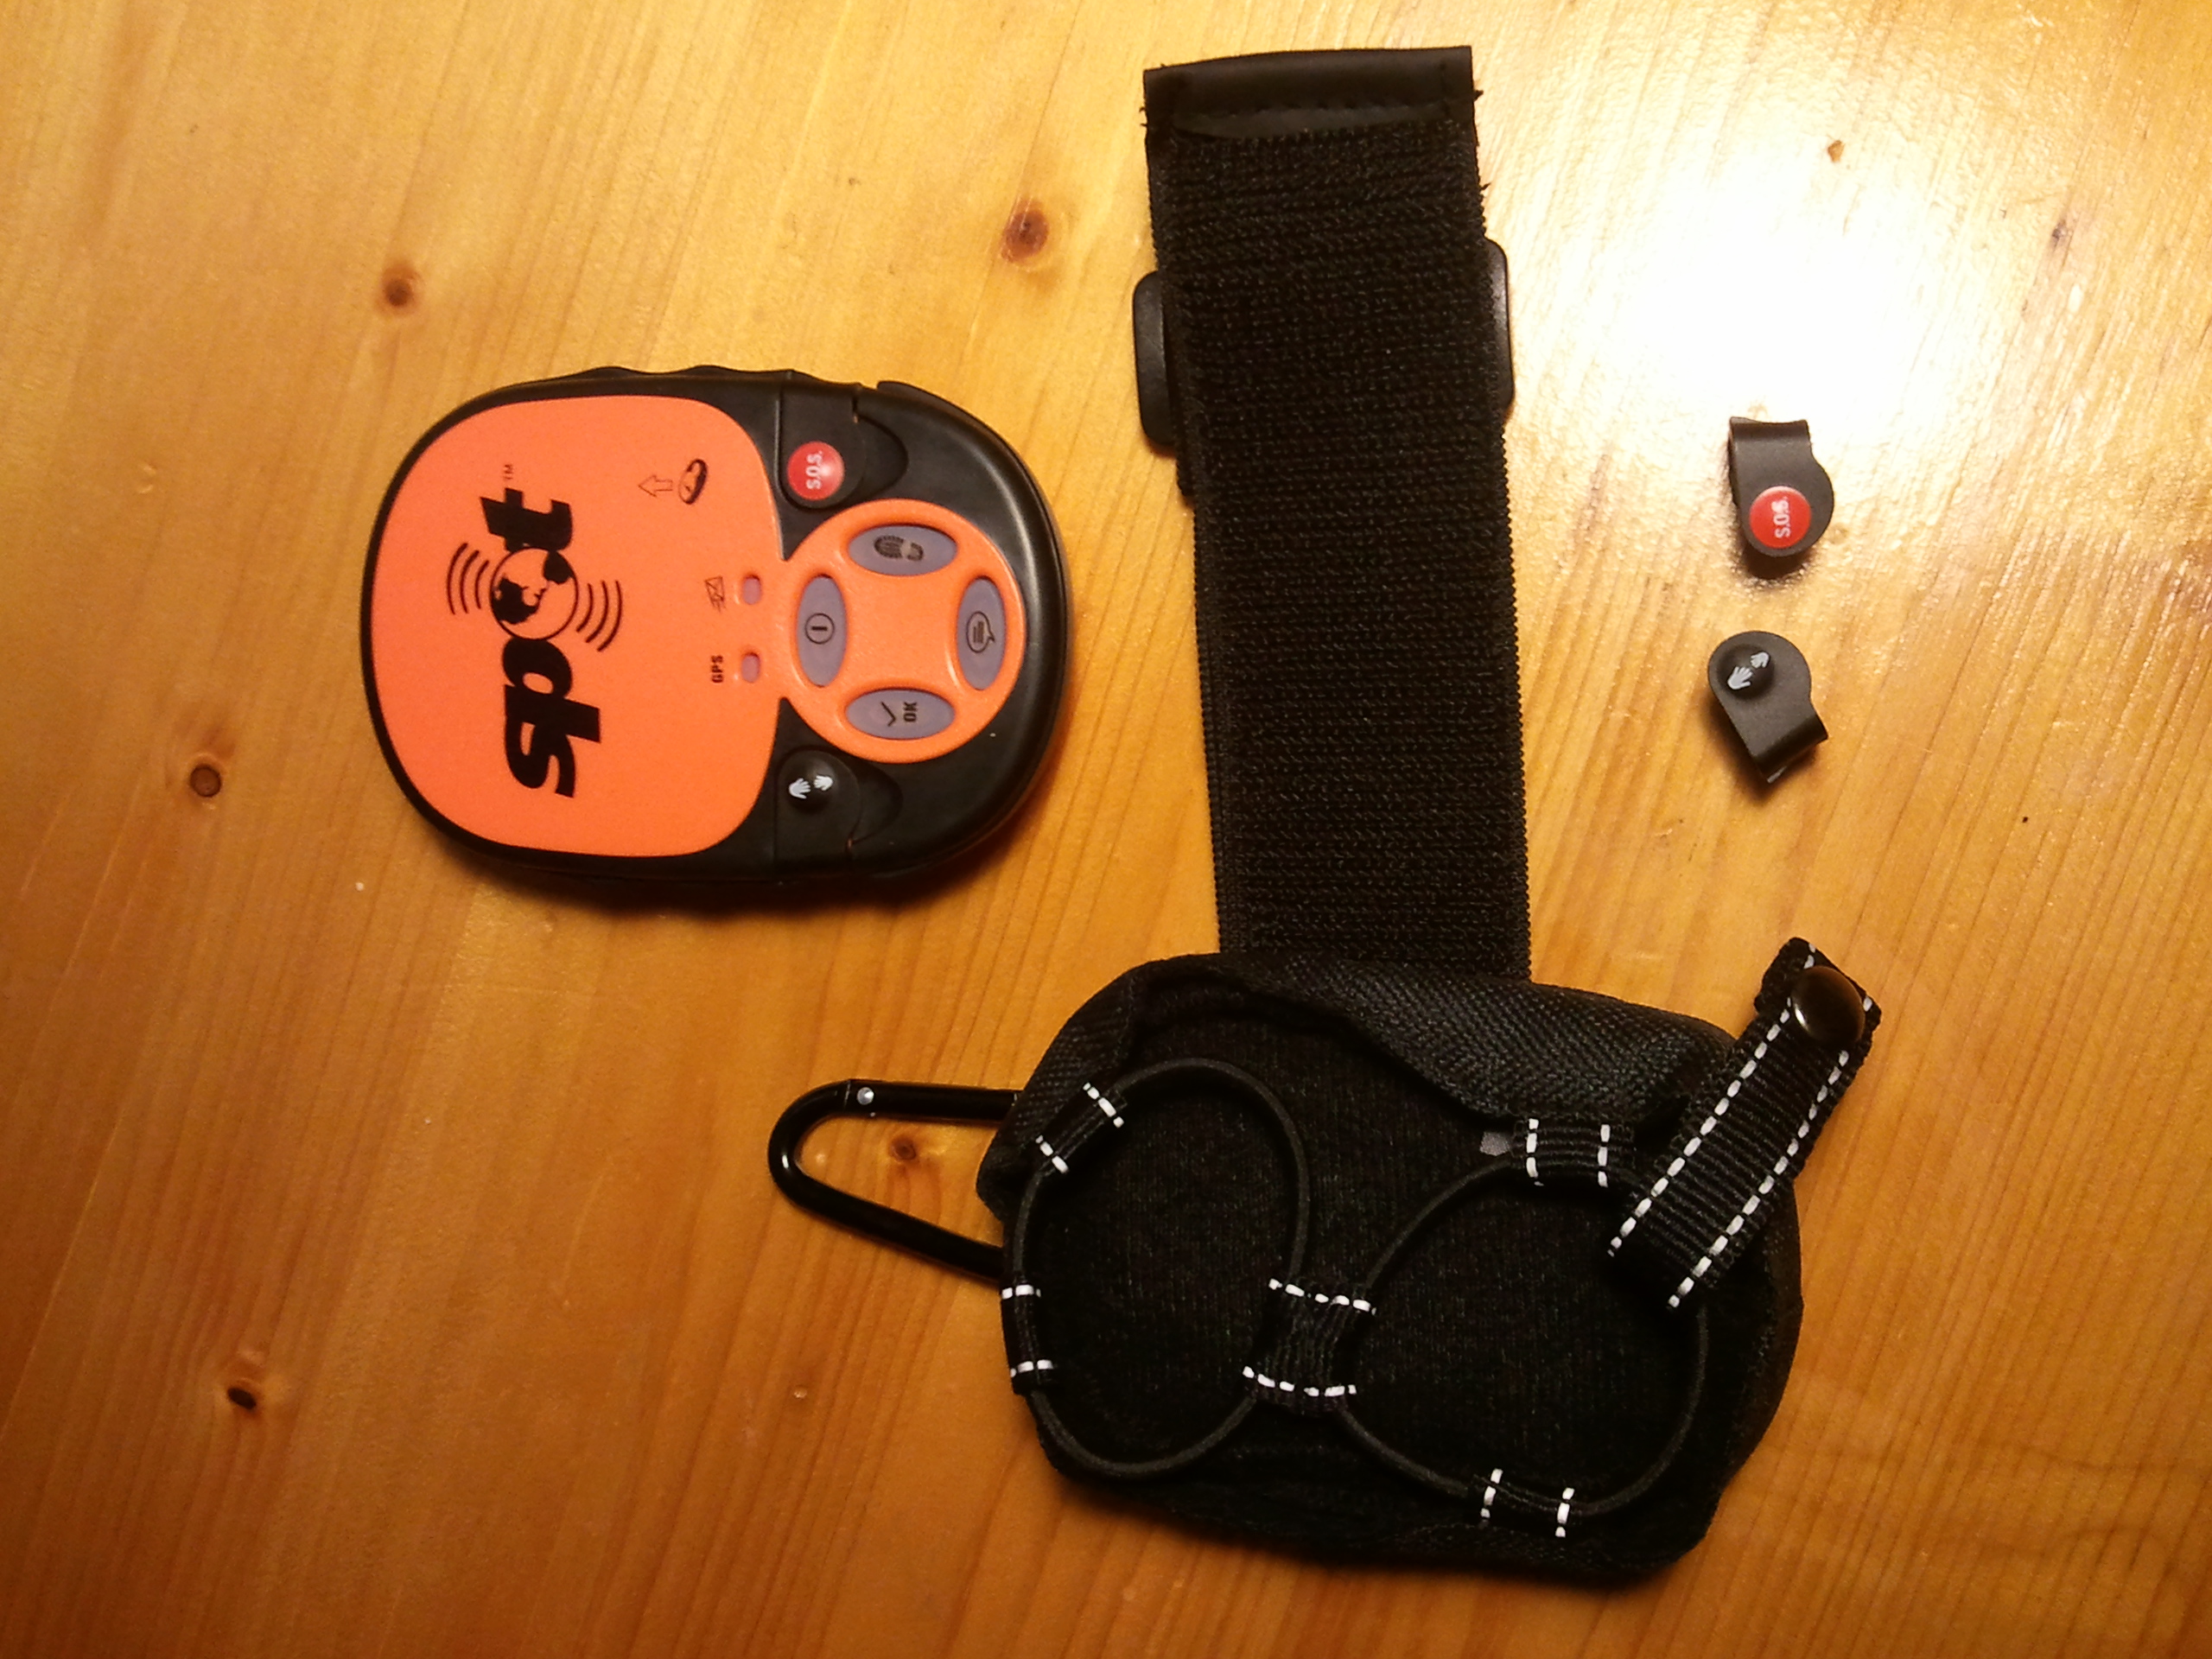
I walked out onto the street and towards my bike thinking about how unlikely I was to get my money back and trying to convince myself that 90€ was not that bad. I put the box on the bike’s seat and ripped the tape sealing it to find… The real box containing my SPOT!
I went to work, very relieved and much happier! When I got home this evening I was eager to open it and see how it worked.
The box contains the unit itself (a lot smaller than I thought); a kind of pouch to carry it around your arm, velcro it to a surface (the patch is too small, though, – I think I would lose it quick if I stuck it like that on the bike) or just hang it on to your belt or trousers; two replacement covers for the emergency buttons; the instructions and three batteries (Energiser Ultimate Lithium, the instructions are adamant that only this particular brand and model should be used). It does not include a cradle to mount it on the bike, but I can probably get one cheap and adapt it to the RAM mount that came with my Garmin and that I’m not going to use (more about that in another post).
 Now that I have almost everything I need for the bike I am planning to go on a test trip in a couple of weeks. I will get it activated this week and see how it works then.
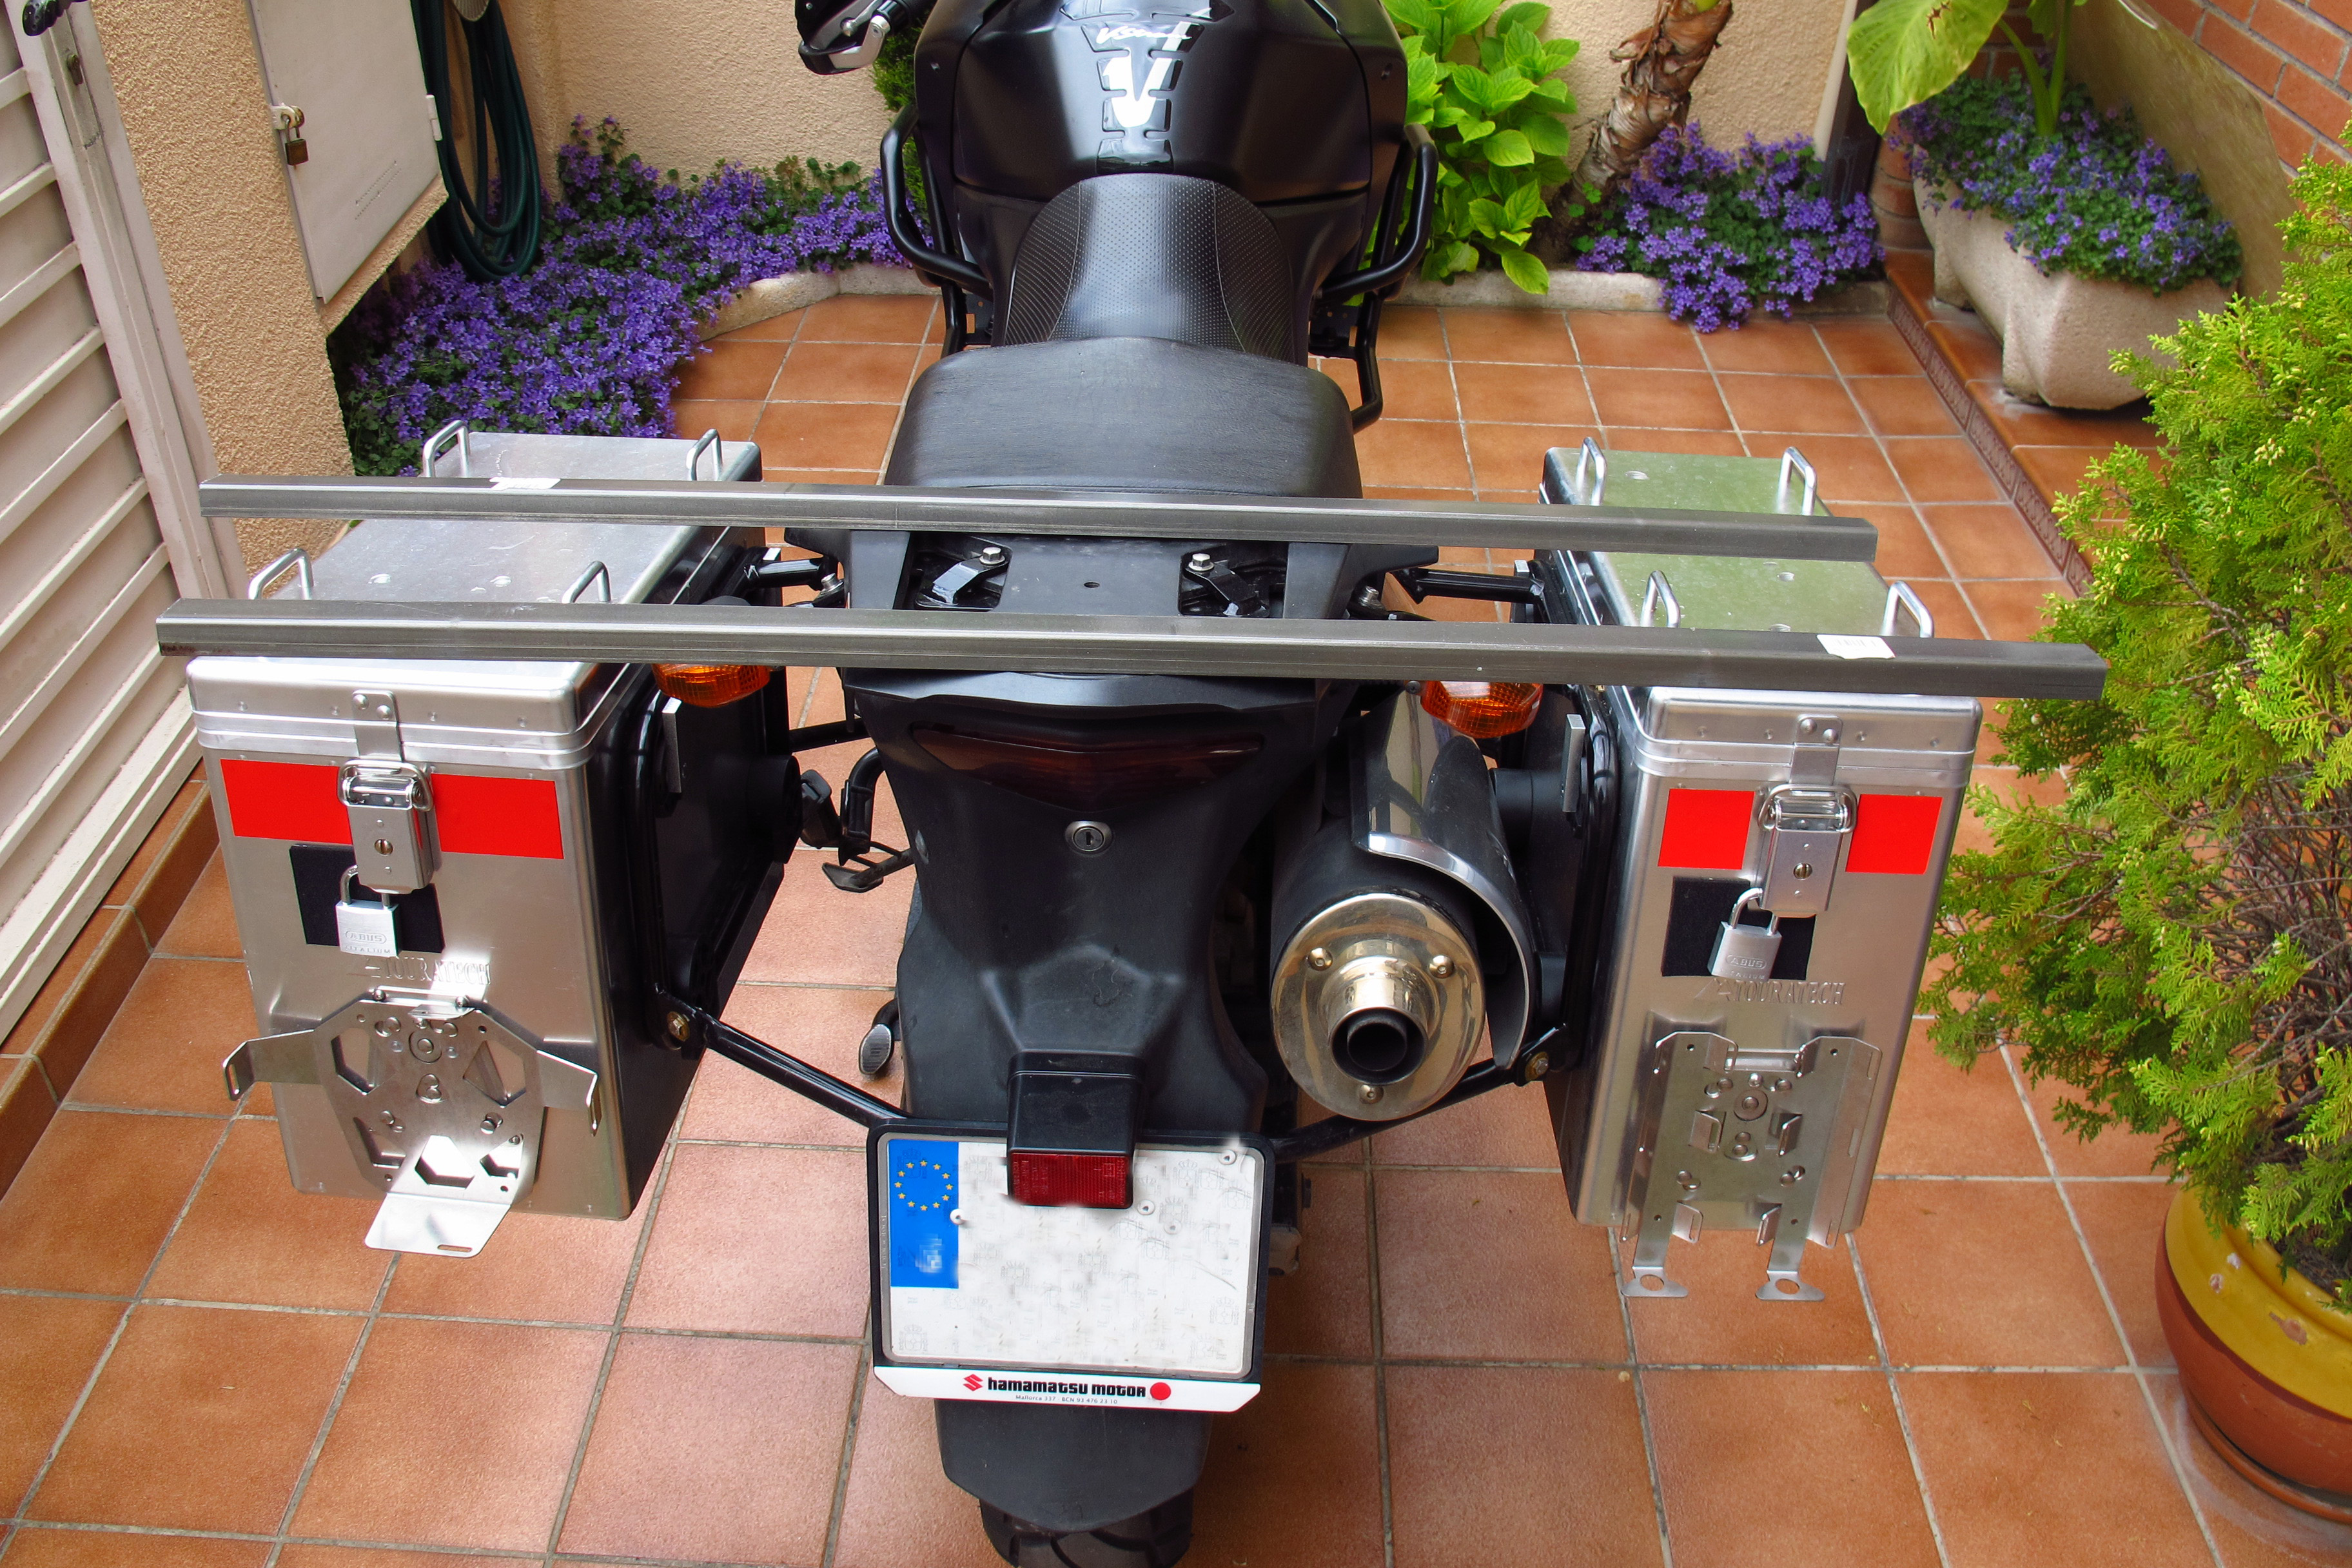
Installing the panniers and GPS mount
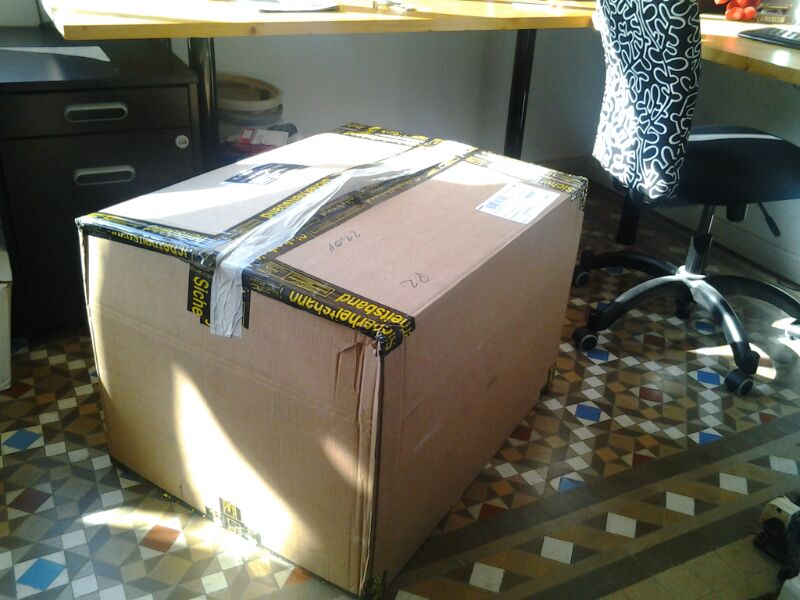
A couple of weeks ago a huge parcel was delivered to my apartment; I was not there, so the doorwoman picked it up as she usually does in these cases. But this time, when I say “pick up” what I mean is “took delivery”, because it was such a big box that the poor woman could not move it on her own. My flatmate got home before I did and he managed to get it on the elevator and drag it into the flat.
It was the last big purchase in preparation for the trip: a pair of Touratech Zega panniers, mounting frames for my bike, some accessories for the panniers, a headlight guard, a Garmin GPS and a mount for the GPS.
Now I only needed the time to install everything on the bike, and the perfect moment came last weekend. A rainy weekend meant that my plans to go cycling on Saturday had to be scrapped, so I went to my parent’s and got down to it.
I knew I would need at least a whole day for the panniers and the GPS base, as the latter meant taking appart all the fairings and maybe remove the fuel tank to get the wiring from the battery to the front of the bike, and the former came without the mounting parts installed. I got the panniers without them for two reasons: Firstly, if I did it myself, I could position the panniers exactly where I wanted on the bike, and secondly and most important, it saved quite a lot money. The only drawback? It takes time, because it means that 18 holes have to be drilled on each pannier, and that’s after having taken all the right measurements.
Having learnt from Steve Stallebrass’ blog that it is quite hard to mark the drilling points while holding the panniers against the frames on the bike, I first installed the frames on the bike, had a passenger sit on it to make sure the panniers left room for her legs to rest comfortably on the footpegs and then marked the general position of the pannier in relation to the frame.
I then removed one side of the frame (no need to remove the other, since the rectangular frame the panniers attach to is identical on both sides) and marked the exact drilling points comfortably with the pannier lying on the floor.
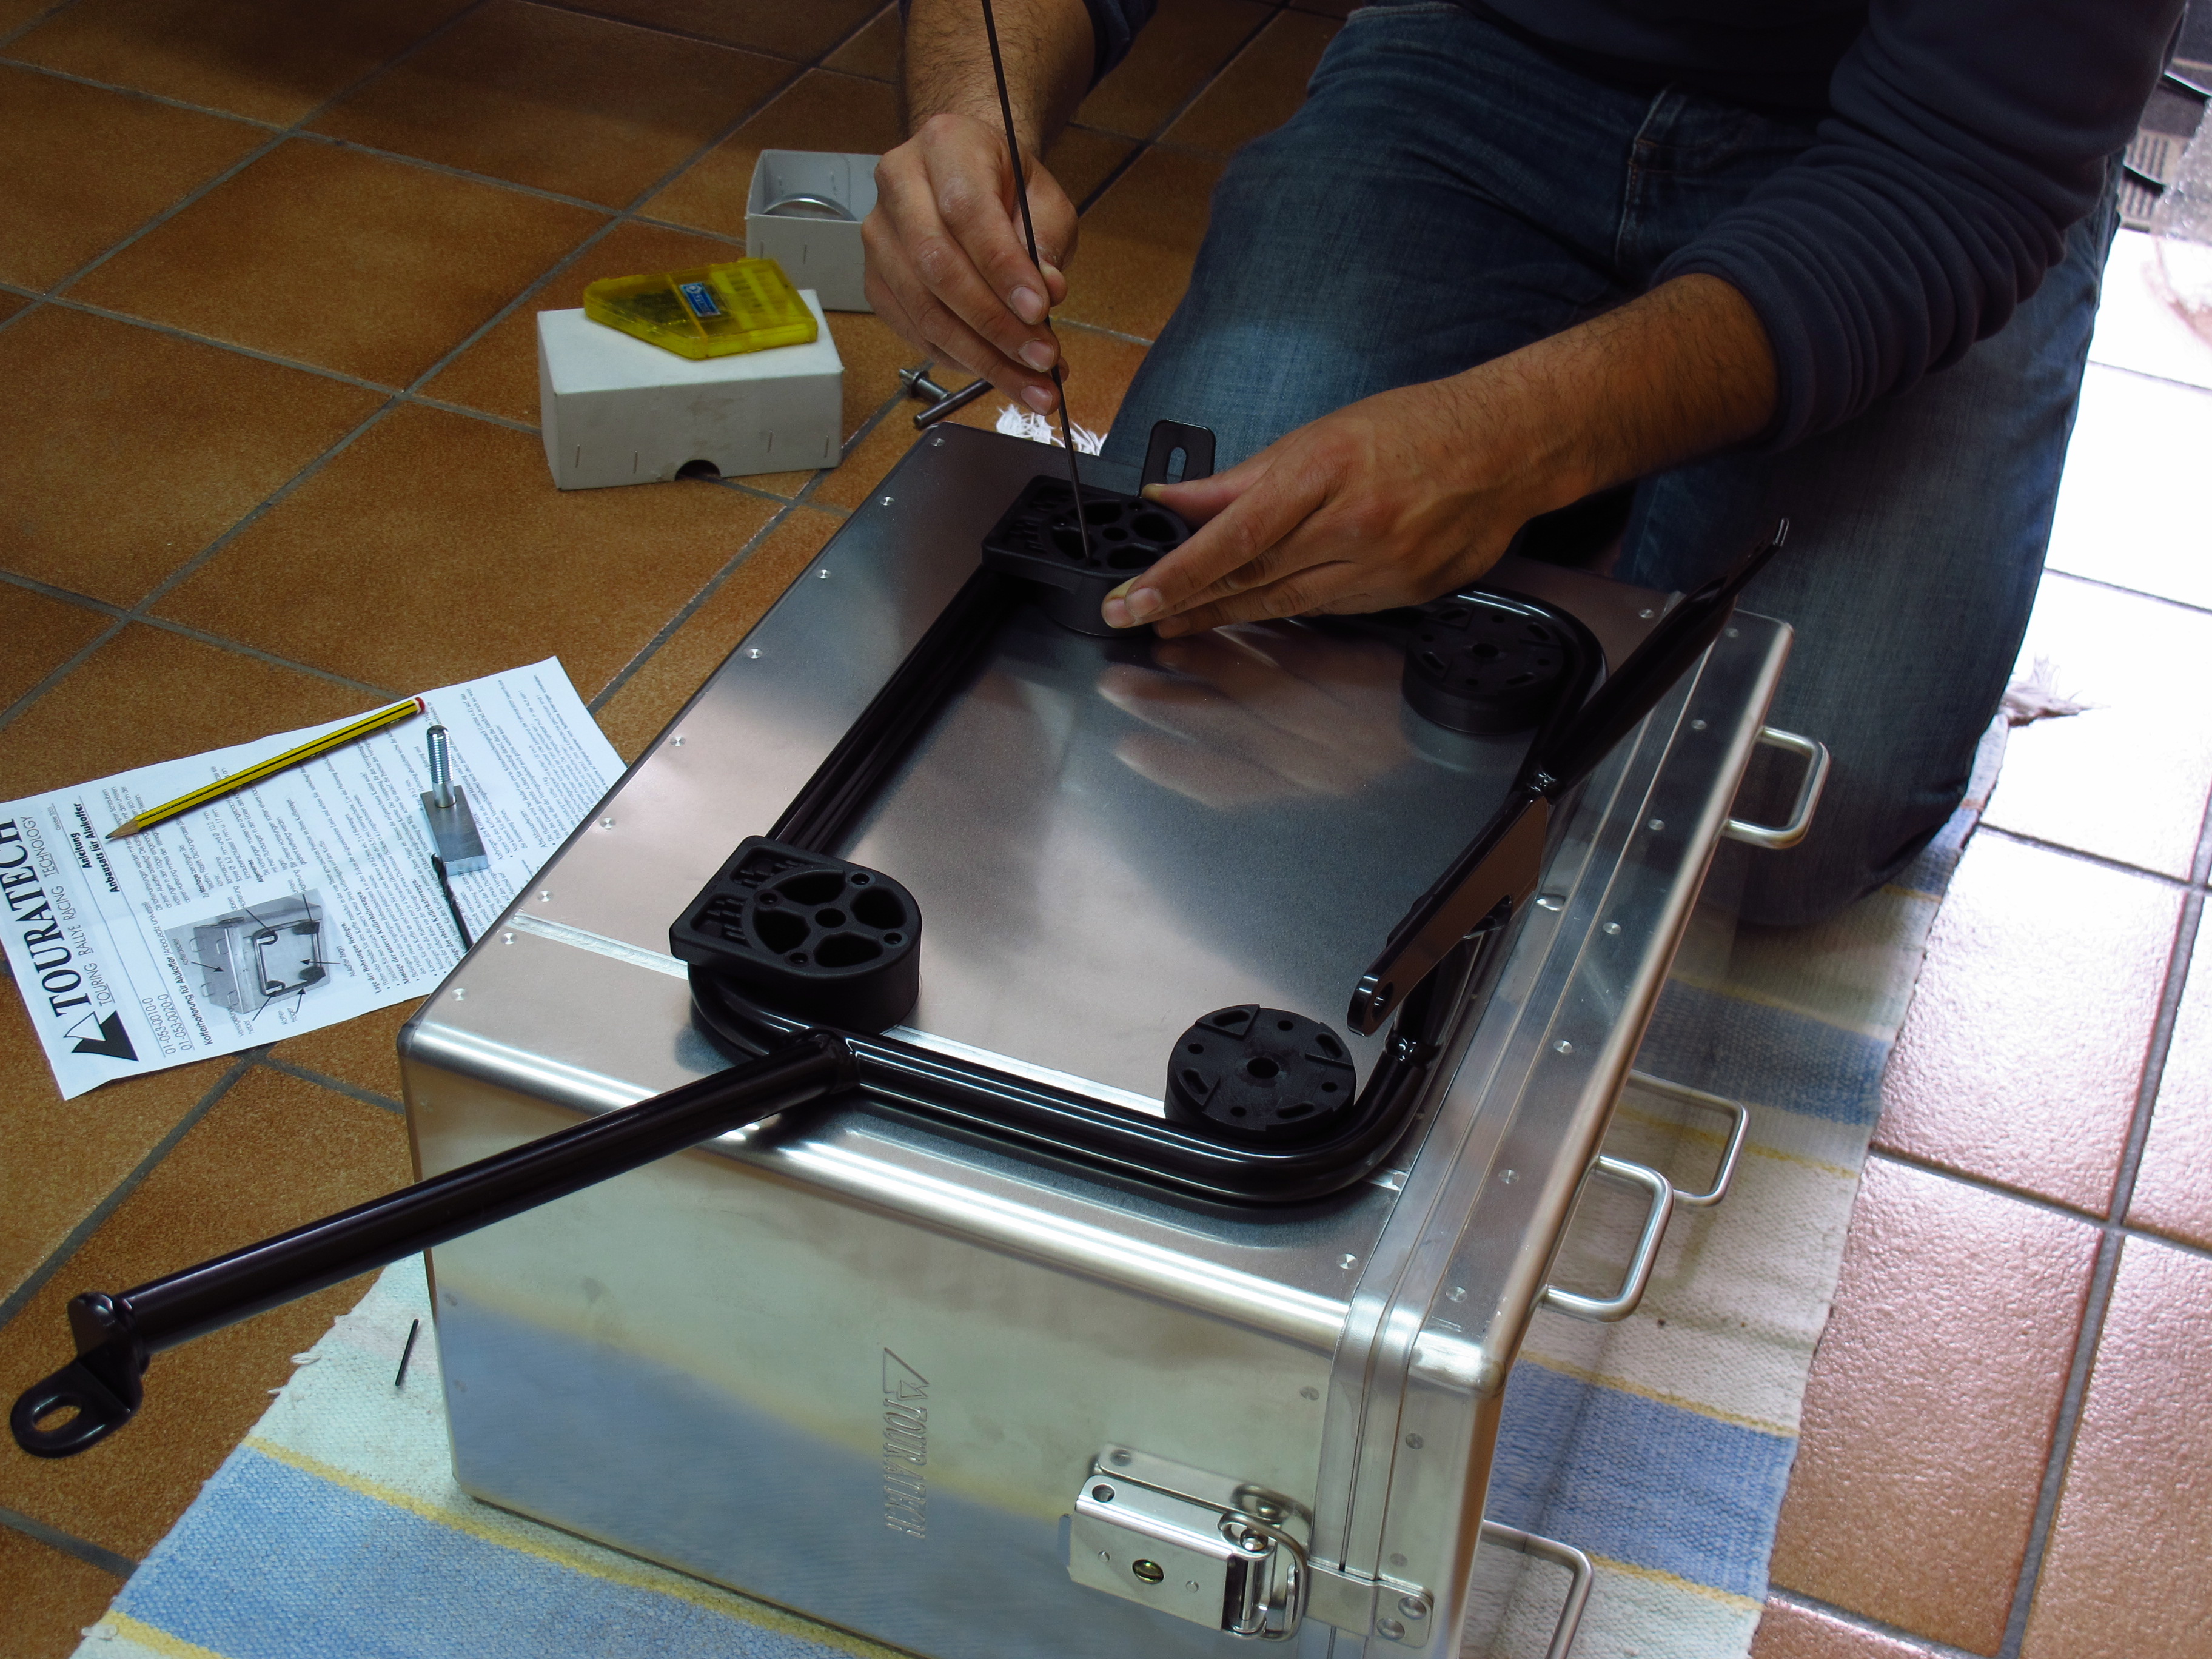
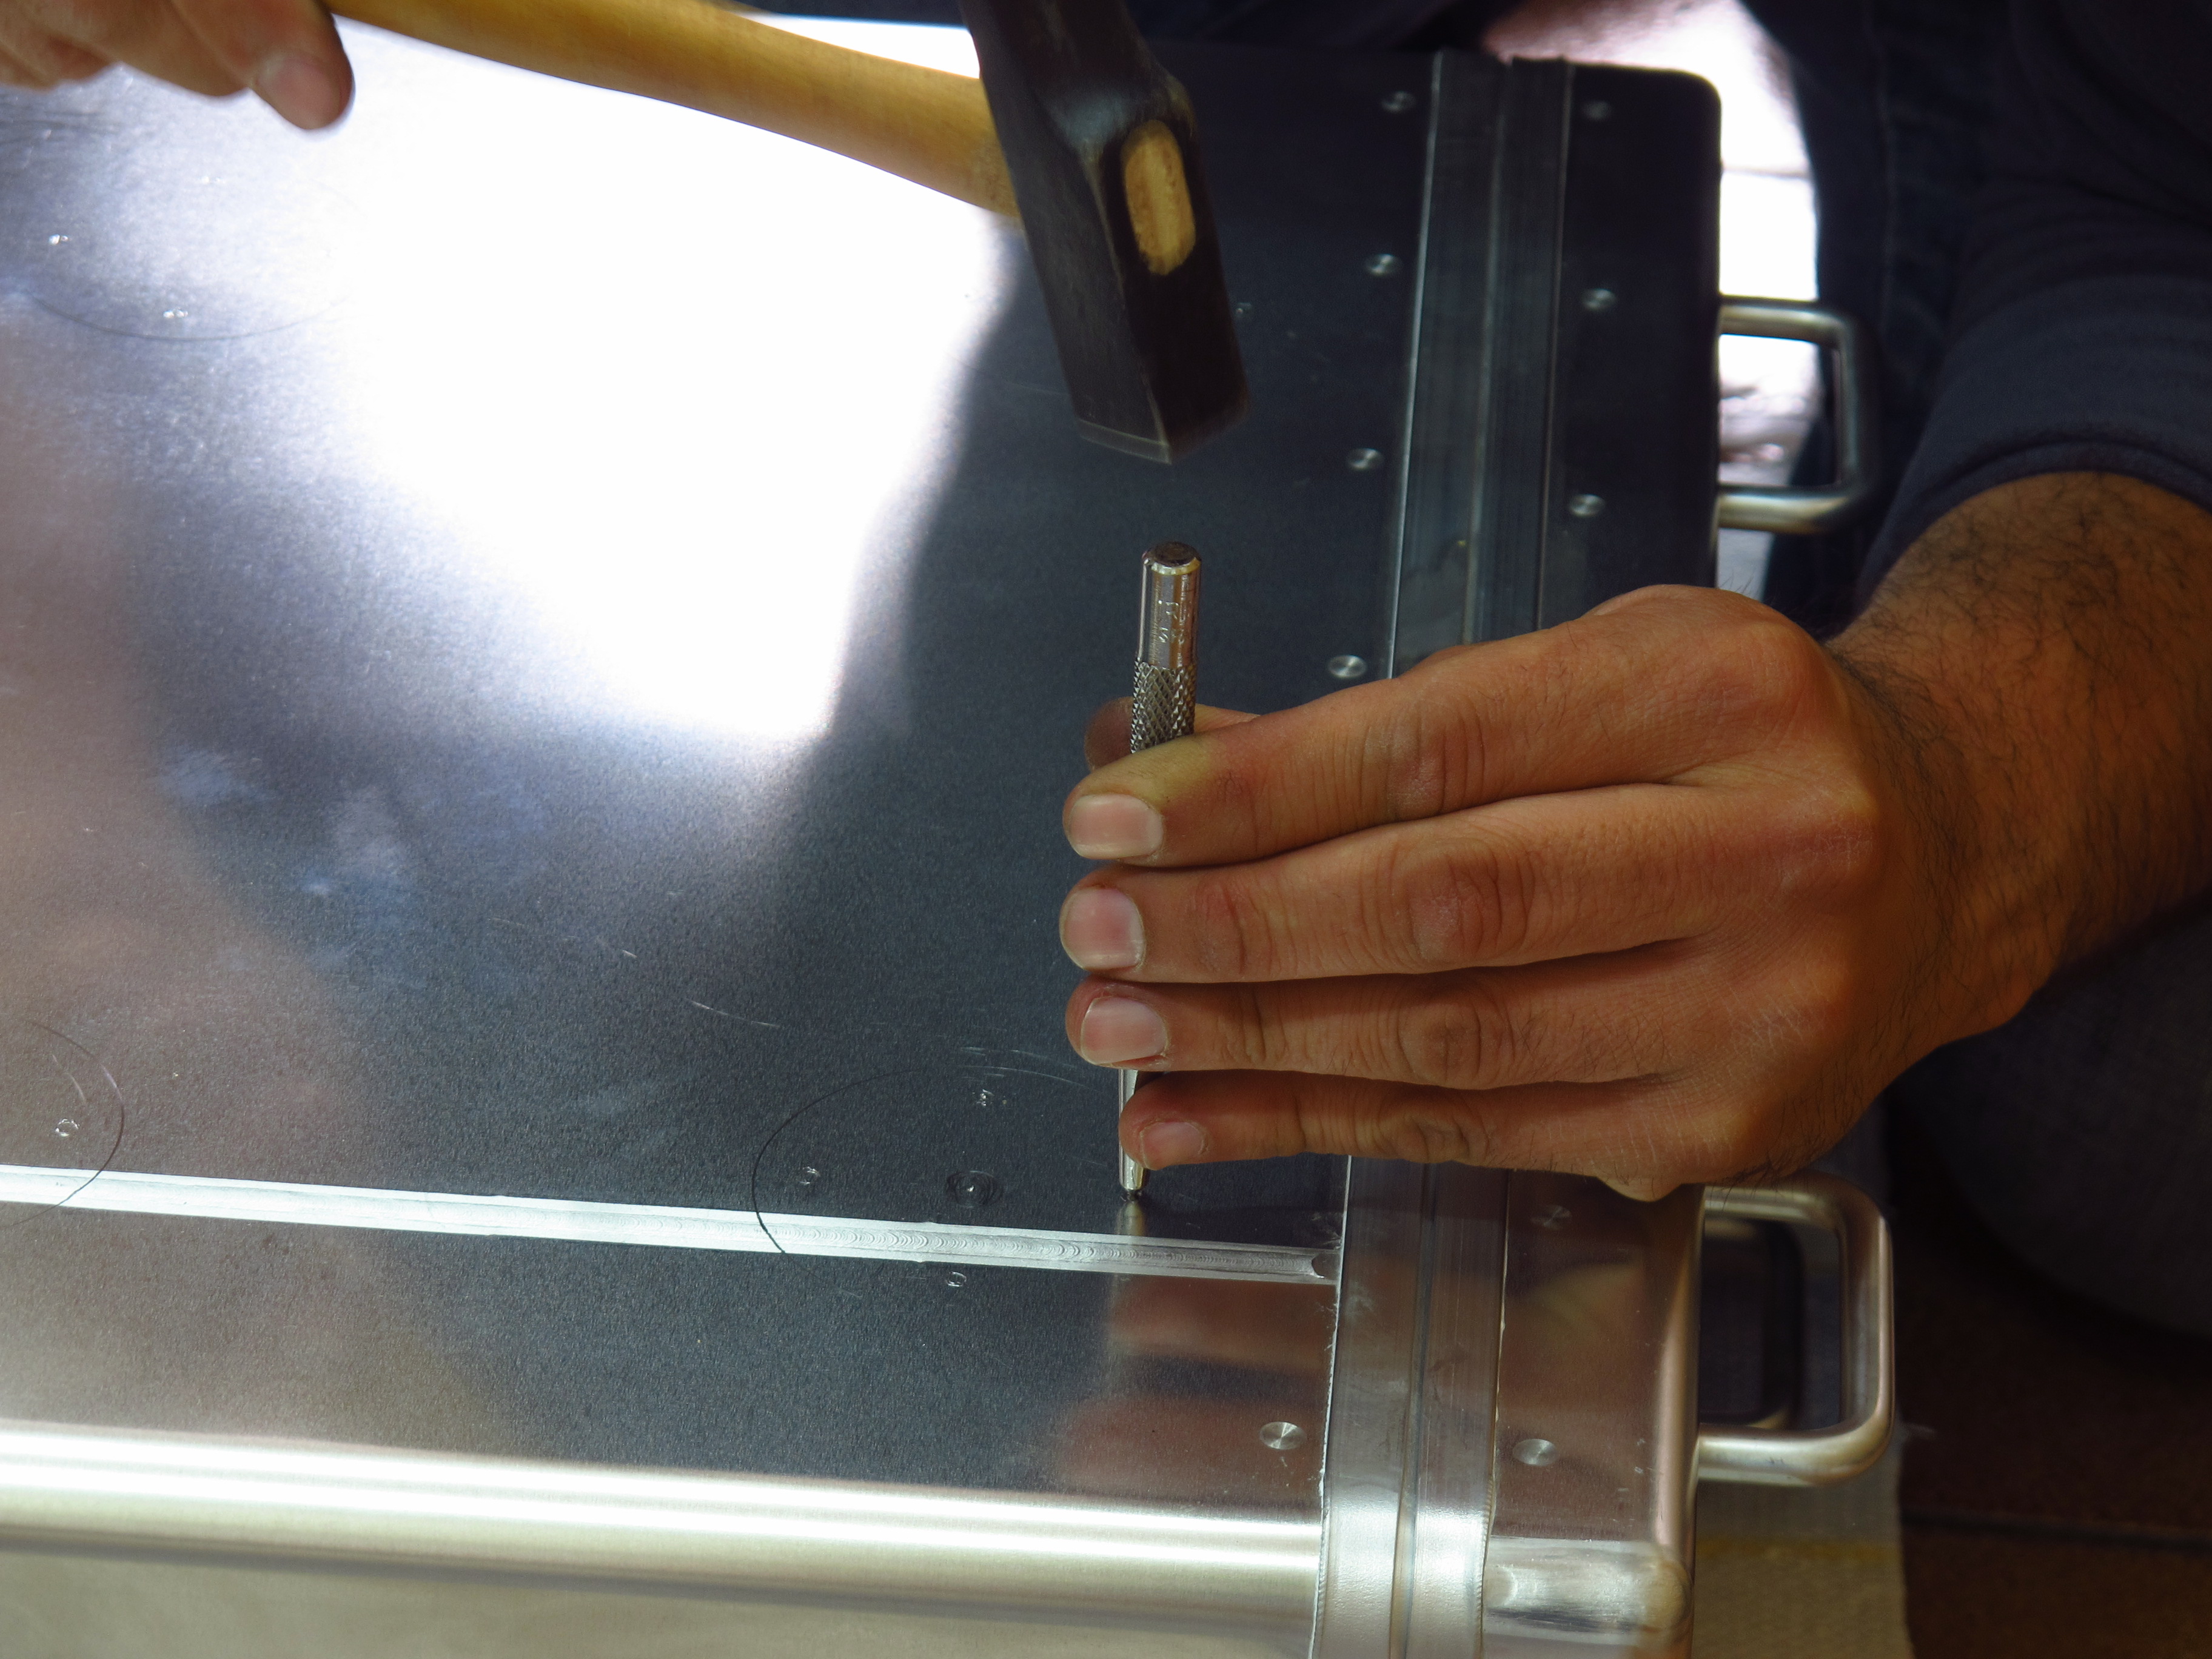
Once the points had been marked, I punched a small dent to make sure the drill would not slip and scratch the panniers and started drilling the holes, first with a 3mm drill and then with a 5 mm one. The two bigger holes for the rotating brackets were made with a 10mm one. All that was left then was to file any shavings and smooth the holes and screw the mounts in. It sounds quite straightforward, and truth be told, the process is not complicated, but it did take quite a long time to do it on both panniers.


Now the panniers could be mounted on the bike, it was time to mark and drill the holes for the mounting plates that support the accessories I had bought for them: a holder for a 3-litre jerrycan and another one for a couple of bottles.


It was now time to install the GPS mount and the wiring that will keep it charged while it is attached to it. I did have to remove all the plastic fairings from both sides of the bike, but luckily I managed to get the wire through the front fairing and under the fuel tank without having to remove these.
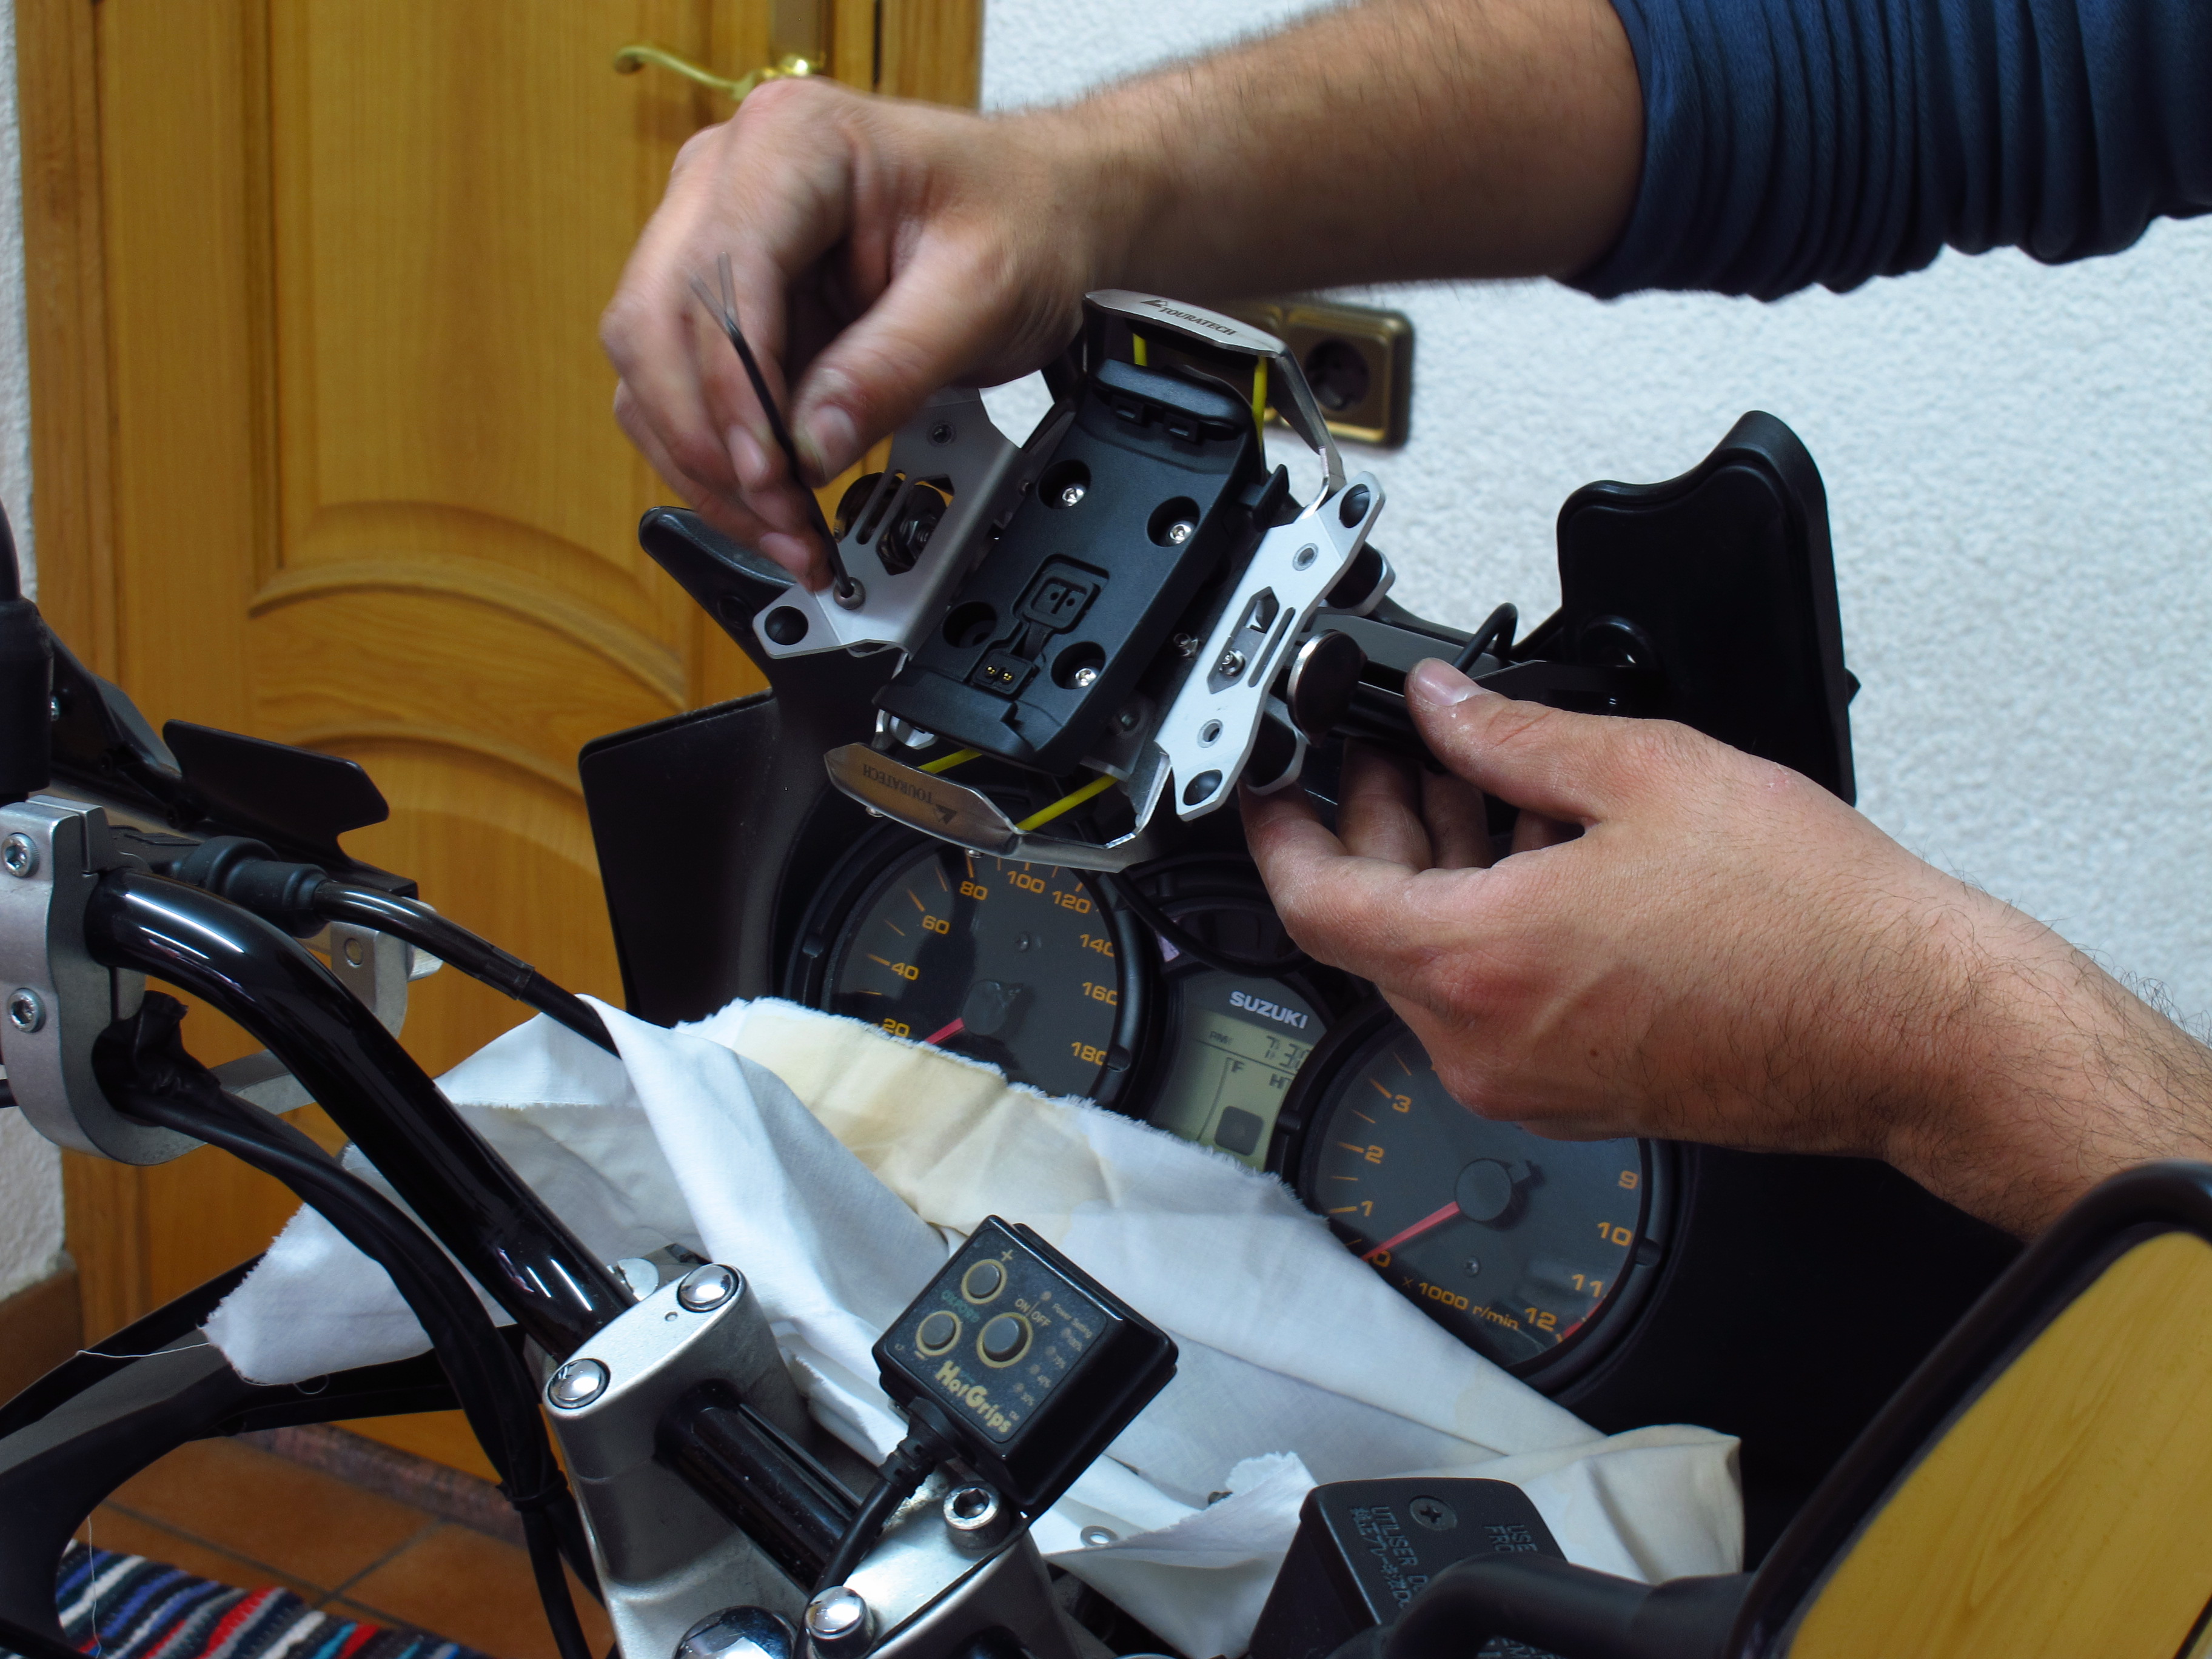
The Garmin Zumo I bought came with a RAM mount kit, but I prefer to use this one, as it is lockable, so I do not need to remove the unit every time I stop. I will recycle the RAM mount for the SPOT tracker.
Finally, I put everything back together and tested the GPS. It works!
This is how the bike looks now:


Heidenau K60 Scout and Kazakh visa
Just a short post to tell you that the tires I ordered are here. It’s a set of Heidenau K60 Scouts, and I am now going to spend the weekend figuring out how to carry them on the bike all the way to Volgograd, where I will have them fit while the bike is being serviced in preparation for Kazakhstan.
I decided to take this ones because I have had good references from other riders, they seem to be a good compromise – not to radical on the road, grippy enough off road, and they seem to last much longer than other knobbly tires, important since I expect them to last all the way back to Europe.
I will also be taking a puncture repair kit and a compressor but I have my doubts about taking tire irons. I have never tried to replace a tubeless tire, and it seems to be very hard to do on the roadside, especially breaking the bead. Can anyone advise me on that?

I was hoping to carry them lying flat on the passenger seat and the back rack, but I also have to carry a rather big Ortlieb Rack Bag (I did not want to have too many little bags attached to the bike, they might easily get stolen in short stops to get supplies), so I am not very sure how to position them. I will experiment this weekend.
On a side note, this week I gave my sister (who lives in Madrid) the application forms and paperwork to get a Kazak visa. I do not have a hotel reservation or an invitation letter, but it seems that there is a simplified application process for Spanish citizens. Let’s see if we get lucky.
Installing the crash bars, headlight guard and skid plate
Well, it has been a very productive week and weekend! Unfortunately that means that I am now behind in keeping the blog up to date, there’s a lot to write about; I will do it on separate posts. First one:
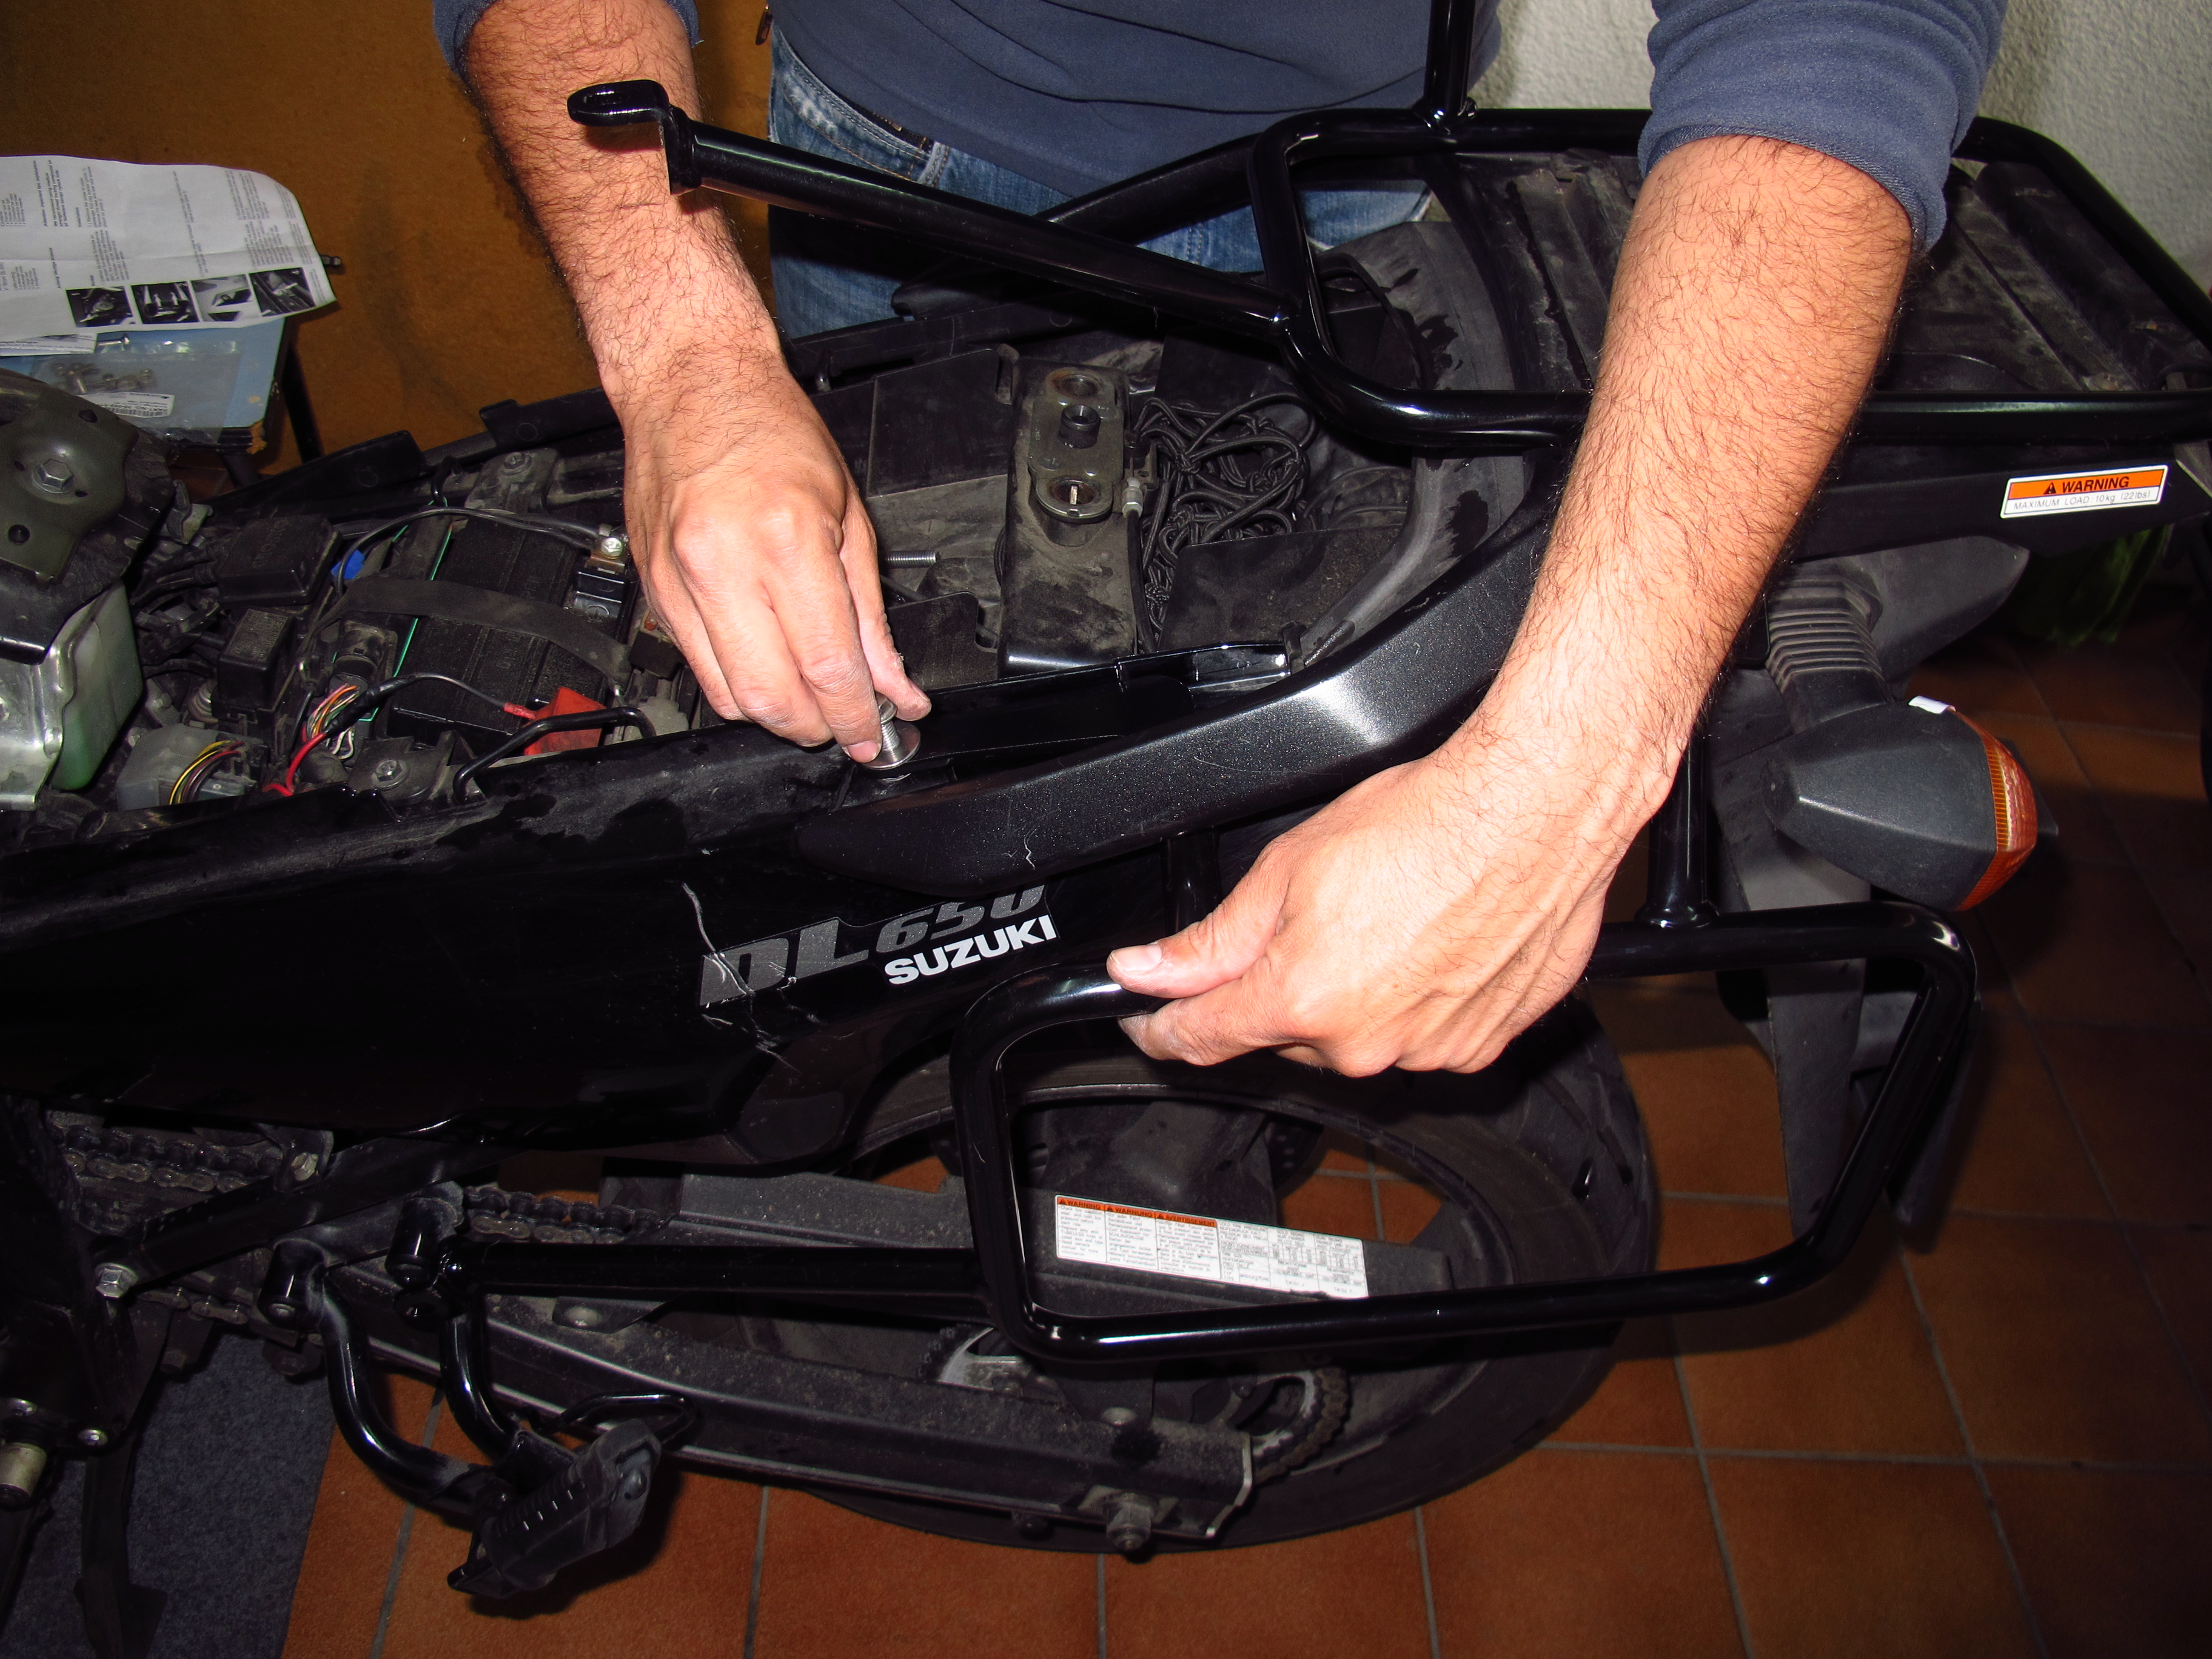
A couple of weekends ago I got down to installing the crash bars, headlight guard and skid plate, which I had not had time to install when I did the panniers and GPS mount. I had seen some people have trouble aligning the mounting points with the chassis on YouTube tutorials, but I am happy to say I had absolutely no problem. The only setback came from the long screw that goes from one side of the chassis to the other and supports the engine block. The crash bars that were installed on the bike when I bought it second hand were the original Suzuki ones, and they are attached to that screw. I imagine that when you buy them the mounting kit includes a longer screw that enables you to attach them. I removed the crash bars and saw that with separator washers the screw had enough thread in it to stay in place effectively, so I thought I would have no problems installing the Hepco & Becker bars, which attach to different mounting points. However, they partially cover the recess on the chassis where this screw is located, and because the longer screw I had in my bike protruded out of the chassis, it was impossible to fit them.

So, a week later and having purchased the original screw from a Suzuki dealer I was able to fit the bars without any problems. They offer far greater protection than the original ones, are thicker and look cooler.
The problem came, however, when I had to install the skid plate. Adventure MotoStuff had supplied it with a mounting kit for the Hepco & Becker crash bars, but from what I could gather from the pictures, Hepco & Becker had discontinued the bars for the pre-2012 V-Strom and developed new ones for the new model. Since both bikes have the same chassis the bars will also fit the older ones, and these are the bars that I had bought. However, AdventureMotoStuff had sent me the kit for the older model, which has a lower crossbar, so the mounting brackets were about 100 mm too low.
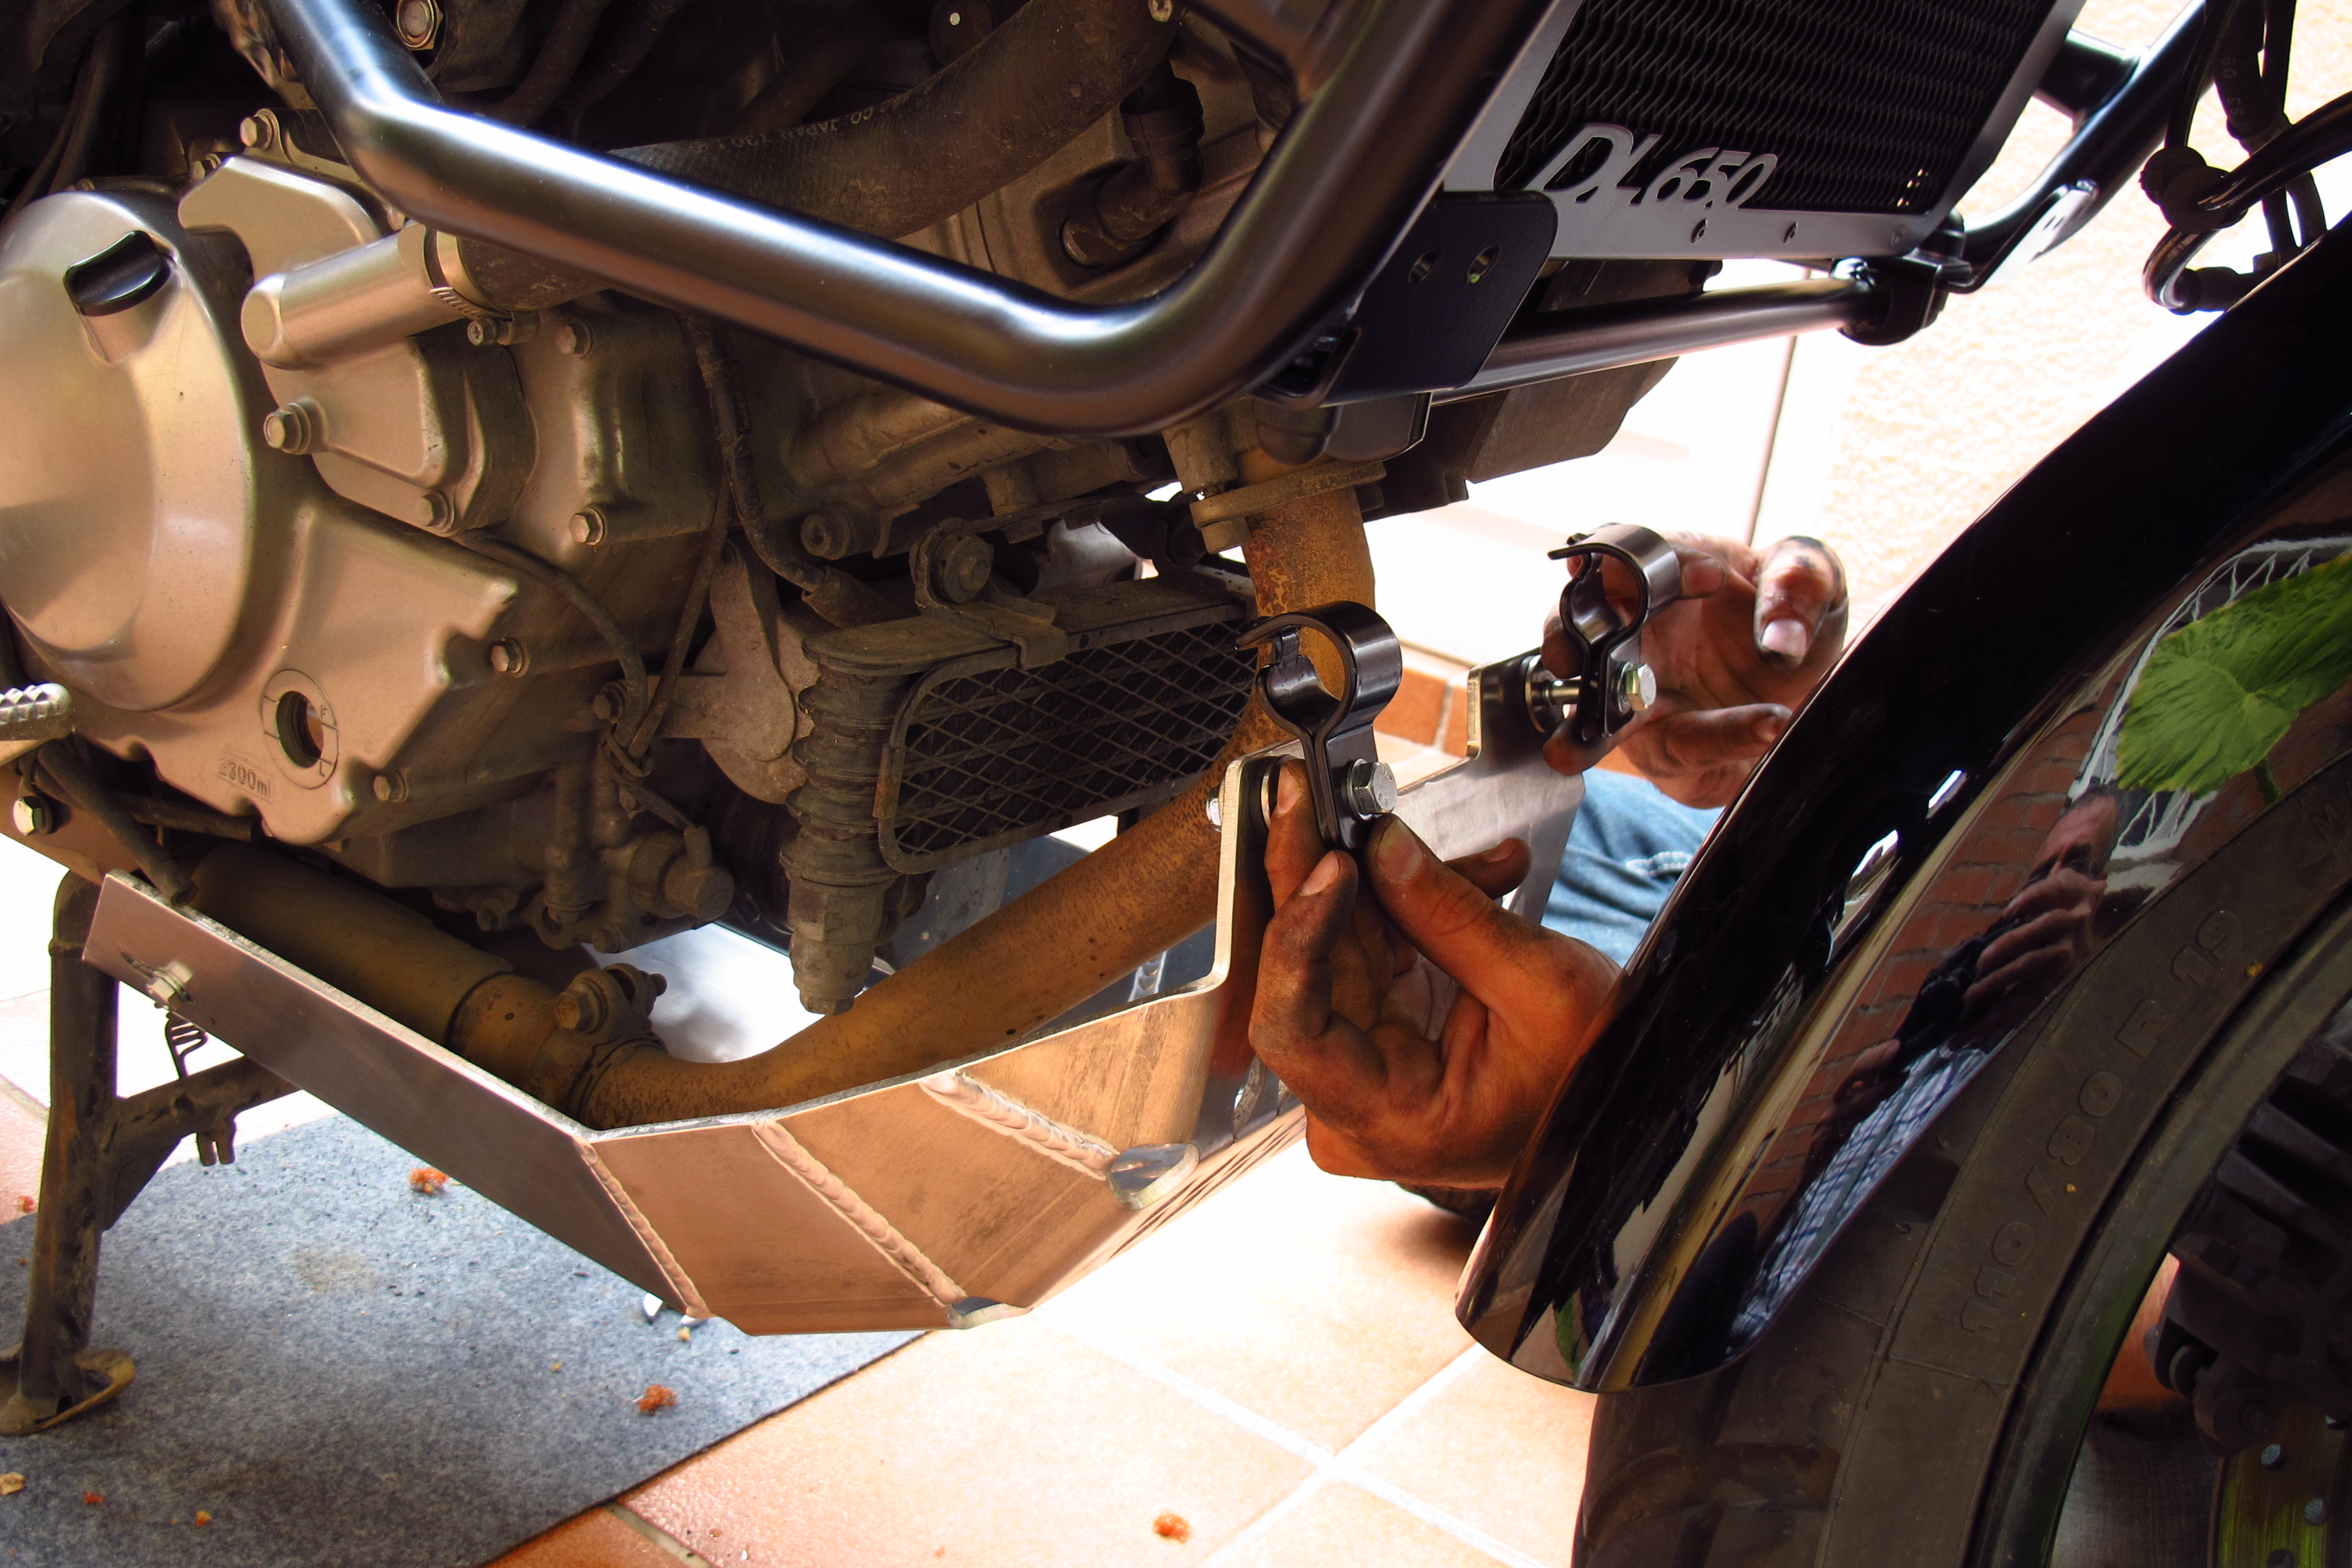
Now, on a previous post I made positive comments about this company’s customer service, when I was trying to decided which combination of crash bars and skid plate to use I wrote to them and they replied promptly with clear and useful information. I am afraid that I will have to withdraw those comments now… I sent them an email explaining the problem I had and including some pictures for reference, inquiring whether they manufactured mounting brackets for the new bars or not. That was two weeks ago. I am still awaiting their reply.
Seeing I was not going to get any help from them, I bought an aluminium bar and built my own extension to fit the skid plate. Here’s the result:
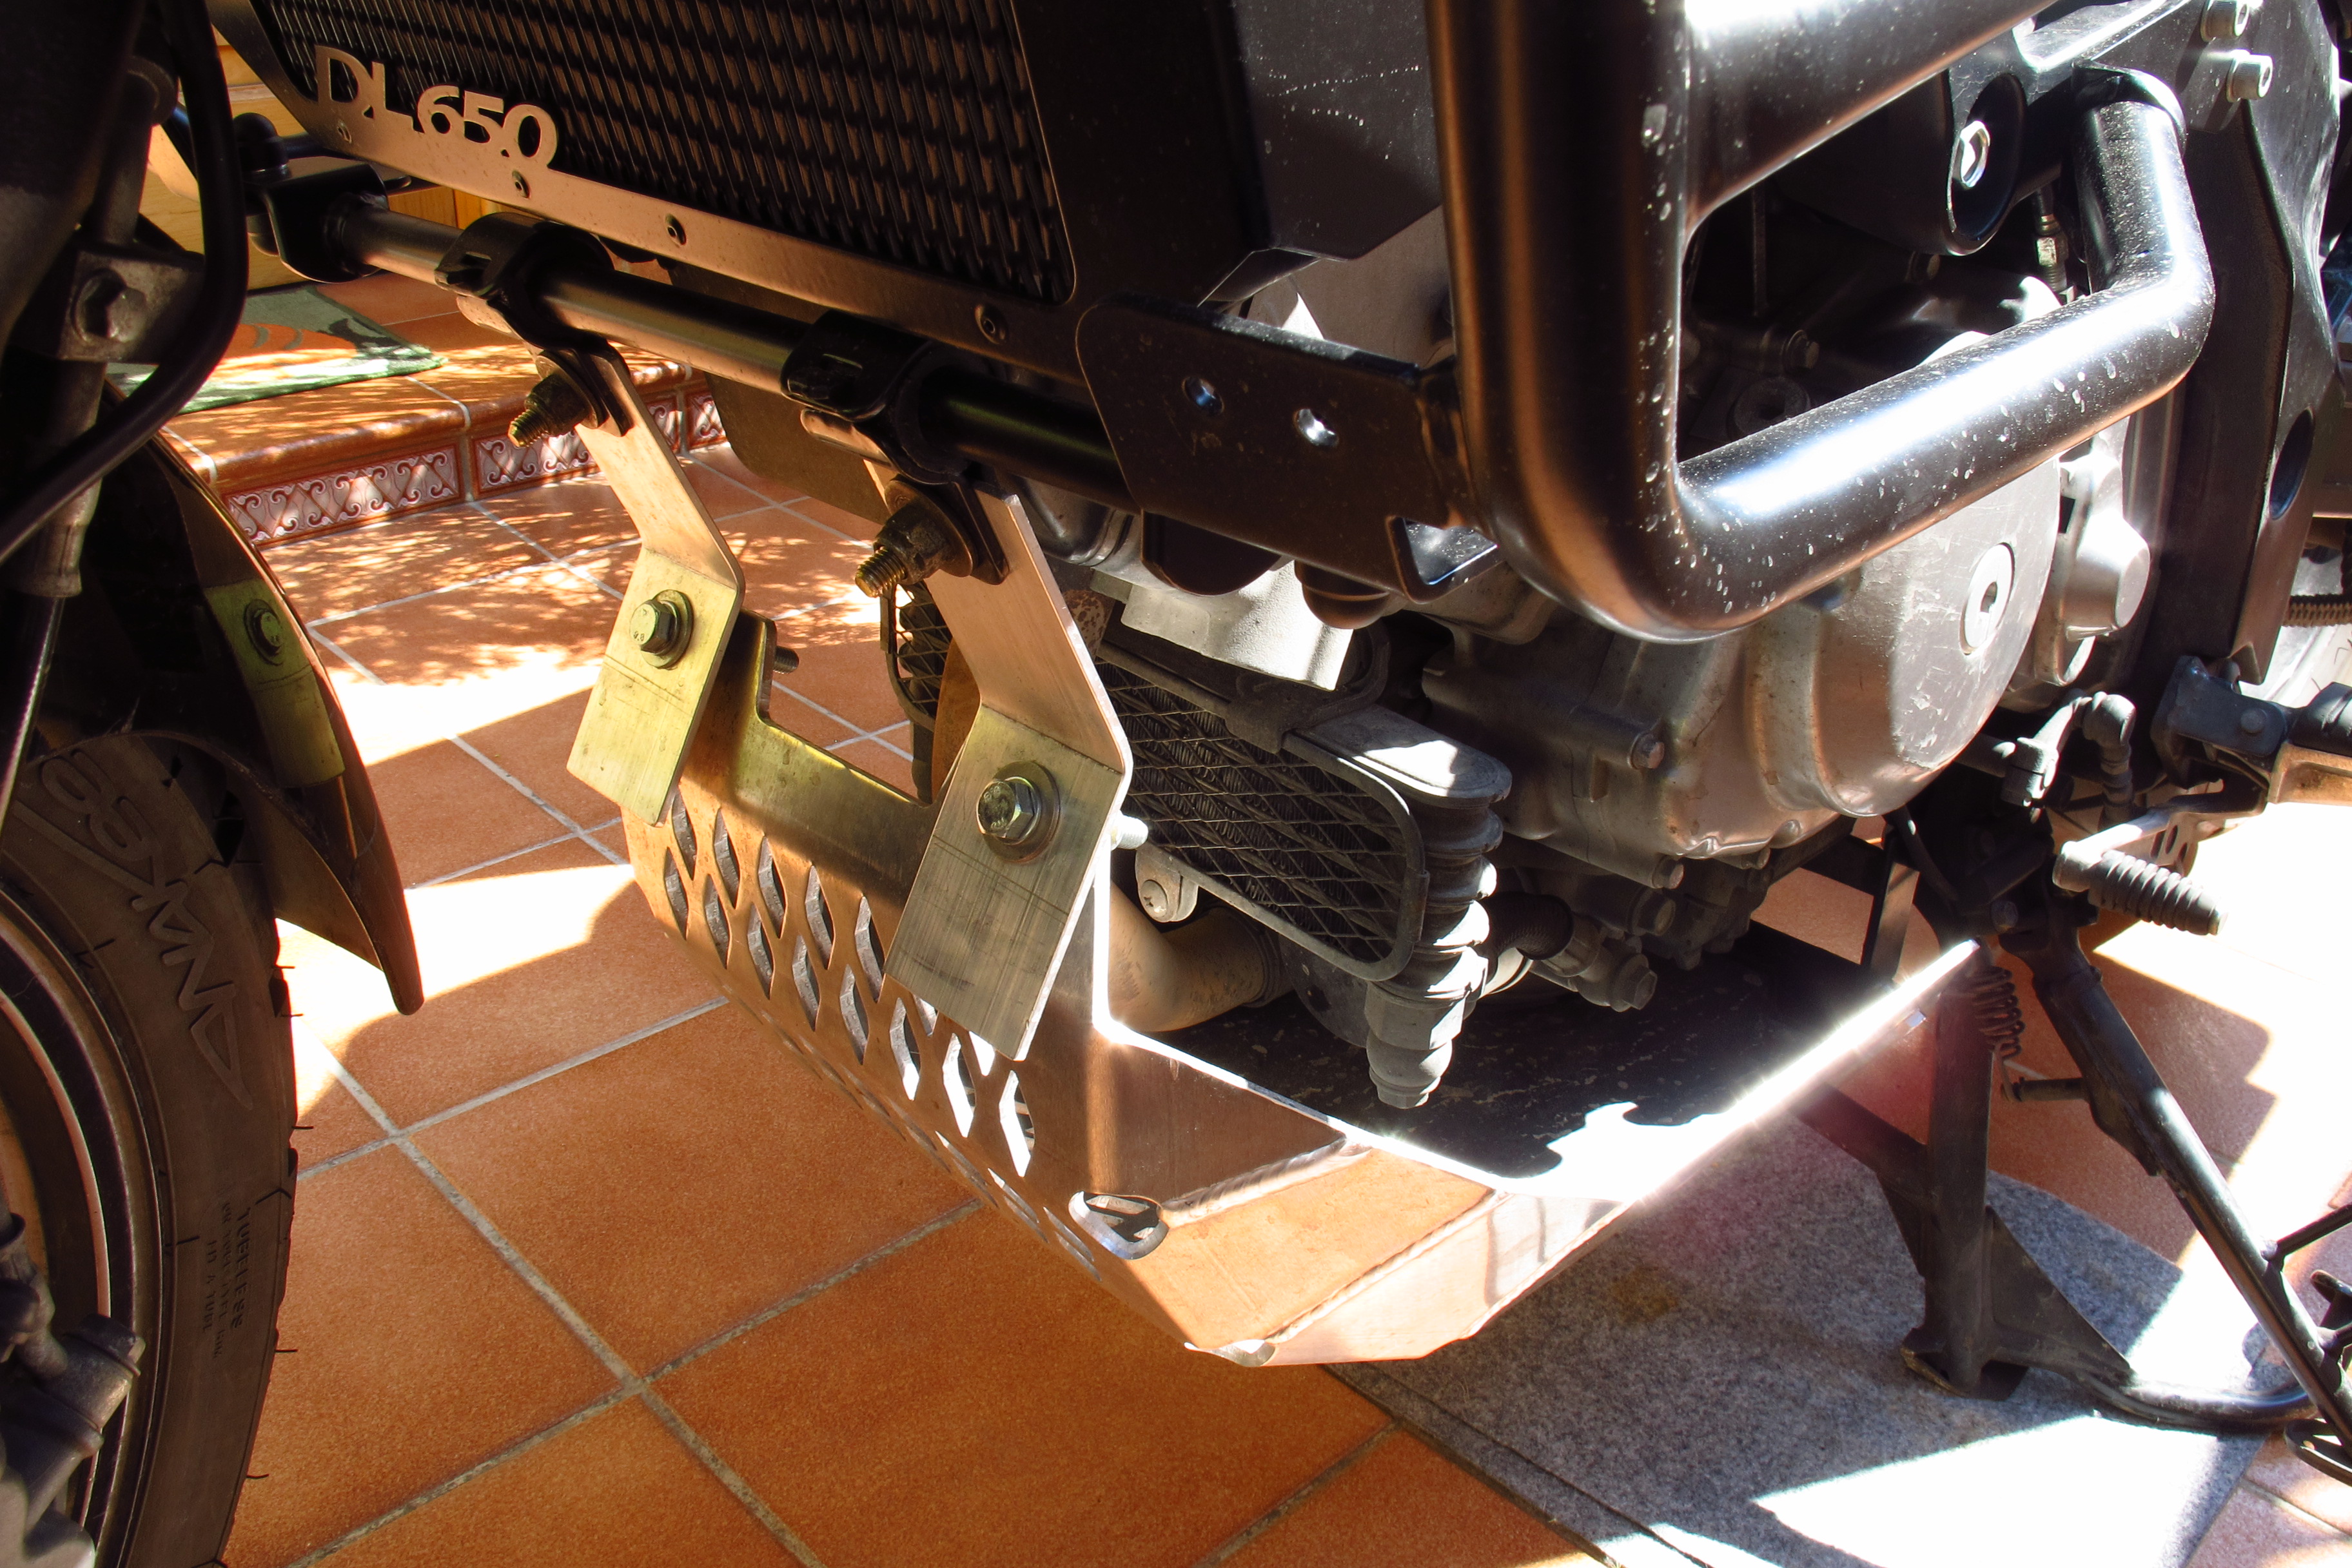
It is a lot more solid than it looks or than I expected it to be, so I am quite optimistic that it will work without problems during the trip.
Finally, I fit the headlight guard. The V-Strom has enormous headlights and they are very exposed to small stones flying from the road or even small falls, so I decided this was a must. However, with such big headlights the mesh I had to fit was enormous, unlike the more discreet protectors for, say, a GS. Even so, once fitted it looks better than I expected.

How to carry two tires all the way to Volgograd and other stories
Tires are an important piece of kit for trips like this, and in my case the subject of much thought – not so much about which tires to use, but whether I should take a set with me or not.
I had decided that I would ride Europe in the tires I already have – a set of Michelin Anakee 2, they have plenty of thread left and lots of people have got very high mileages out of them – and then swap them for a set of Heidenau K60s in Volgograd before starting the roughest part of the trip.
Most people say that it is hard to find the sizes I need for my bike in Russia, let alone Kazakhstan or Mongolia, so I could find a workshop when the moment came to change them and wait for them to order and have a set delivered, I could buy a set myself and send them ahead of me for them to be ready when I got to Volgograd or I could carry them with me from the start.
Waiting for tires to be delivered was not an option, since I do not want to spend any longer than necessary unless there is a problem, and forwarding them required having a contact in Volgograd to pick them up and store them, and they might be made to pay import taxes upon delivery. I imagine I could have arranged that through the HUBB, but it was too much hassle and I liked the idea of having a couple of spares with me if a puncture can not be easily fixed with a repair kit. I could always limp to or arrange to have the bike transported to the nearest workshop and have the tire changed.
So having made the decision to take the tires with me, I spent the weekend studying different ways to secure them to the bike.
I carry my camping/cooking equipment on one pannier; the tools, repair kit, spares, maintenance kit on the other; the paperwork, important items, laptop, camera, etc. on the tank bag and the clothes, first aid kit and sewing kit on a waterproof rack bag.
I quickly discarded the option of hanging the tires on the back of the bike – it pushed the CoG too far back and there are already a jerrycan and oil and grease bottles back there, not to mention that they would partially cover the rear light or the exhaust or the license plate depending on the position.
I have not fitted any tank saddlebags and I had seen pictures of a guy who had slung his tires over the tank and had them hanging on both sides of the bike. I tried that, but they are too big and when strapped tight they interfered with either my legs or the front wheel.
So they would have to share the rack and passenger seat space with my rack bag.
I tried different positions – the bag first and the two tires vertically behind it, the other way round, one tire standing behind me and another at the back, with the bag in between, one tire standing, the other flat and the bag on it, even have the tires standing on the panniers and the bag fitted through them… All positions looked awkward and had several disadvantages – water would accumulate on the inside of the tires, they stood too tall, I would have to remove them every time I wanted to take something from the bag or the bag itself (and that’s every single day)…
I did not want to have to remove them until the moment came to use them, the idea was to strap them securely and then lock them to the rack with a cable and a padlock the make them harder to steal. In the end then, the best position was to lay them flat and put the bag on top of them.
There were two thing I did not like about this option – the whole thing was rather tall (it almost reaches to my shoulders) and there was a big unused space inside the tires. However, after some thinking I found a good compromise.
I was going to carry my provisions inside the rack bag (I got it big because I did not want to carry too many smaller ones), but if I used the space in the tires to carry them the bag would be emptier. Not only that, but the stuff inside would be easily compressible (mostly clothes) so it would flatten more against the tires and enable me to roll the top of the bag more times, thus making it more waterproof. It was decided.
Lying flat on the seat and the rack, the tires took quite a lot of space, and if I sat comfortably without them touching my back, the were a couple of cm too far back, so they did not rest on the rack, which meant I had to do something to support them there. I had removed the top case but I had not fitted a base to the rack, there was only the original one, and I did not want to pay through the nose for a rack extension just to have one end of the tires rest on it, so I decided to make my own tire rack.
I got a couple of L section steel rails – aluminum was lighter, but it was too flexible, and the steel rails are very strong for what they weigh – and started to work on them to make them fit the mounting points on the bike rack.
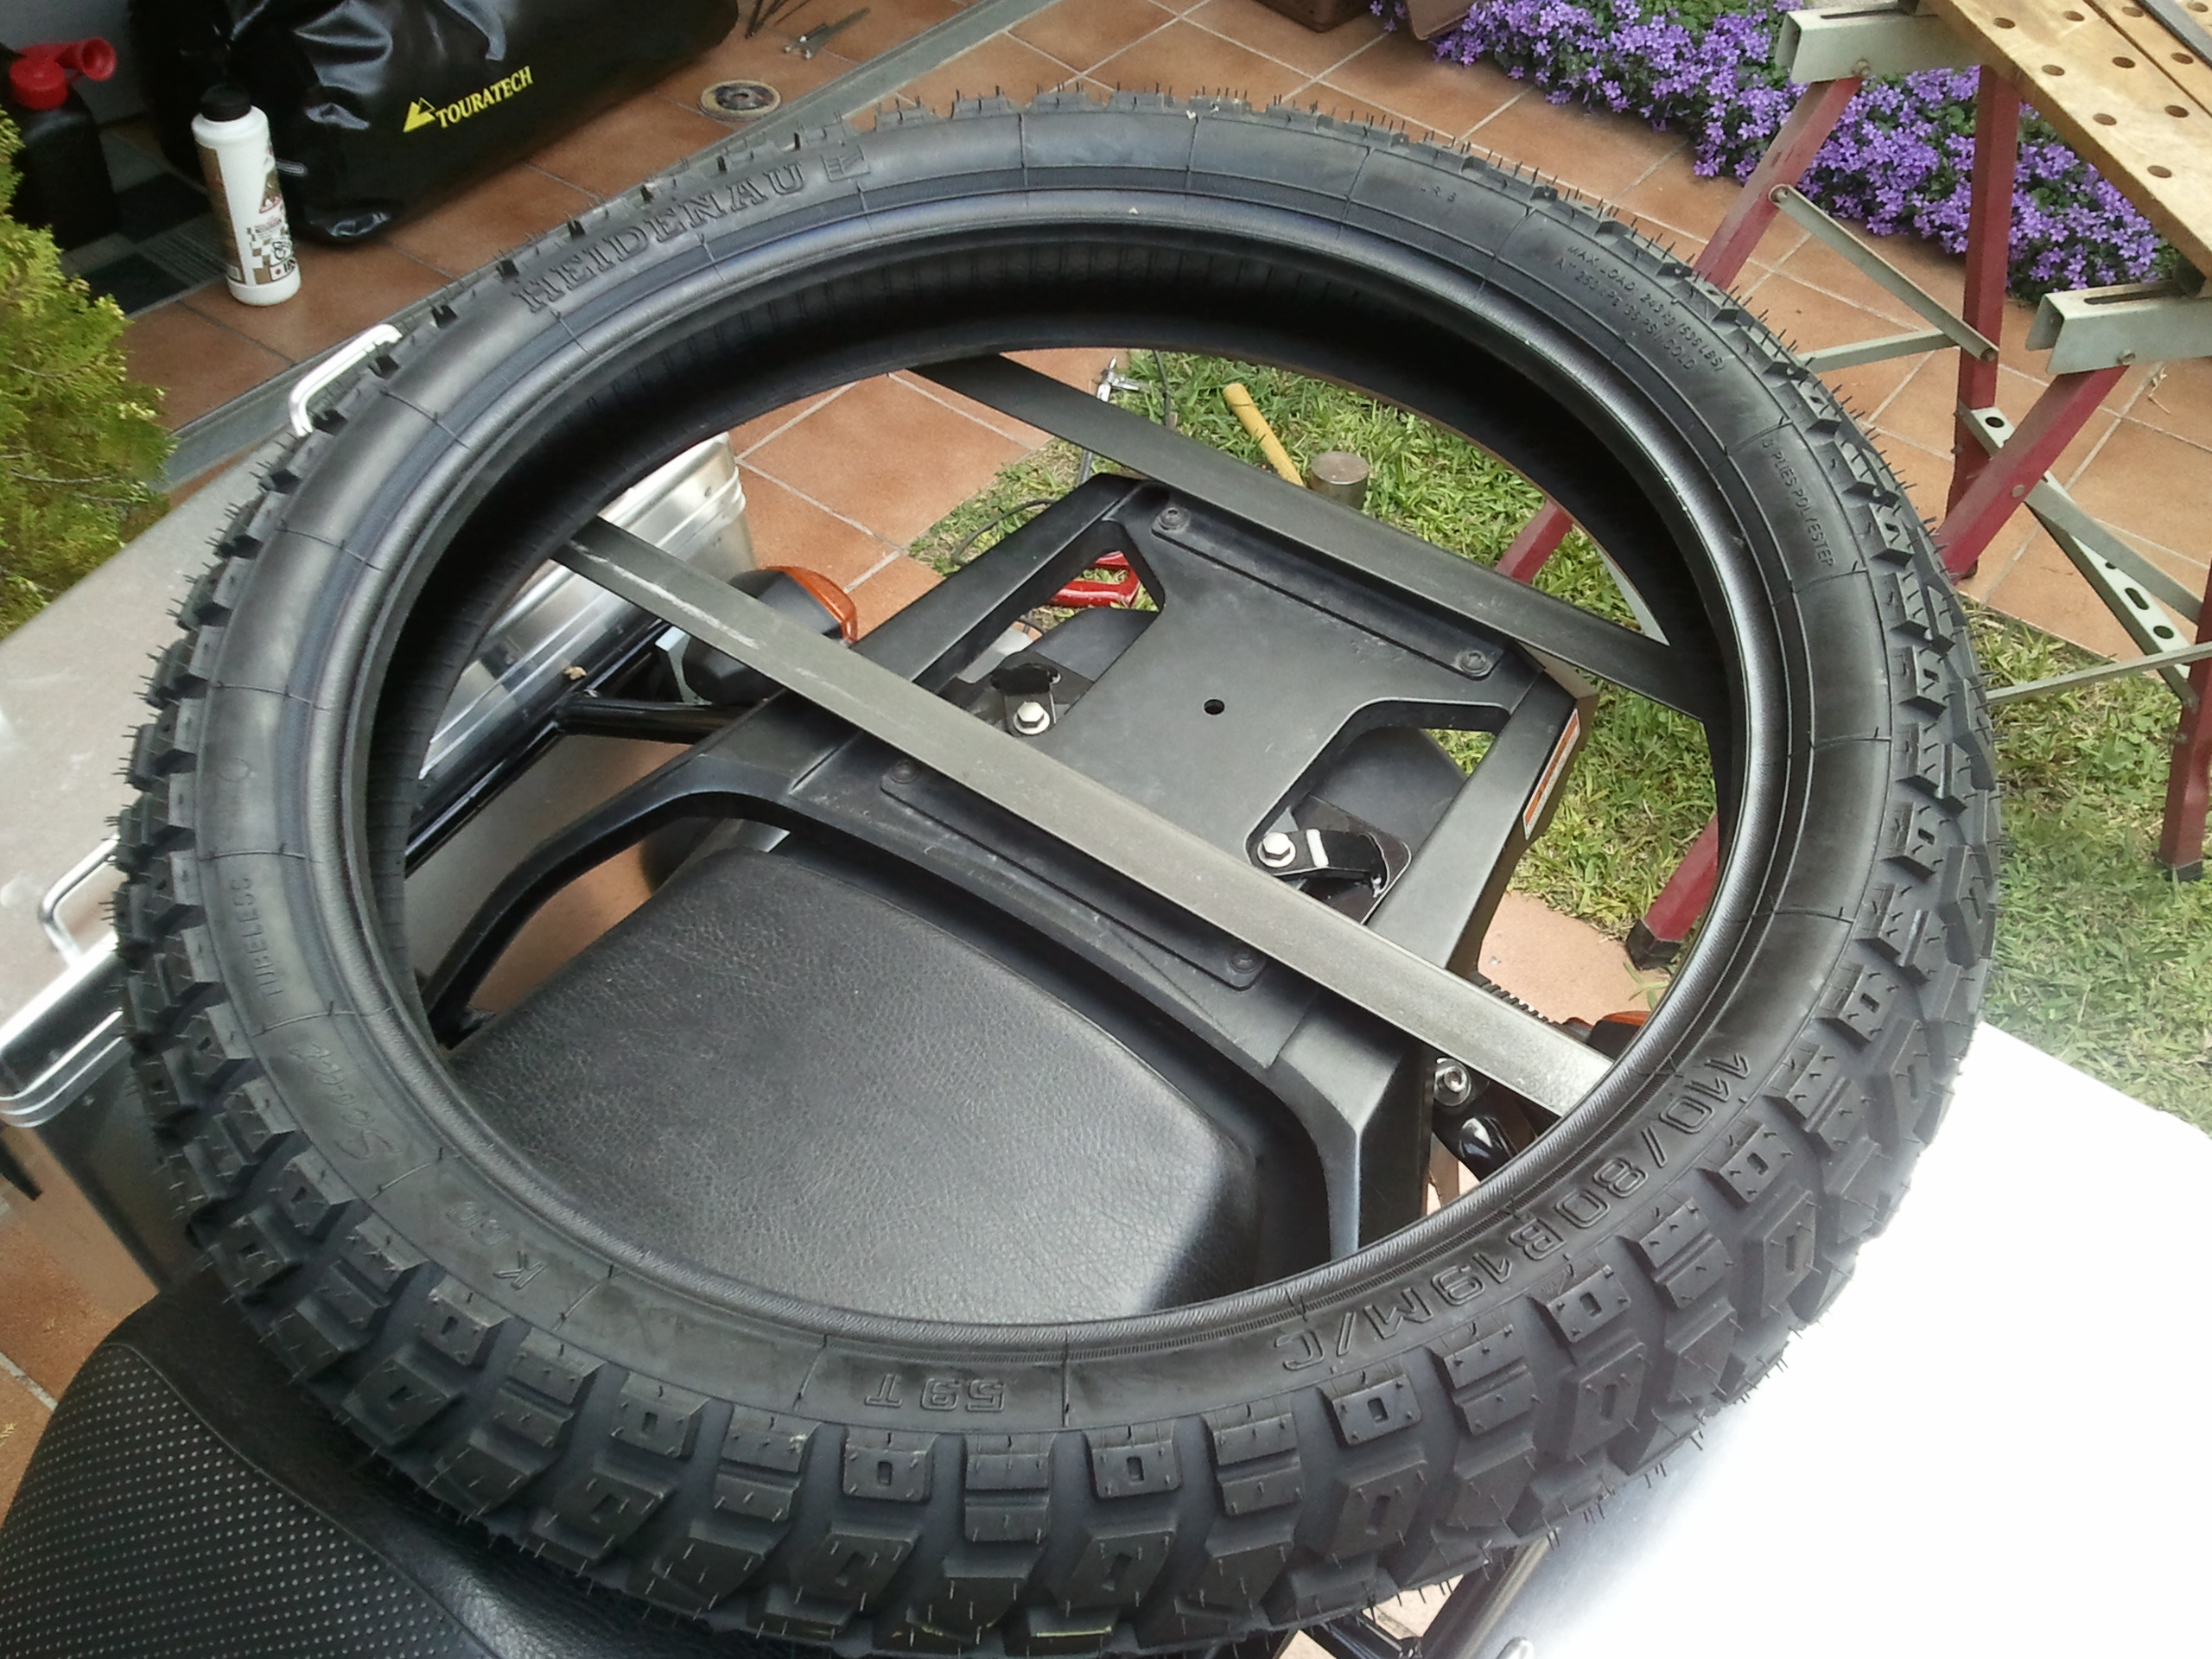
I have to say that I had the privilege of having my father’s assistance and advice on this, a natural-born engineer (and one of the best I know, at that) so for the price of a couple of bits of metal and a few hours of work in great company I got a perfect custom-made tire rack. Suck that up, Touratech.


We cut them to the appropriate length, filed off the edges, shaped the lower side to make it fit flush with the bike rack without losing any structural rigidity and drilled the mounting points and while we were at it, a whole at each end that makes a handy attachment point.


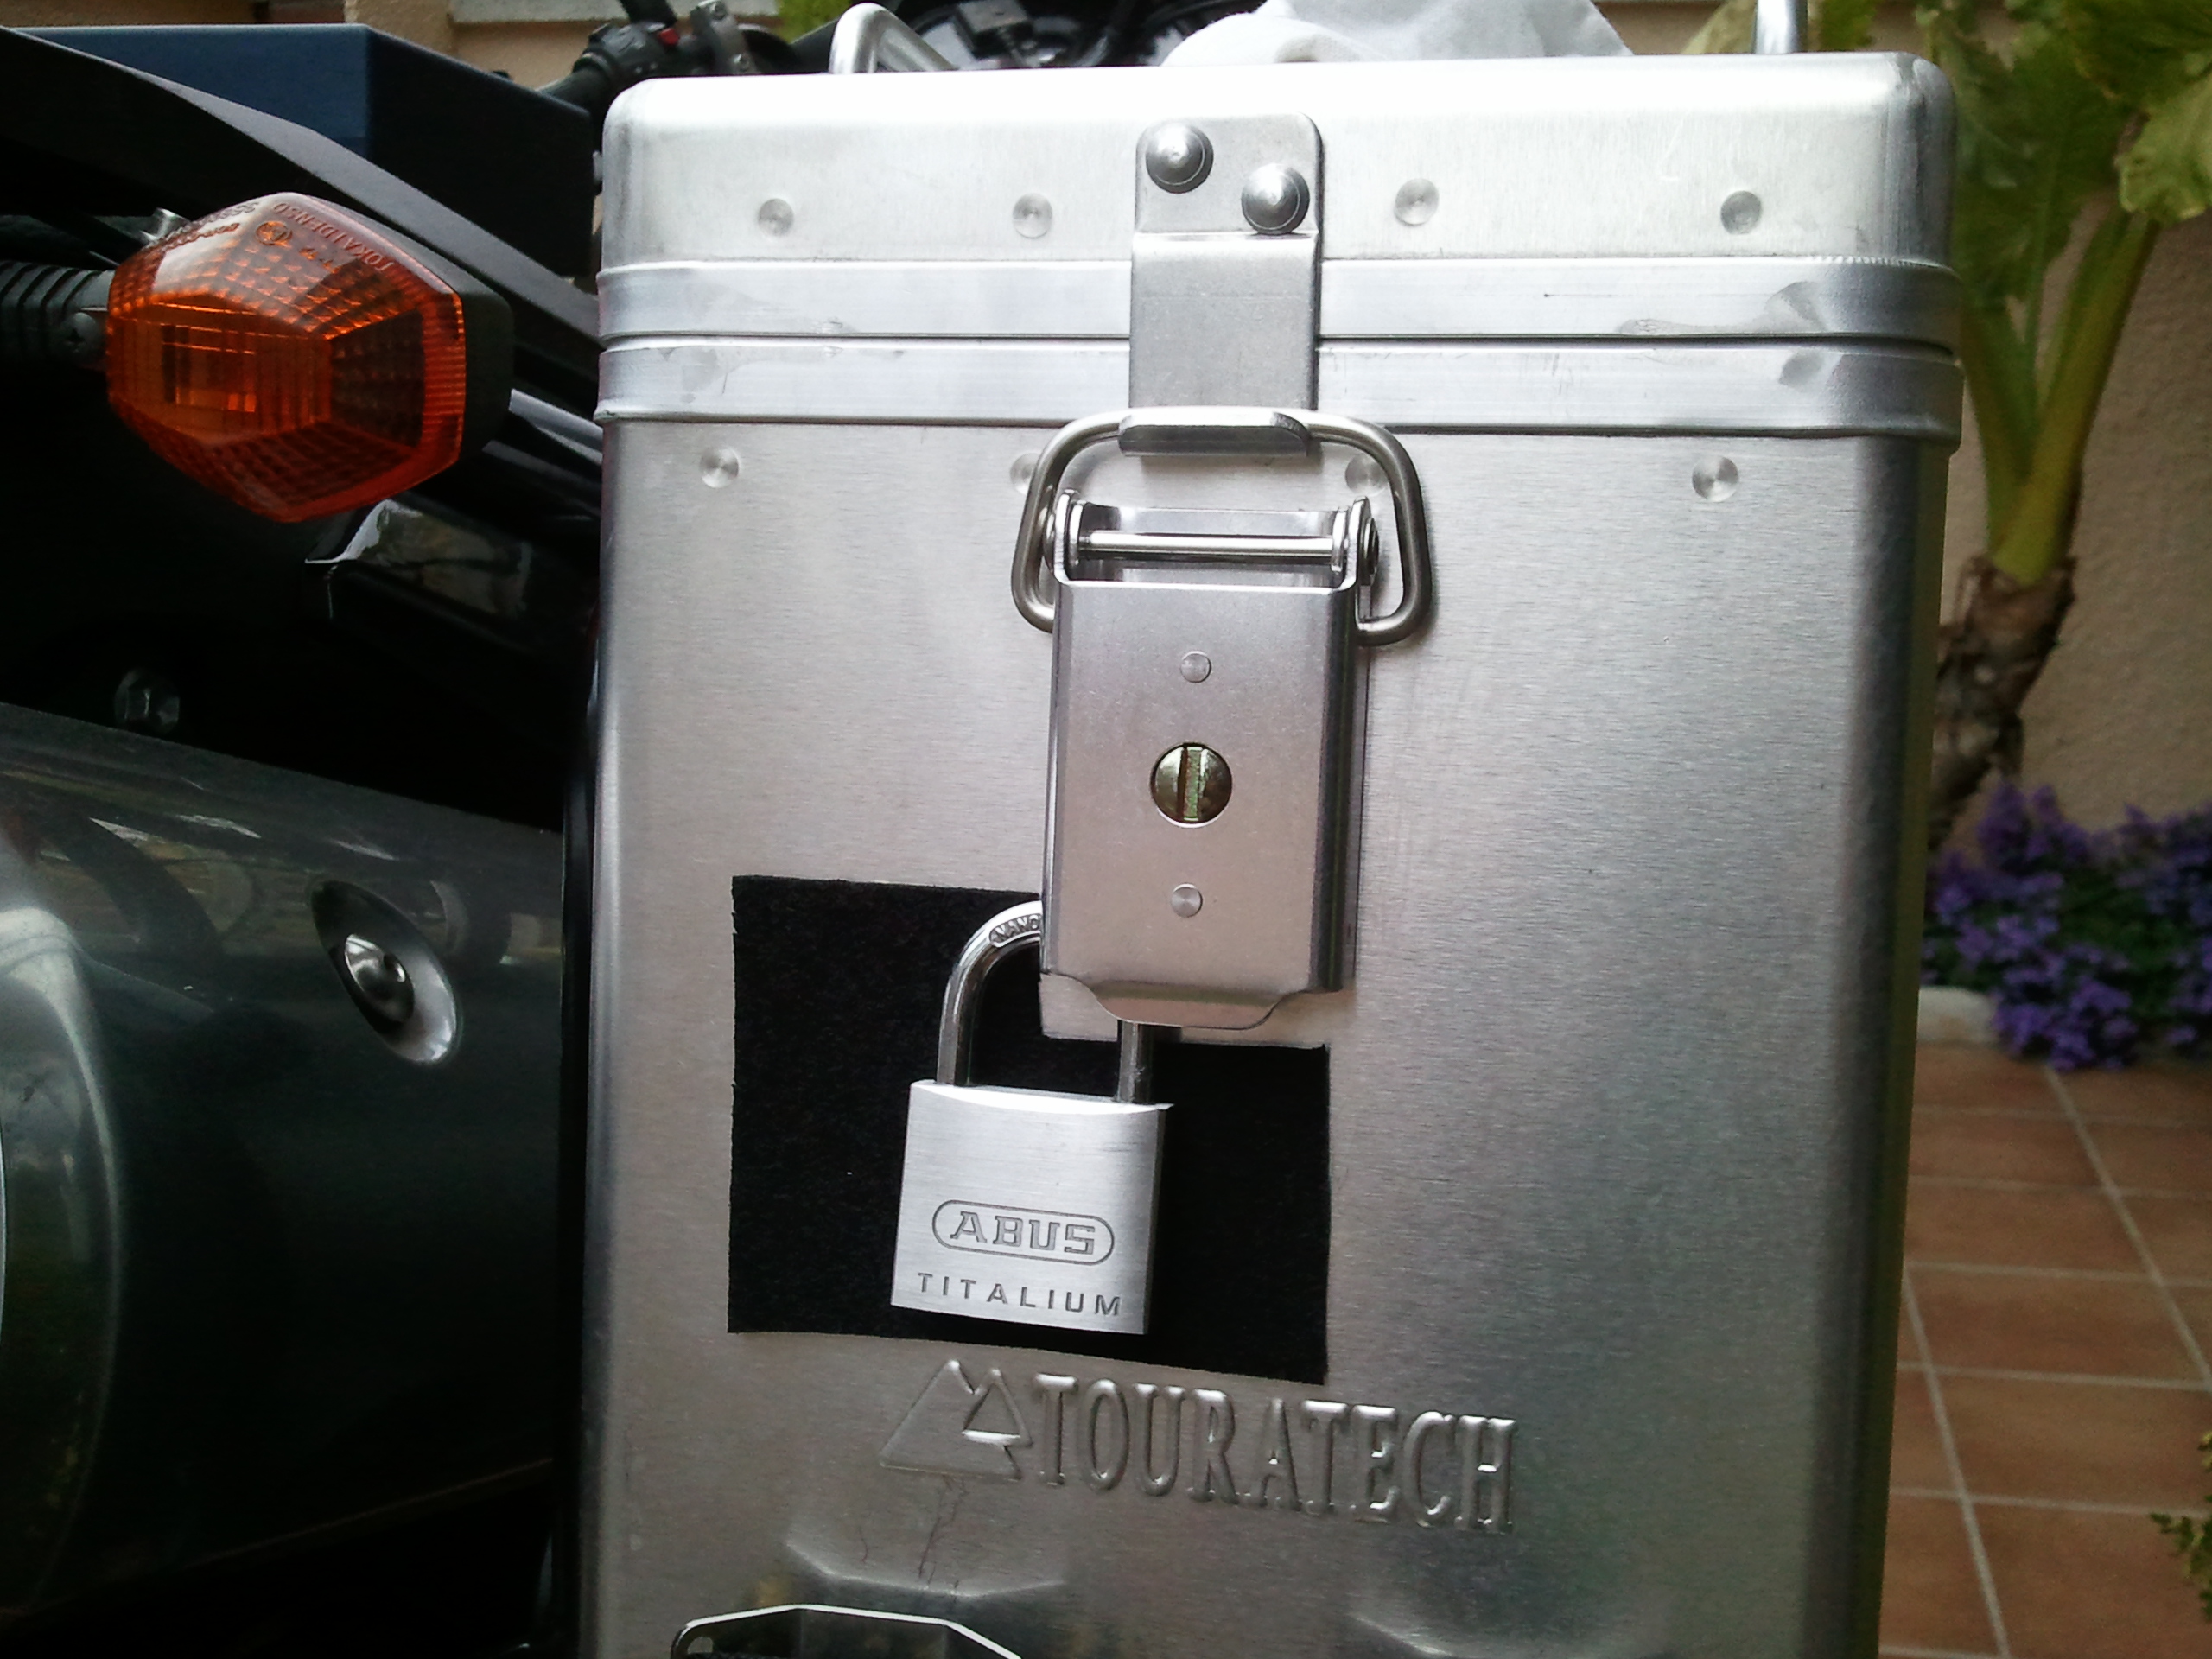
Apart from that, I also spent some time improving/customizing the Touratech panniers. I had got four padlocks to lock them and they are great – light and they are all opened with the same key, but in only two days riding around they had started to scratch the aluminum, and they rattle as hell between 5 and 6k rpm, which is the usual working range of the bike…


So I got some adhesive foam and cut four protectors to stick under them. I also got some reflective tape to put at the back of the panniers, I want to make myself well visible, especially in those parts of the world where drivers are not as used to the presence of motorbikes as in Barcelona.

Finally, I got some cheap bicycle bottles and bottle holders and fitted them to the front of the panniers. I hope the air stream will keep them cool and they will make a nice extra supply of water for the harder parts of the trip.
Kazakh visa latest news
Today my sister has finally managed to hand in my application forms to the Kazakh consulate in Madrid. After having been told that it was closed because it was a Kazakh national holiday, then a holiday in the city of Madrid (one of the maaaany they seem to have), then that they are not open on Wednesdays, she finally found it open today.
She said that the guy there was surprised someone would want to go to his country as a tourist, and even more surprised that I was then moving on to Russia.
It seems that the visa will be ready next Thursday, let’s hope it all works out in time for a friend of mine who is coming to Barcelona this Friday to bring it to me.
Facebook page
Good morning!
Here I am, after a long weekend on the bike, testing all the equipment, sipping some instant coffee with milk and sugar that I bought for the trip. Not the best coffee in the world, but hey, it is hot coffee and I shall be grateful for it in some cold mornings.
Anyway, I will talk about the weekend on a longer post that I hope to write between today and tomorrow. This post was to announce that, following a suggestion from a fellow rider at the V-strom owners forum, I have set up a Facebook page for the project. The contents of the page will be the same as here, it will contain links to all the posts in this blog. It will make it easier for people to follow and share and the main difference is that in there I have uploaded practically all of the pictures I have taken so far, instead of just the highlights I have been posting here, so if anyone is interested in those (mostly technical so far), there thay are.
Here is the link:
https://www.facebook.com/Stromingtheworld?ref=hl
It was eight o’clock on Saturday morning, it was pouring with rain and my plan to leave early and spend the day riding was already delayed because I had forgotten the bike’s documents at my parent’s home. Oh, and I did not have a driving license…
I live in a flat in the very center of the city and my motorbike sleeps in the street – that is one of the reasons I bought a second hand one and not a brand new top of the range GS – so the logistics of the trip are not easy. I cannot work on the bike there nor, for that matter, walk up and down the stairs of my apartment with all the equipment I need and strap it to the bike one or two things at a time – it might get stolen while I go back up to get the rest. So when I need to service it or install things, as I have been doing these past few months, I use my parent’s place. They live in a nice big house 30 minutes away from my place and have a front yard I can roll the bike into and work in it, so on Friday morning I attached the panniers (which can be locked) at home and then took the tank bag and rack bag down the street and off I went. At my parent’s I removed the top case, which I am not taking on the trip, installed the tire rack I had made the week before, strapped the tires in place, put the bike cover and the food bag inside the tires, strapped the rack bag on top of the tires and attached the jerrycan, chain cleaner, oil and water bottles to the panniers.
I ran into the first obstacle right outside my parent’s gate. A new school is being built right across the street, and construction work is almost done, so the enormous crane they were using had to be dismantled, and can guess which day they had picked to do so? That’s right. Friday. When I arrived there was this rather big telescopic crane truck parked in front of the gate, but as they had not started work yet, I was able to ride onto the sidewalk and into the yard. Now, however, they seemed to have finished lunch and got down to it, and the crane had rotated to start lowering the sections of the other crane and its huge counterweights were barely half a meter from the gate. I started work in half an hour, so I had to find a way out of there or I risked a bunch of unhappy students, and they’re not kids but workers from a pharmaceutical company. Fortunately, the counterweights were quite high and there was just enough space under them for me to back the bike out, turn and ride on the sidewalk between the truck and the houses while they were moving.
The reason I was going to work with a fully loaded bike was, again, logistics. I work on the outskirts and finish at 10 pm, and on top of that I was spending the night at my girlfriend’s, who also lives away from Barcelona, and hitting the road early on Saturday morning. As I did not want to have to get up at 5 am or set off rather late, this meant taking everything with me on Friday. Well, that would be the first test – leaving the bike out in front of my work and see if anything got stolen.
Fortunately, nothing did, not at work and not during the night, and at eight o’clock on Saturday morning I was ready to leave despite the rain… when it dawned on me that the bike’s documents were in the top case in my parent’s garage. Damn.
An hour later I was on the motorway, happily leaving the city behind. I had the documents and the rain had stopped, it even looked as if the sun might come out. I had not solved the driving license issue, mind you, but that was something I already knew – I had had the bike for two years, ever since I got my license, but as it was my first license, it was an A2 type, meaning I could only ride bikes up to a certain power. Mine was limited and I wanted to have it derestricted for the trip this summer, so I had taken the course a week before. At the end of the course they took my license and was told I would have the new one in a week… but I didn’t. It looked as if I was going to have to take the risk and go away for the weekend without one.
I wanted to test the camping and cooking gear, and the GPS, into which I had programmed the route using BaseCamp, but most importantly, I wanted to see how far I could ride on bad roads before I got tired and whether I would be rested enough to ride back the following day, so I soon left the motorway and headed for smaller roads; just past Igualada I took a smaller road heading for Santa Coloma de Queralt and Poblet. I knew this bit of road, and I knew which way I wanted to go – there are a lot of backroads – so I had programmed several waypoints into the GPS. I was surprised then to find that it did not seem to know exactly where it was going… I have never really liked these devices, and have never owned one until now. I considered I needed one to make the best use of the excellent waypoints Walter Colebatch from HUBB has complied for Northern Asia, but I have always preferred to rely on a good old paper map. I had to stop several times to correct it, selecting the next waypoint manually instead of letting if follow the whole route. I changed some settings and preferences and eventually got it to work. I admit that it was probably my lack of experience with the device that was to blame, but I did not find it intuitive to use at all. On one of the stops I made I put the thermal lining back on the jacket as it was quite cold even if it was not raining. I had stuffed it under the lid of the left side pannier, together with a the pants lining and pair of winter gloves for easy access. They will stay there for the trip.
Past Poblet the road began to climb and wind its way to Prades and I was starting to have fun. The bike handled really well despite all the extra bulk, and it did not feel underpowered on the way up. I rode south-east along the Serra delMontsant, enjoying the wonderful views and the empty roads, and on the way down to Falset I spotted a big extension of empty clear land to the left of the road. Thinking it would be a good place to start practising my off-road riding skills, I pulled by and rode into it. The ground was a combination of gravel from the road construction, mud and some small bushes. I rode into it and the front of the bike slid a bit, but unlike the last time I had tried to ride on conditions like this, I relaxed me arm and let it do its thing, opening the throttle slightly to keep it straight. Even fully loaded and on road tires, it behaved well, inspiring confidence. Obviously, I was not going to charge down dirt tracks at 100 km/h as if I was taking part in the Dakar rally, but I felt confident I could travel on dirt roads for longer distances, the plan was to take the trip easy, anyway.

By midday I rode out onto a main A-road and followed the Ebro river up to Flix and Ascó. The weather had held and by now it was even a bit sunny, so I decided to stop for lunch and see if the old second hand Coleman stove I had bought on-line worked. I found a nice picnic area by the road, sat down on a wooden table, took out the food and the cooking gear and got the stove ready. I poured some fuel in it and following the instructions, I pumped it 20 times, opened the valve and put a match to the burner. Nothing. I pumped a bit more, making sure the I had previously turned the pump handle to the right position, but it still refused to light up. Then I noticed I had some fuel on my hand and quickly put out the match, images of my hand lighting up in flames flashing through my mind. It seemed that fuel was spilling out of the base of the burner assembly, where it attaches to the fuel canister. No warm meal then… I cleaned the spilt fuel, emptied the canister, put everything back on the bike and set off again in search of a place to have lunch, with my mood darkened. To make things worse, just a few kilometres down the road it started to rain. I wanted to find a roadside bar or café where I could eat and keep an eye on the bike, but there did not seem to be any nearby. After about 20 minutes riding I started to be quite hungry and my mood worsened, as it usually does when I have not eaten for a while. With the skies as dark as if it was night, I spotted a camp site by the river and pulled into it. Bingo! They had a small restaurant and sure enough, I could park the bike right in front of it. I got off and went for a meal without bothering to even remove the GPS from its cradle.
With my stomach satisfyingly full, rode away and when I was climbing the TV-7411 road past Riba-Roja the sun came out and I enjoyed the beautiful view from the hills overlooking the Ebro river. When I reached the top I saw a dirt road to the right of the road and a sign that read “Civil war fort and trenches”. This area was where one of the worst battles of that time took place – the battle of Ebro – so I decided to visit that and get some more off-road practice. The track was about 2 km long, dry and rock this time, and I was more confident. I rode faster, standing on the pegs, and soon I had got to the end. There was a small car park, although I think a regular saloon might have had some difficulty getting there, and a small marked path leading around a ridge where the trenches and the remains of the fort were.

The trenches were still easy to make out, but there was not much left of the fort, just a couple of concrete walls.
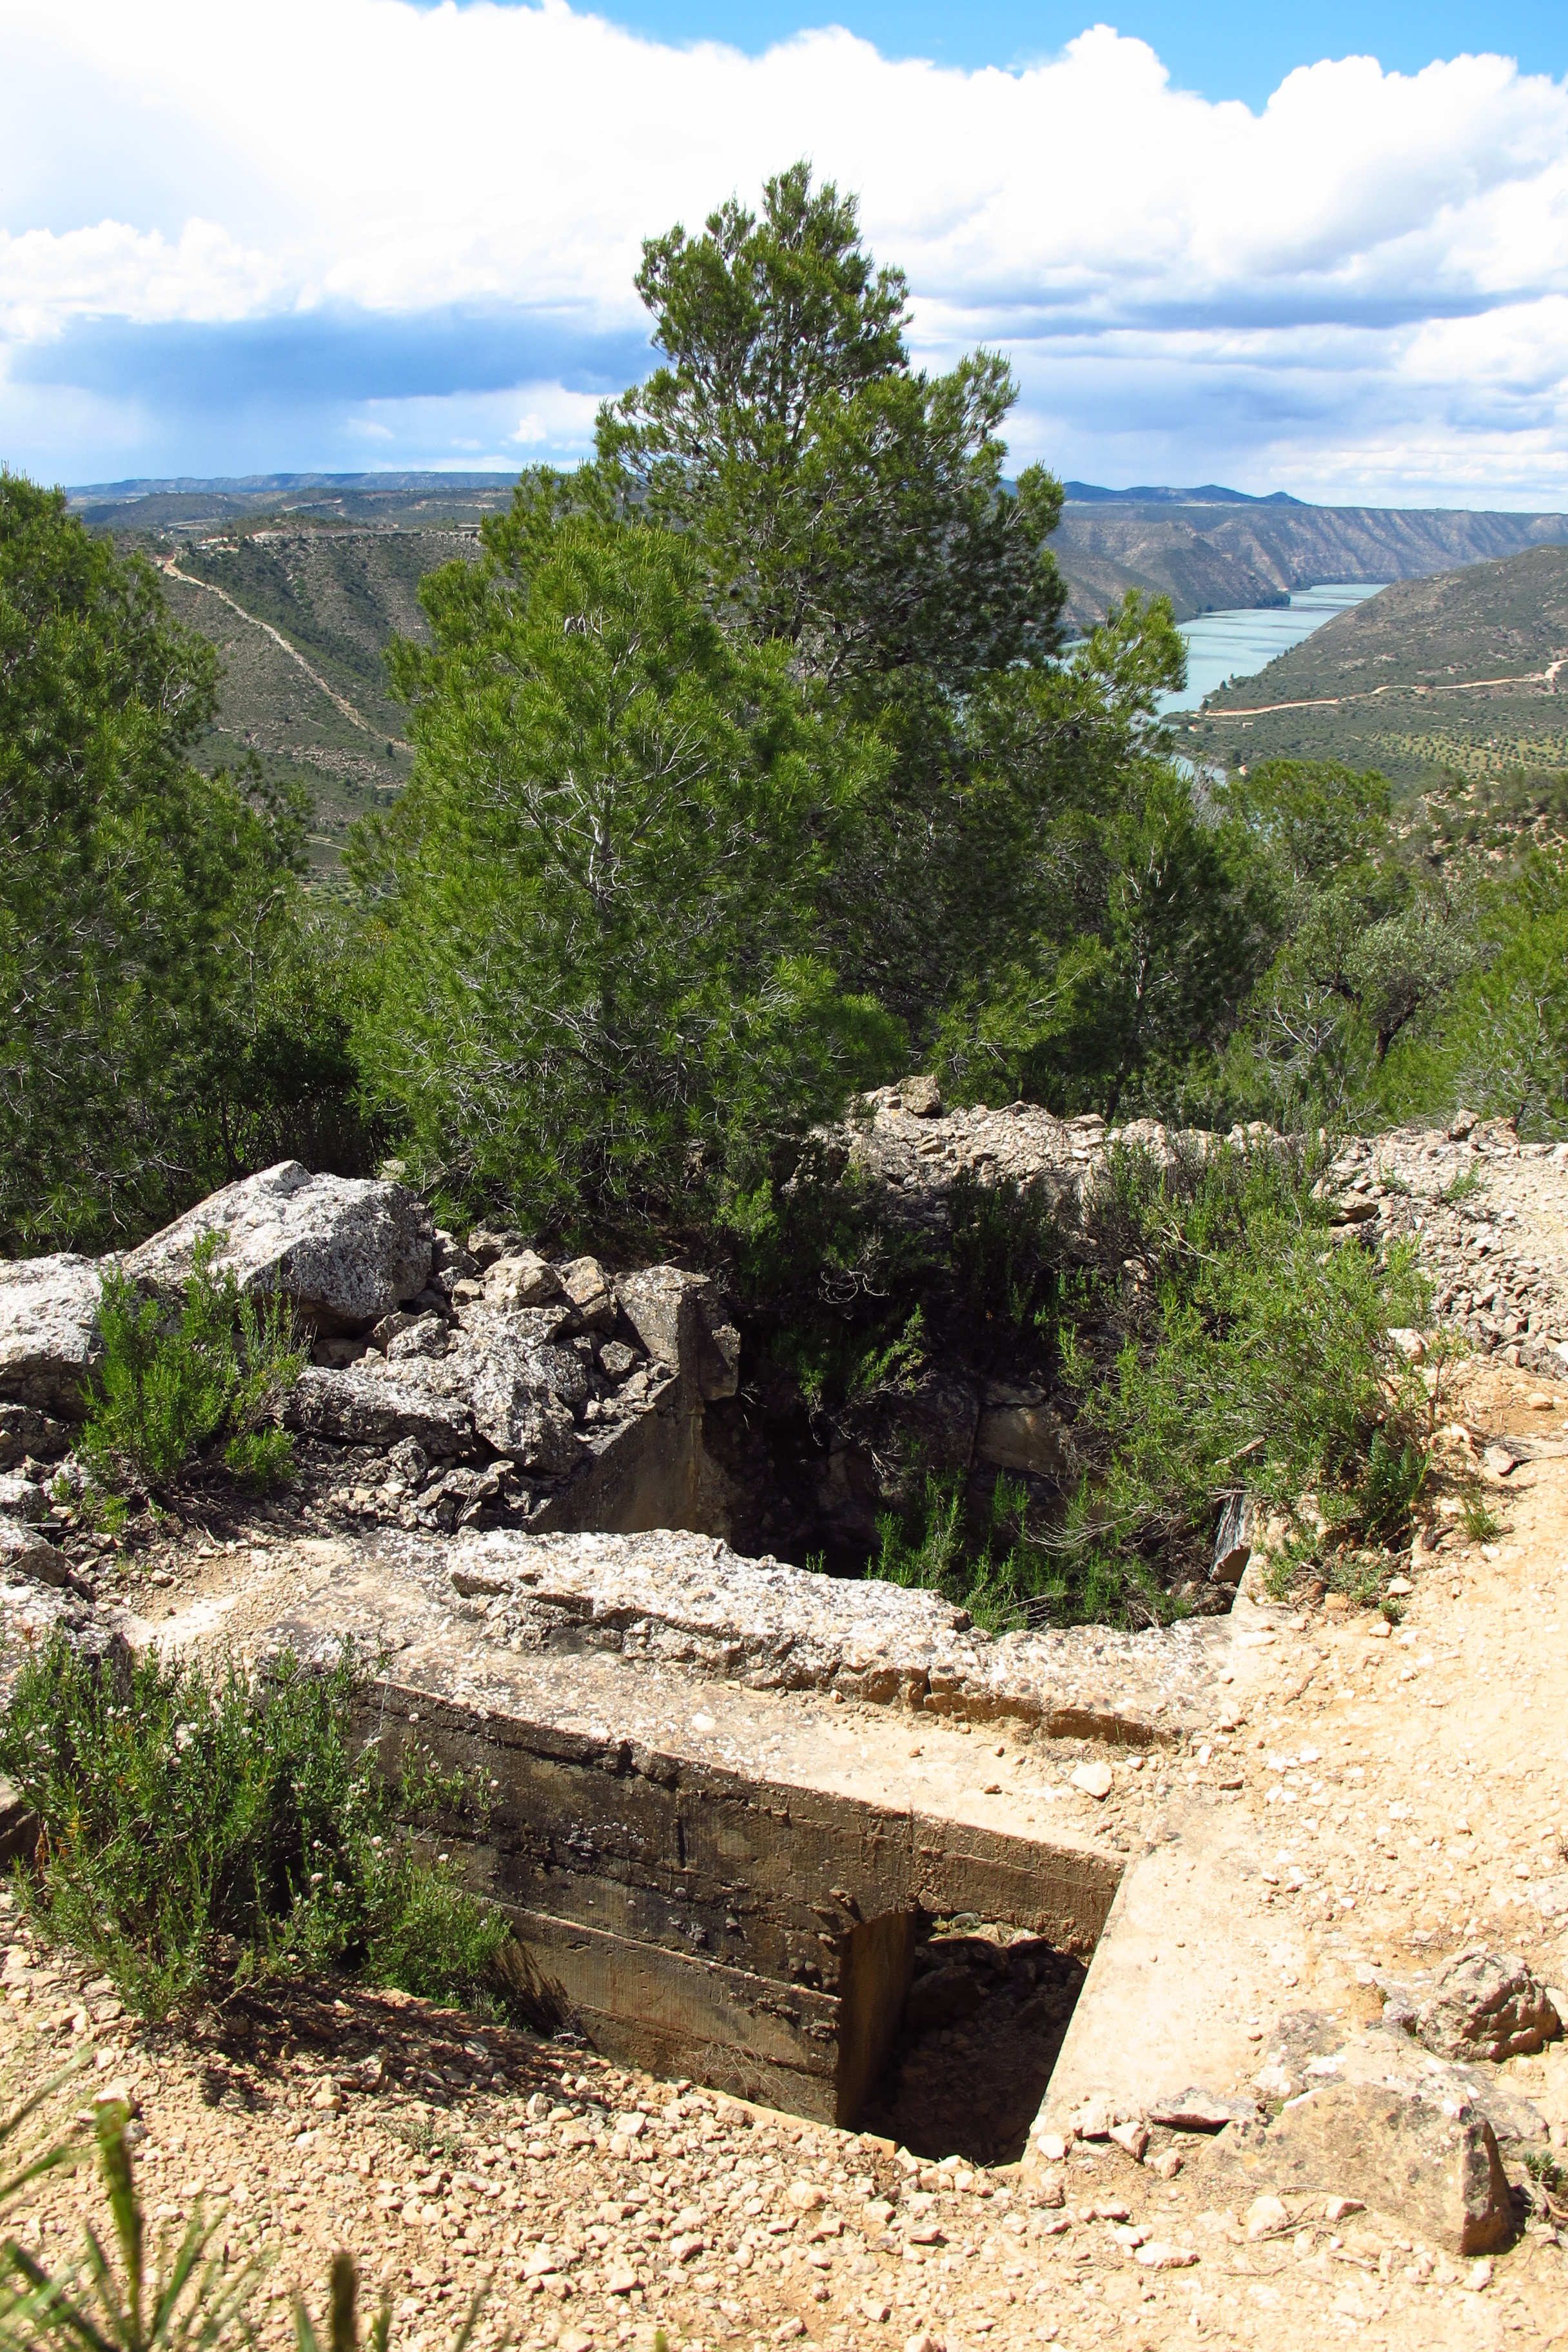
From this position, the troops must have had a great view over the surrounding area and an advantageous position in battle. I found out from the explanation displays that a whole system of trenches and forts had been secretly built in that area to stop the national troops advance, but a lack of coordination and worse, of knowledge of the existence of the system, combined with a very rapid advance from the national troops meant that they were not put to good use. One can only wonder whether things would have been different if they had.
When I got back on the bike I decided to test how it felt to ride with music on. I know this is illegal, at least in my country, but I very much doubt anyone cares in the middle of nowhere in Kazakhstan or Mongolia, and it is a good way to ward off boredom in long distances. It was a good moment to test it too, this part of the trip was taking me through some largely unpopulated areas, so the chances of being stopped by the police were minimal. I put the headphones on, turned the music up and rode the track back to the road. The moment was perfect: good music, great views… I got a bit carried away and rode the track faster than on the way there, and it was alright – both me and the bike managed it without any problems.
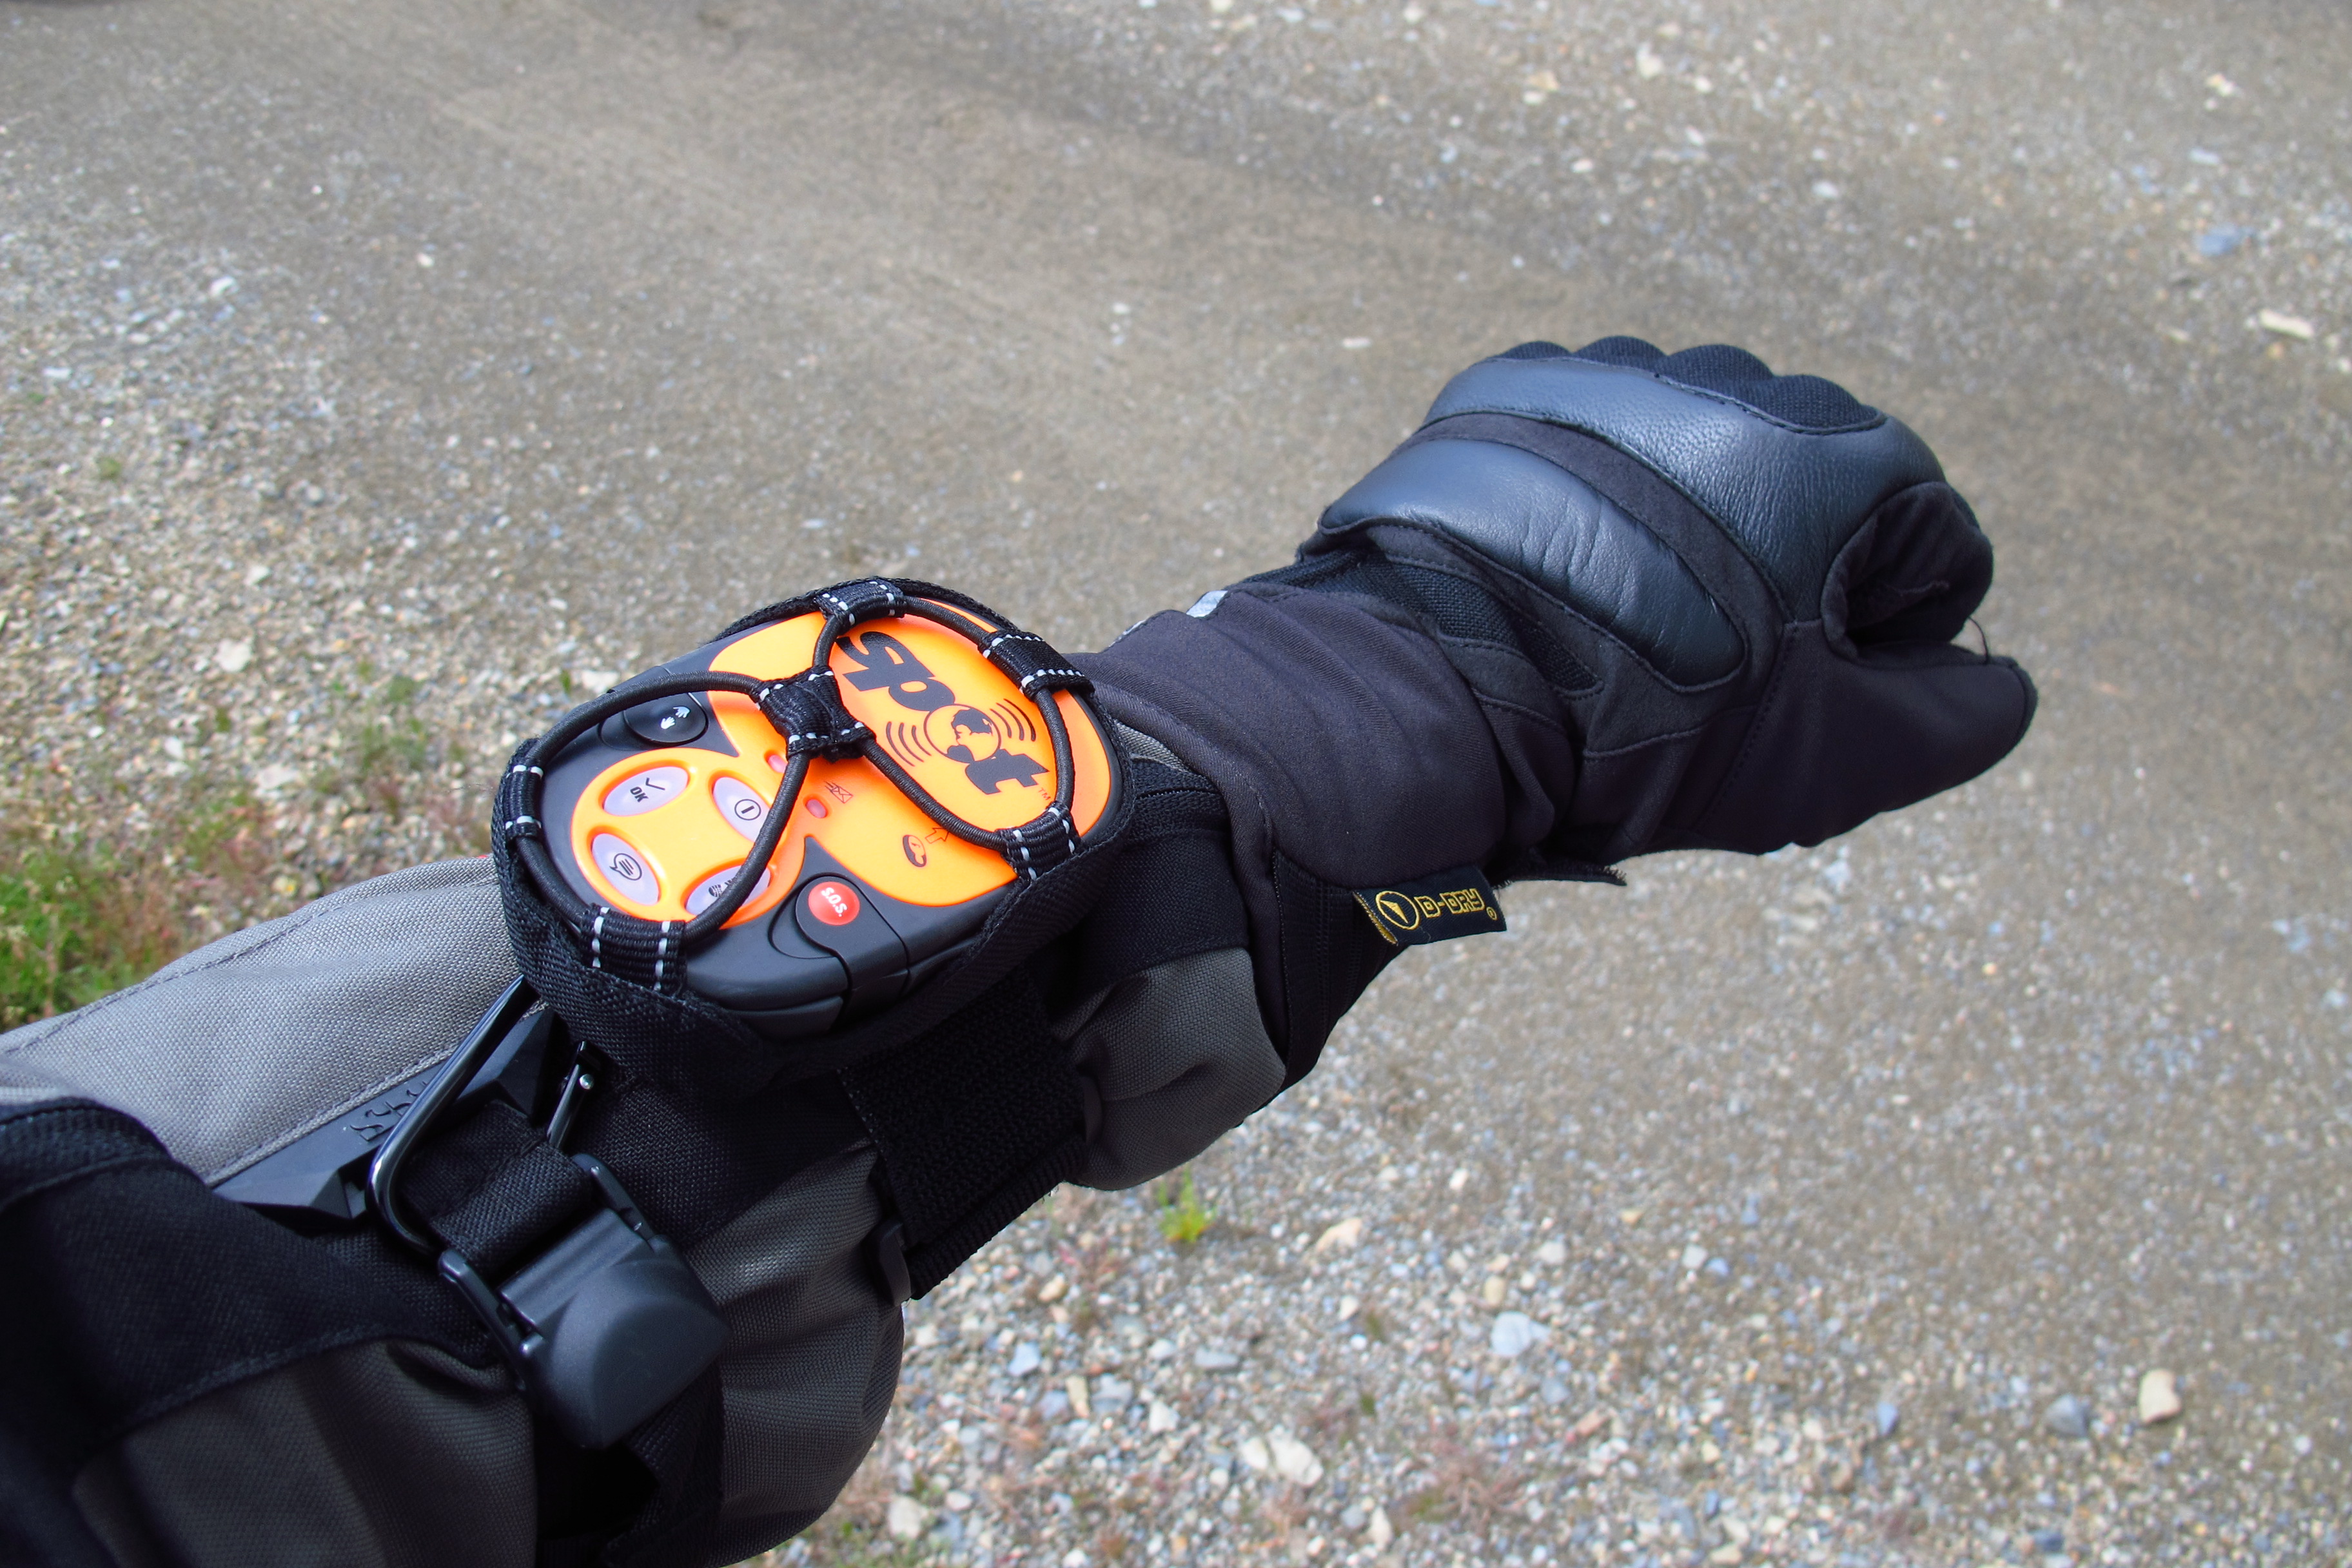
A while later I got to a bigger road and stopped to remove the headphones and sent a message from the SPOT tracker. I had been testing it since I set off from Barcelona, sending check in and personalised messages, as well as tracking the route. I had considered buying a cradle to have it on the handlebars, but it was 20€ and the instructions said it had to be at least 12 inches from another GPS device, and it would have been another thing to remove from the bike every time I stopped, so I simply strapped it to my arm. It is comfortable and it gets signal without problems, so it is staying there.
The road took me through Caspe, Alcañiz and to Calanda, where I turned off again, heading for the Sierra del Maestrazgo in search of smaller roads. This is an area of great natural beauty, and I enjoyed it thoroughly, riding up and down hills, on roads that had more potholes and patches than tarmac, seeing the sun break through the clouds. The GPS seemed to be working better and I switched from the Garmin European maps that came with it to the OSM ones I had downloaded. Both seemed to work fine, but there were roads that simply did not appear on either of them, so to the GPS I was riding off-road.
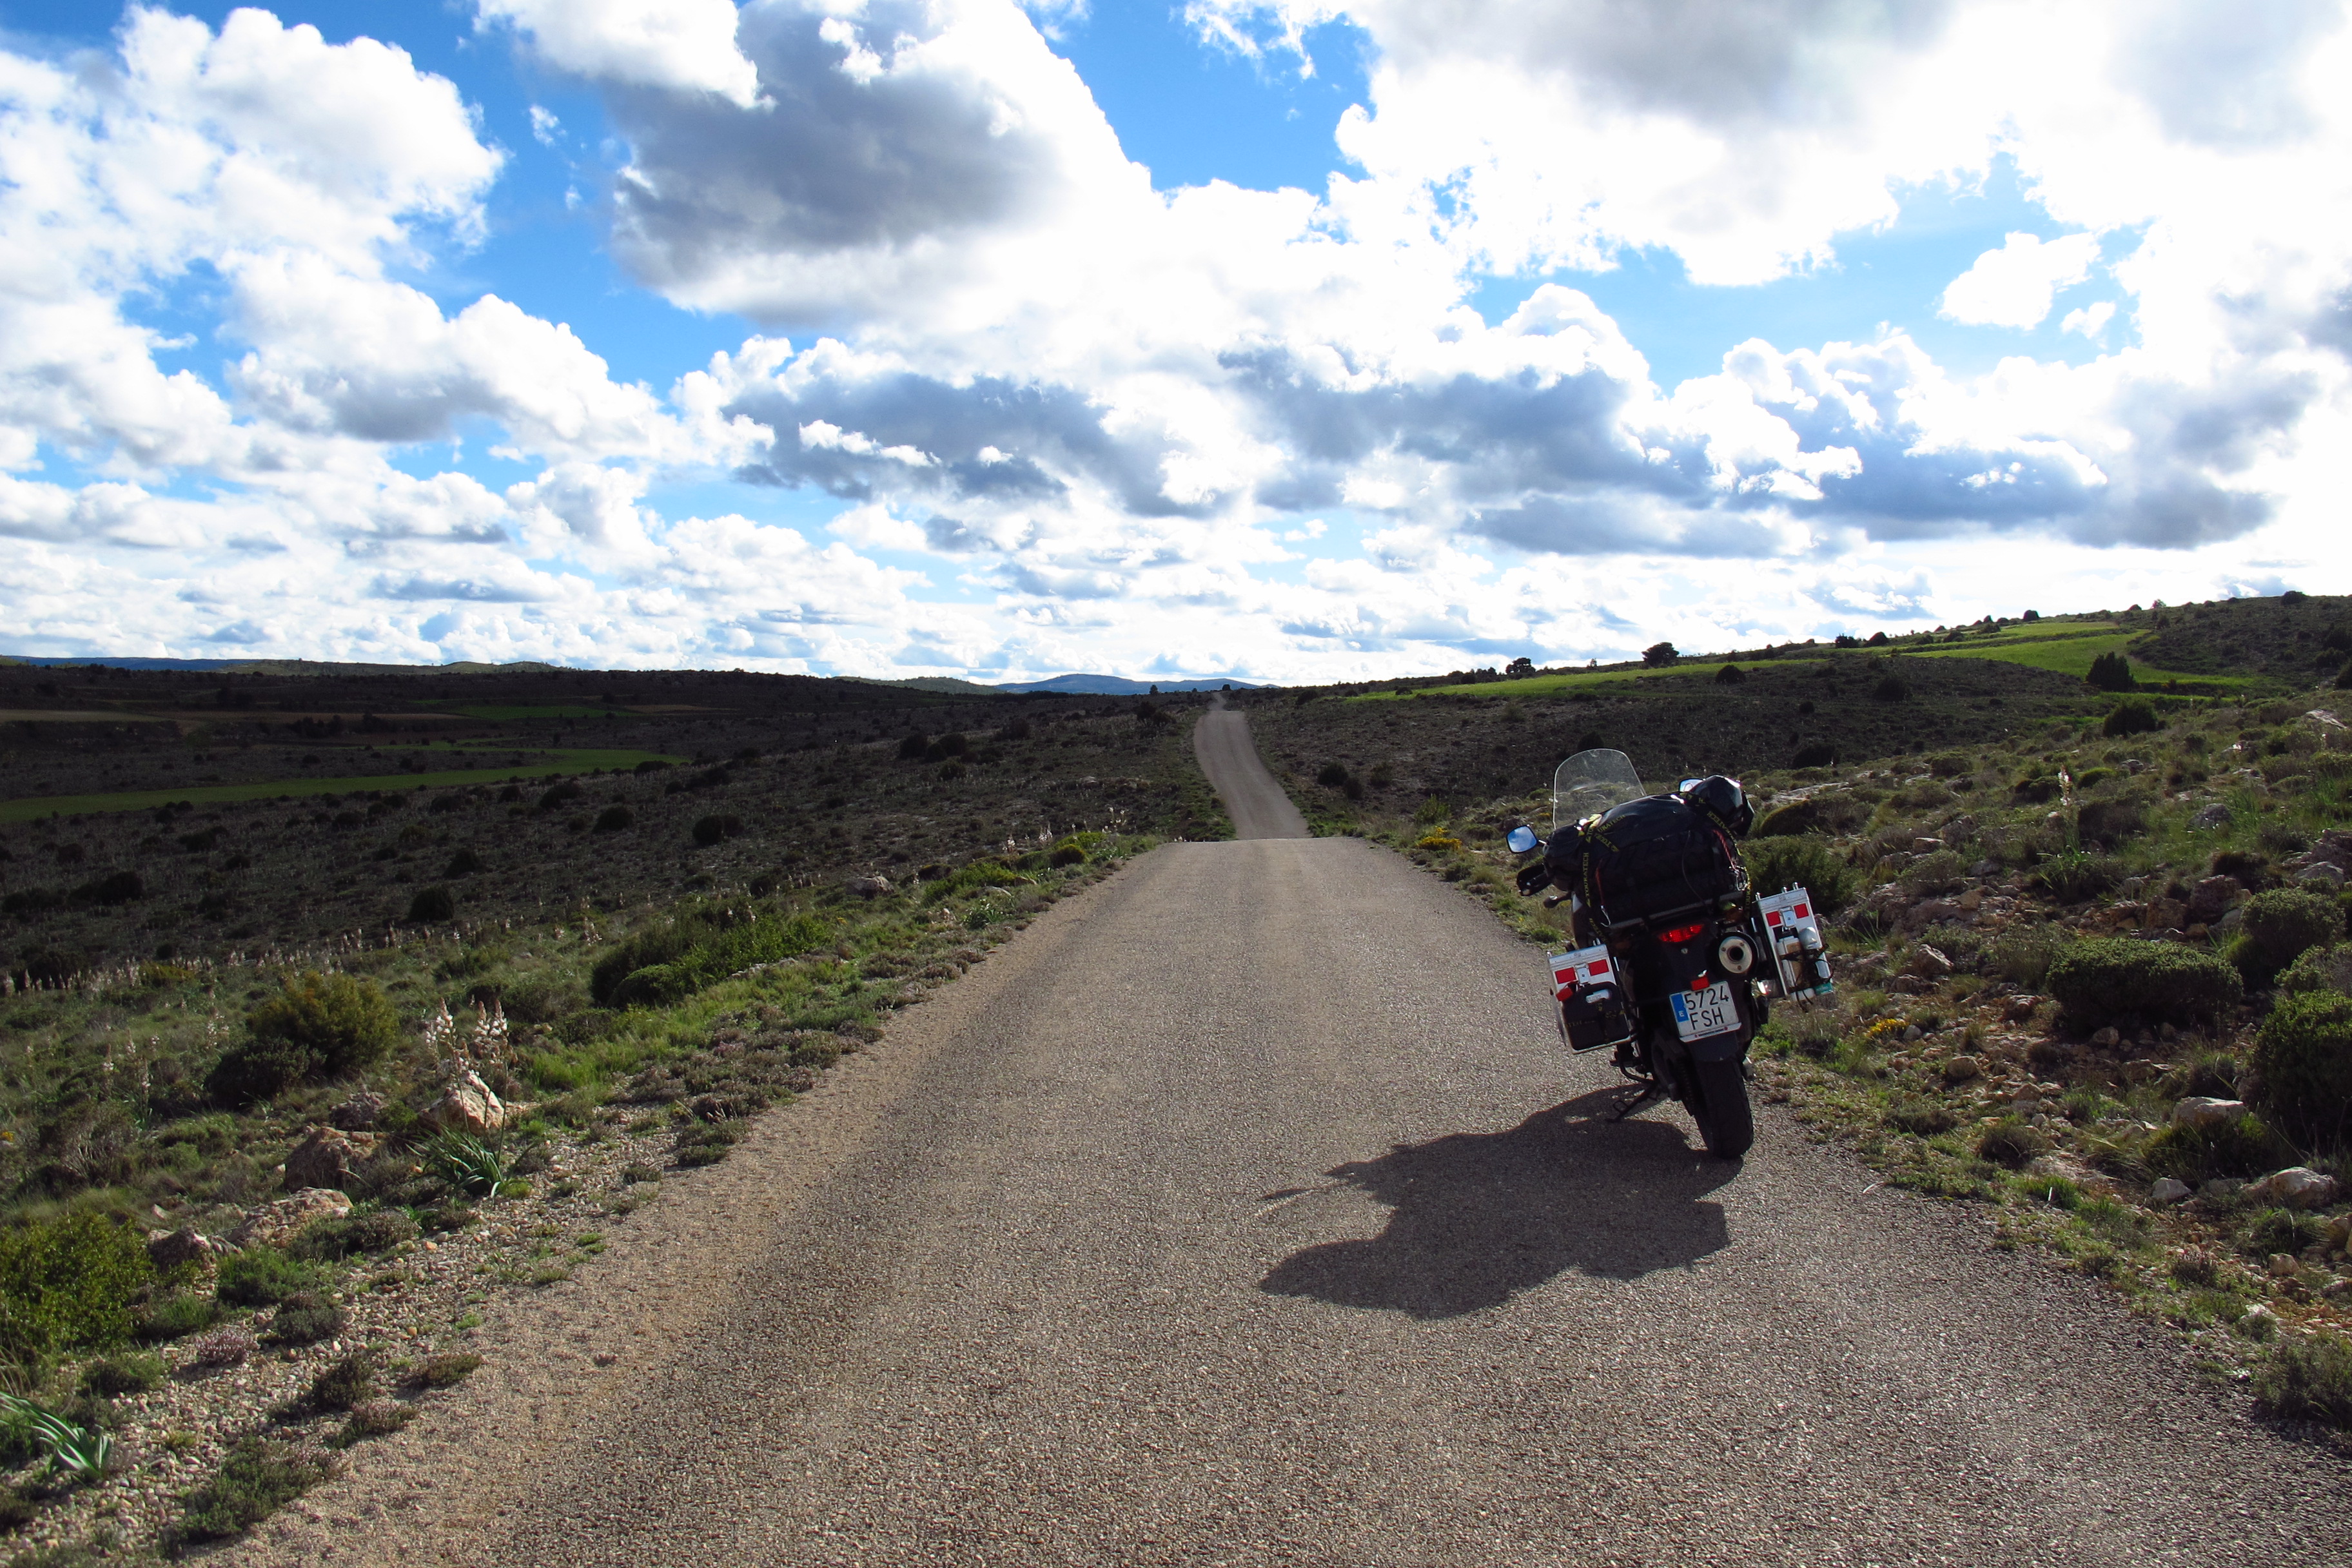
After the last such road, I came out onto the N-420 and had to make a decision. There is this small town south of Teruel where I sometimes spend my holidays, and I knew there were a couple of great camping spots. I really wanted to get there, but it was still far, and it was getting late. Not only that, there were menacing clouds in the sky, so I could either press on and try to get there before dark in time to set up camp, or I could try to find a place to sleep where I was. I decided to ride on.
The roads were good here, long corners and smooth tarmac that allowed me to make good progress. Once I got there, I had to ride up a dirt track to get to where I wanted to camp. It was not raining when I turned off the road and onto the track, but it seemed it had been raining all day and the ground was muddy. I had a couple of scary moments, when the front wheel found soft mud and skid, but I was able to keep it under control and I got to the top of the hill just as the sun was setting.

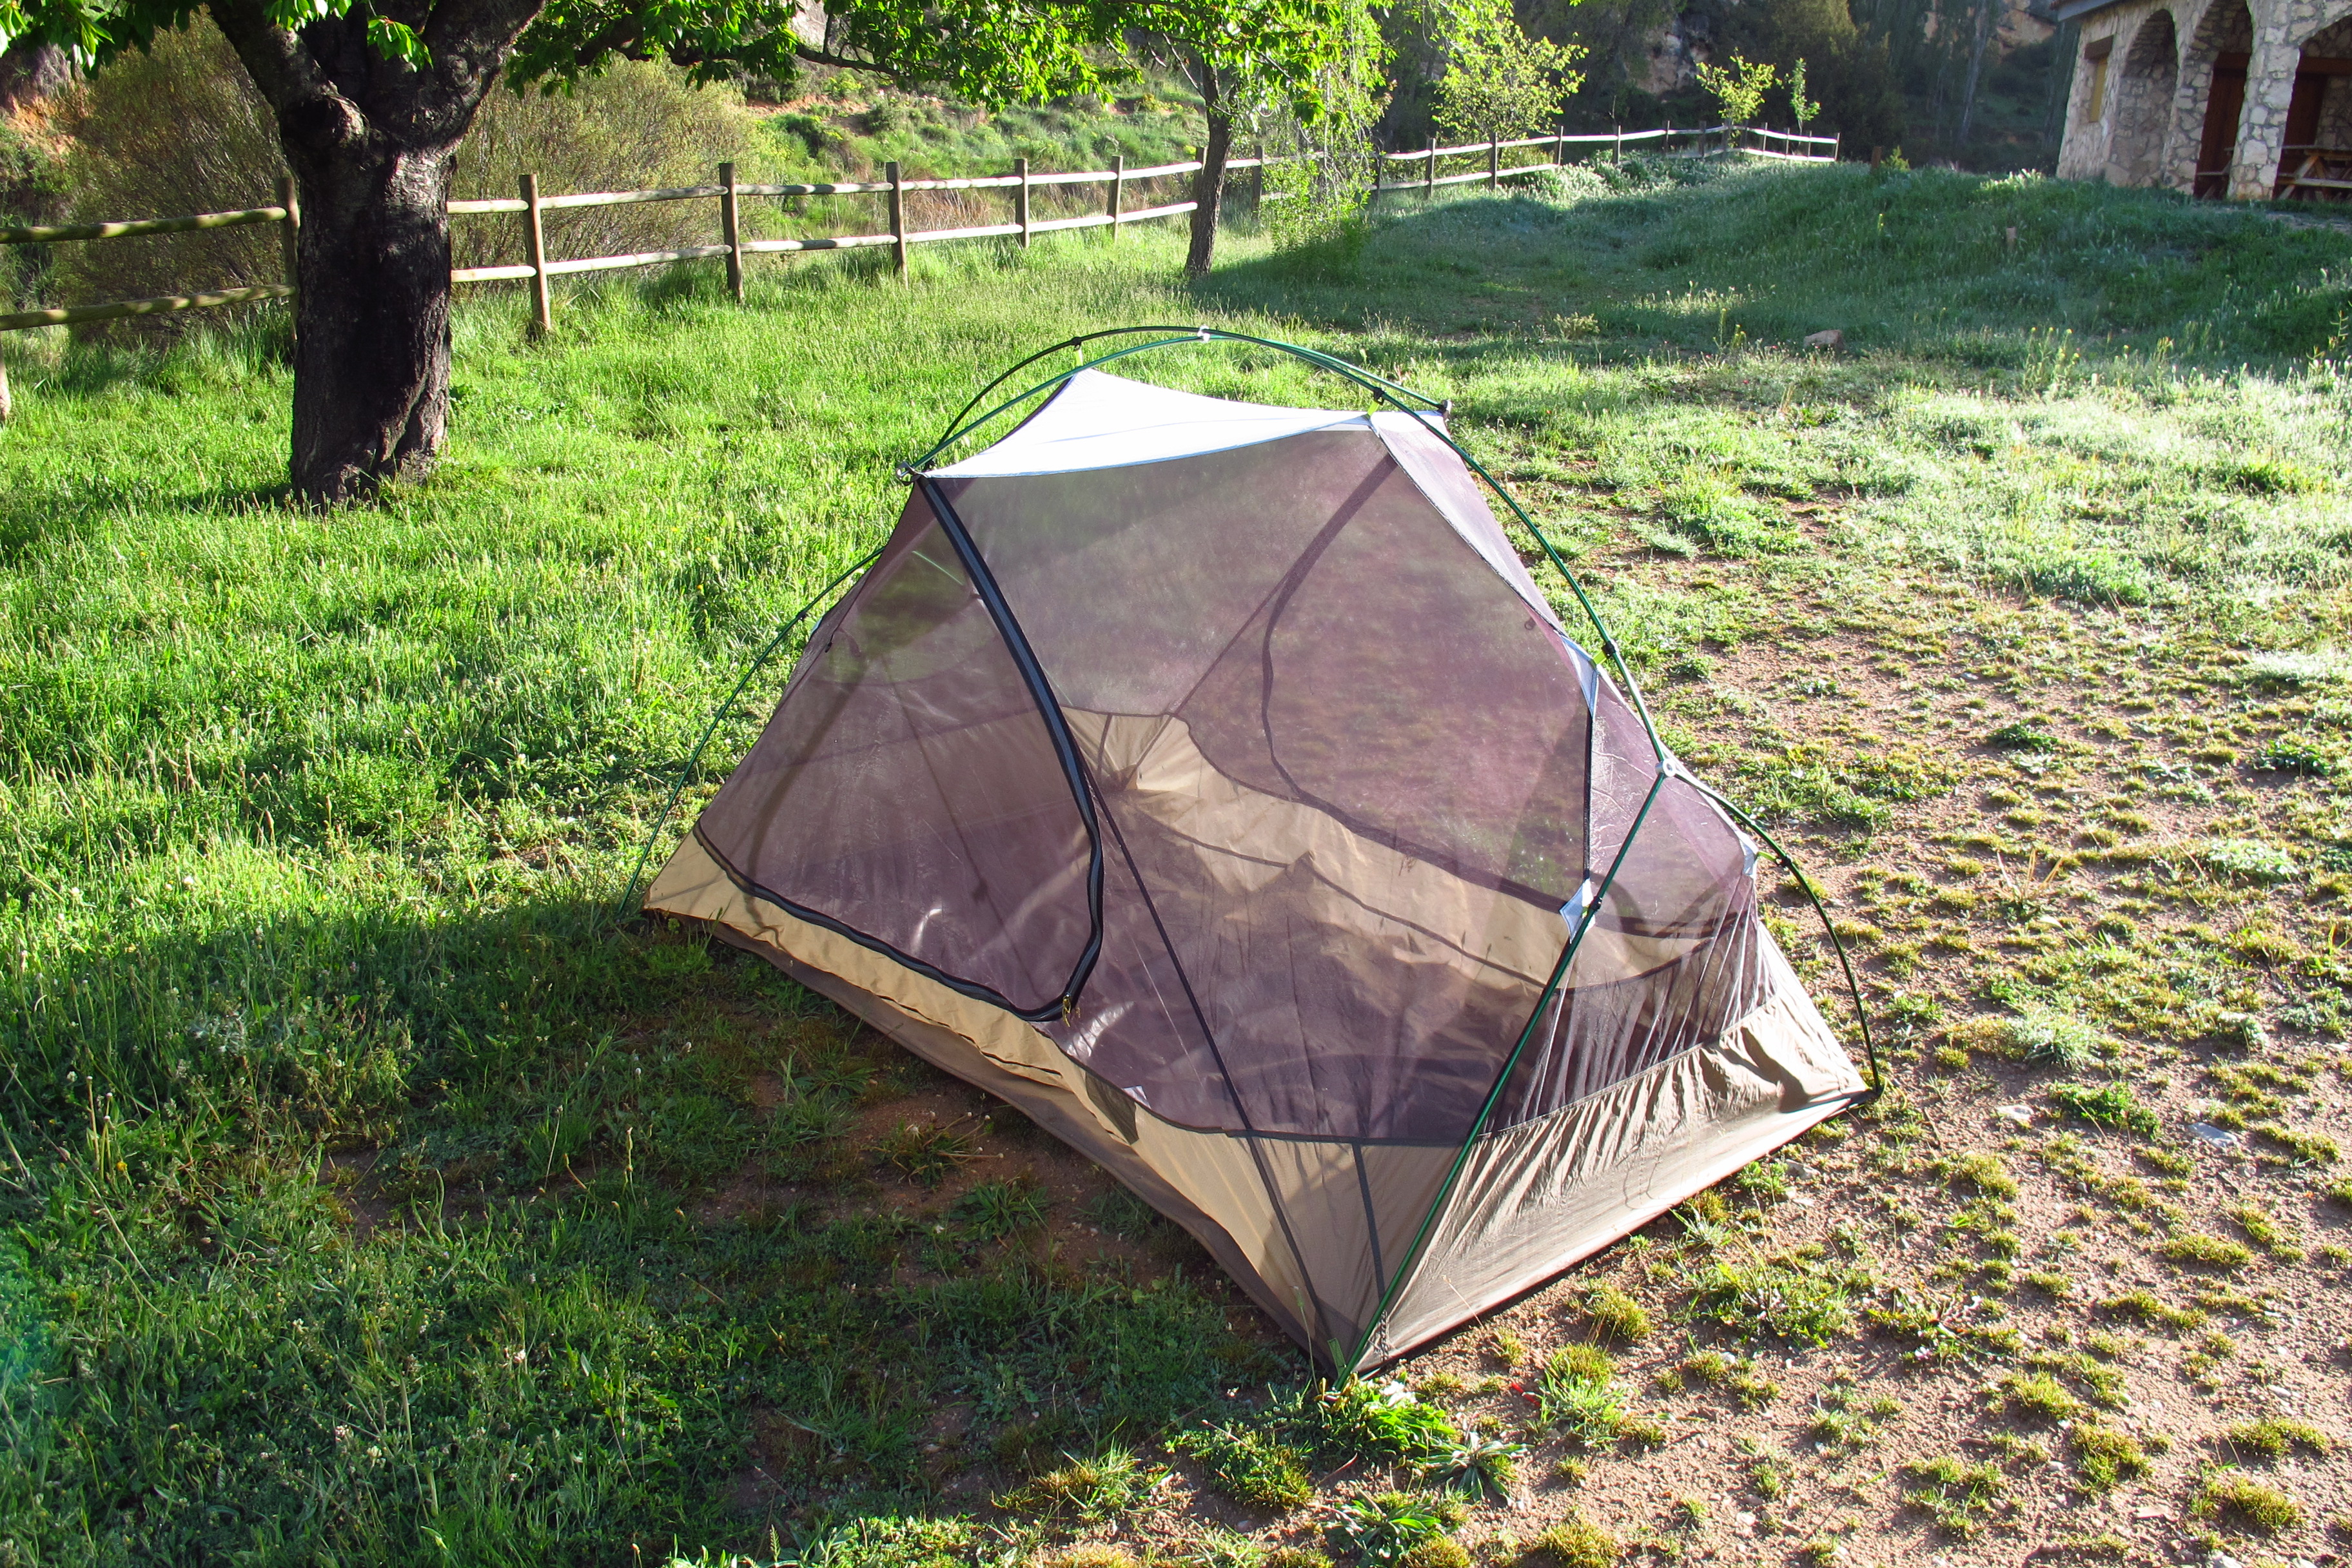
It was a fantastic spot, but the ground was rocky and muddy, and there was nowhere to put up the tent, so I rode back down the track – more carefully in the mud this time – and went to see if the second spot was better. It was, a nice field of grass next to a stream. I got there when it was almost dark, and started putting up the tent on the grass. Fortunately it was easy and was quickly done, and by the time it was dark I had already finished and had dinner. What I did not have time to do, though, was clean and grease the chain and write this entry for the blog, I just went straight to bed.

Sleeping well is important when you spend most of your day on the motorbike and have to do the same the following day and the next and the one after that, so I had tried to get a good sleeping system – I bought an ExpedSynMat 7 and a pillow pump. It was fast and easy to inflate, and much more comfortable than anything I had slept on in a tent before. The sleeping bag was a lightweight one from Decathlon – I had considered taking another one I already have that is warm at temperatures below zero, but I thought that I would only encounter those circumstances some night in Mongolia and most of the rest of time it would be rather hot, so I decided not to. However, I took a bivouac sack in case it got cold, and on this occasion, it proved to be useful. I slept in my thermal shirt and pants, and inside the sack, and managed to spend quite a good night, although my nose – I am endowed with quite a big one – stuck out and felt the cold so badly I woke up several times.


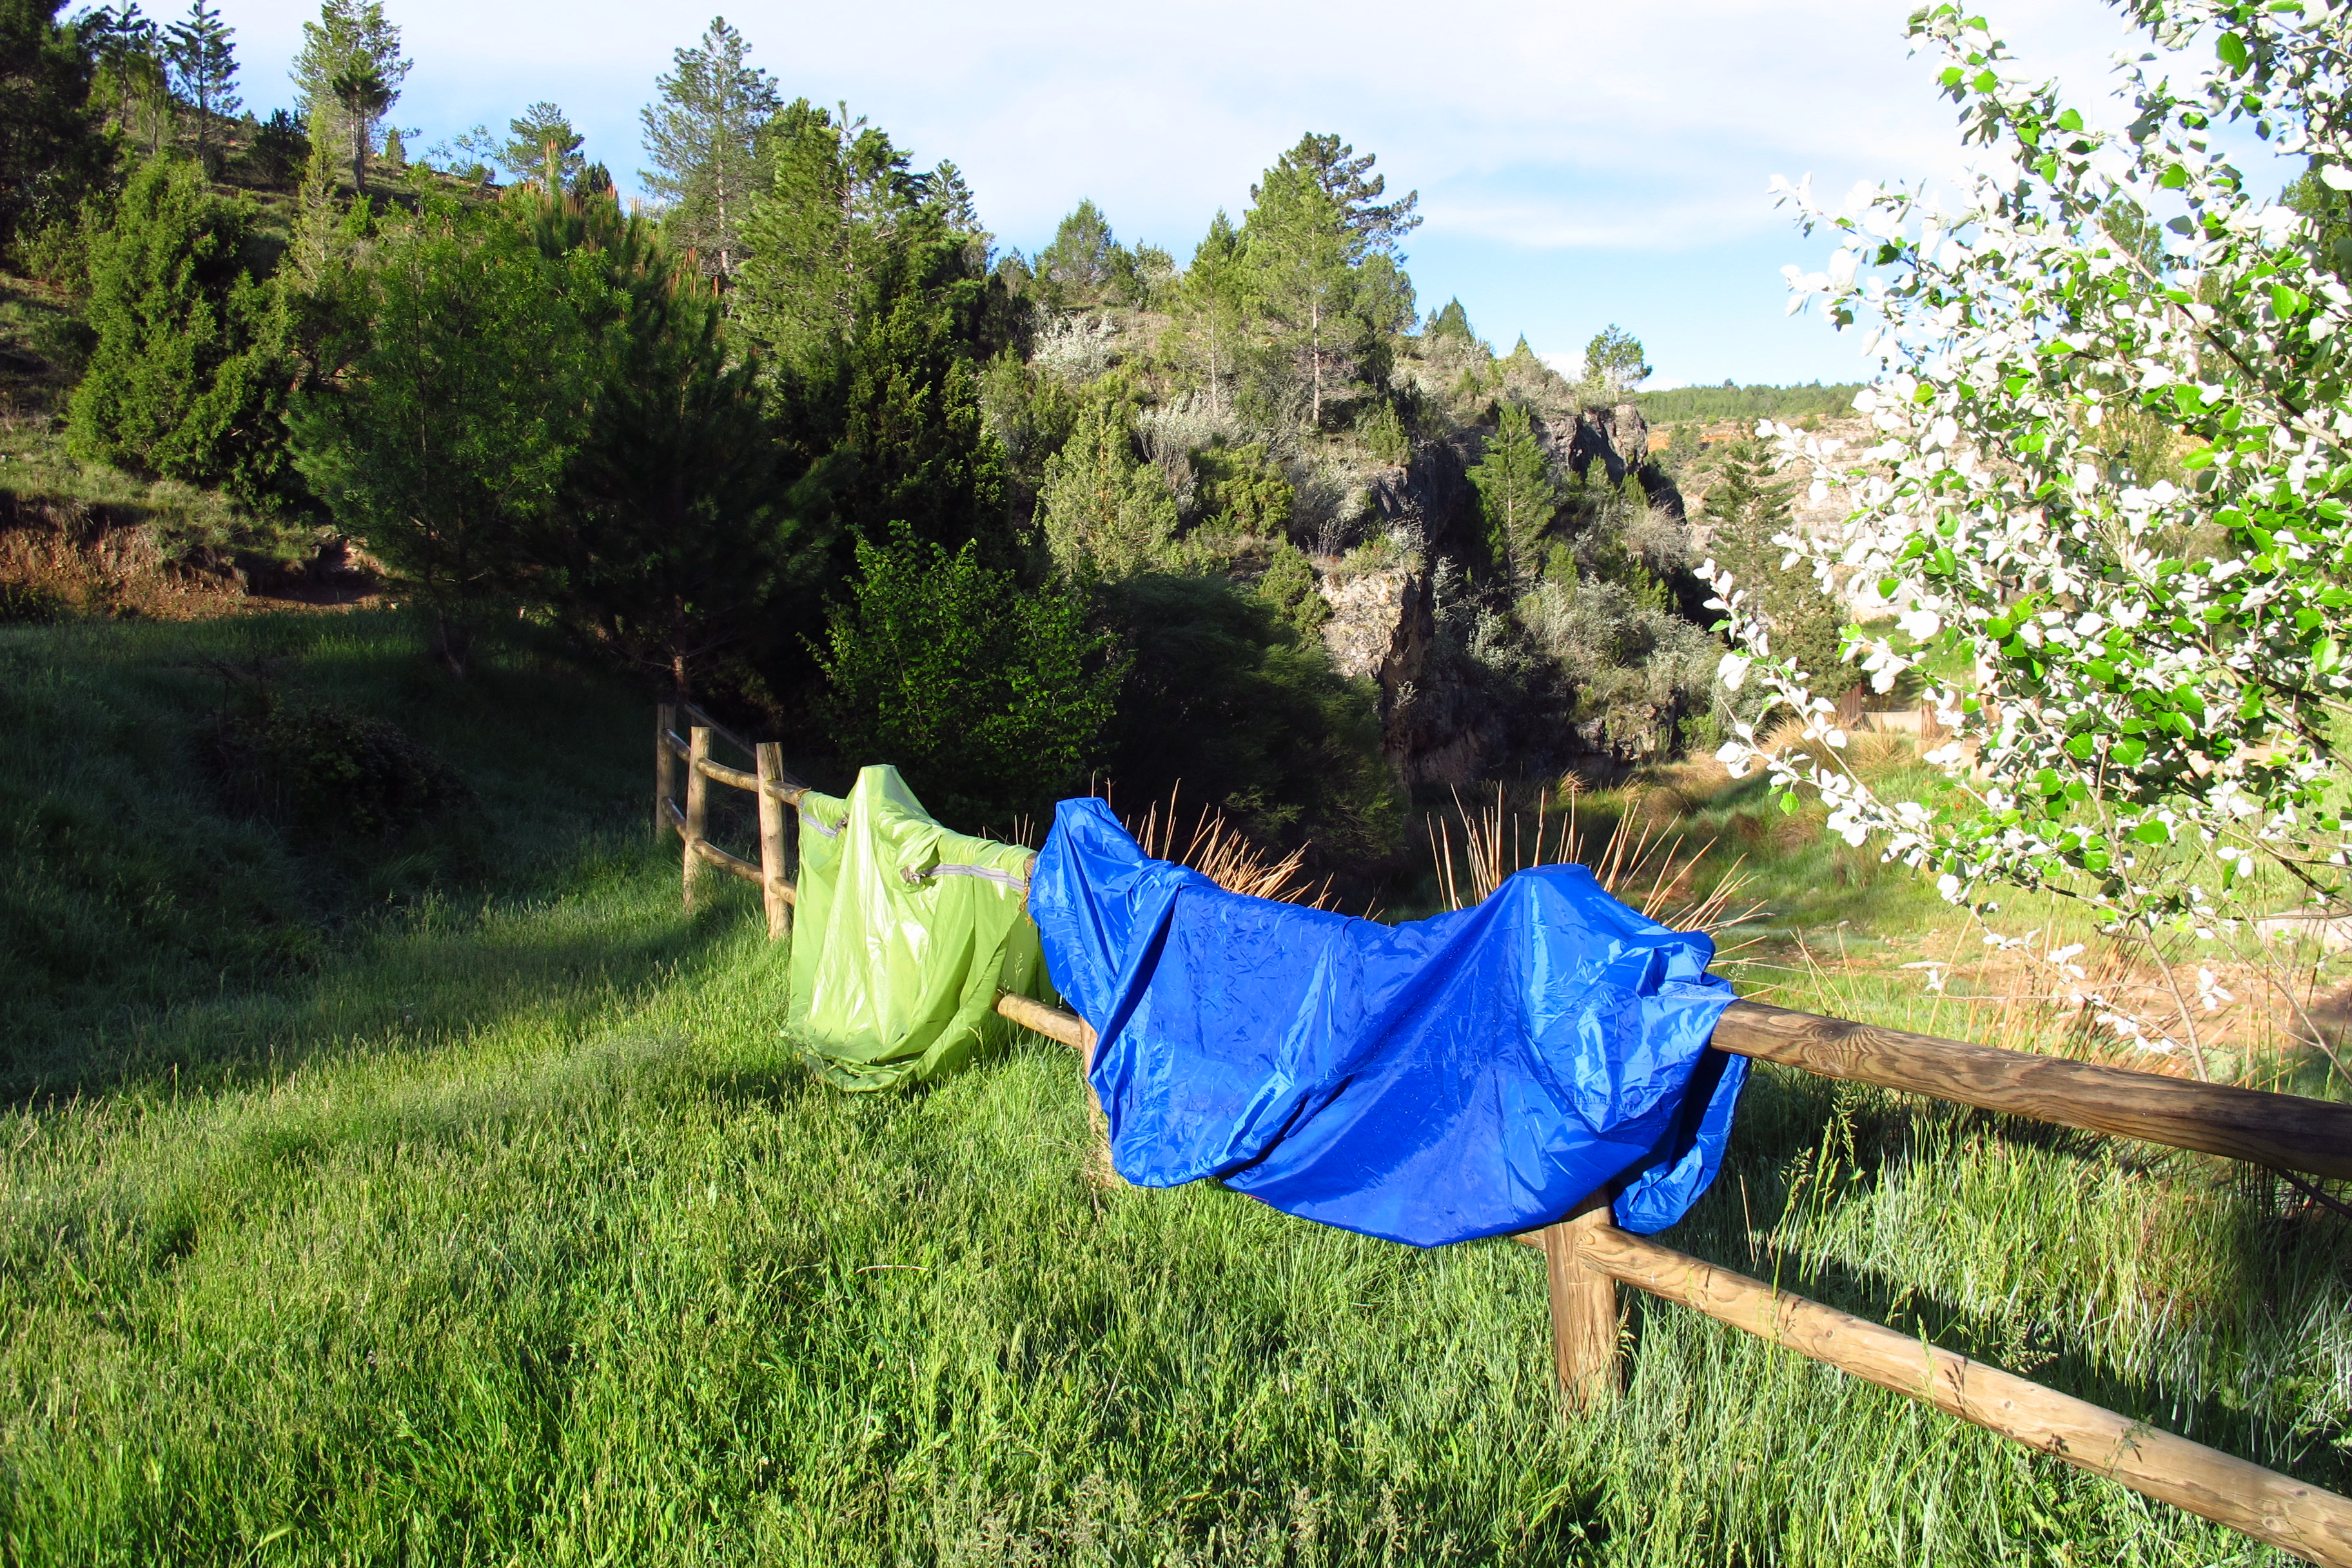
It did not rain that night, but in the morning the tent and the bike cover had a fine layer of frozen dew over them, so I had to hang them in the sun while I had breakfast to try and dry them a bit before packing. I got up at sunrise, so I had plenty of time to put everything back on the bike before hitting the road again. It feels great to get up knowing you have the whole day ahead of you, no work, no deadlines, no stress.
Knowing that it would be another long day and that my stove did not work, I stopped at the first town I found, walked into a bar and ordered a huge sandwich to get the energy I needed. Happily fed, I started the way back.
It was a glorious day, and I headed for the roads that crossed the forests over the hills between the area where I was and Teruel. After about an hour riding through pine trees I arrived in Teruel and seeing that I was making good progress, I decided to take the small roads across the Maestrazgo region instead of taking the more direct way back. By the time I left the area and came down to Mequinenza it was 4 pm and I was starting to get tired of all the shaking and bumping on such bad roads, but I could not be happier. I had some bread and cheese for a late lunch and took the motorway for the last 200 km home.
About a hundred kilometres from Barcelona I stopped at a service station and gave the bike a good pressure wash to get rid of all the mud it had accumulated over the weekend. Needless to say, five minutes later the skies opened and there was heavy rain all the way back home. I got to my parent’s at about 7 pm, it was still raining and I had to remove the panniers, the tires and the tire rack from the bike, put the top case back on to go to work on Monday morning and head home, all under the rain. When I finally got home I was exhausted, but happy to see that I was dry in spite of the rain, and more importantly, so was all my luggage.
It was a long weekend – 670 km on the way there and 560 km on the way back, most of it on narrow, winding, potholed roads, some of it on dirt tracks and the last bit on the motorway, but it was perfectly doable and the stints I have planned for my trip are shorter than that. The motorbike has performed flawlessly and so has all the gear (except for the stove). I will relocate a couple of things for easier access and buy a few others (clothes line, another towel, a PacSafe net…) but overall the result of the weekend test is very positive. The bike and the equipment are ready, now it is time for me to get ready! I’ll need to work out this last month.
It was eight o’clock on Saturday morning, it was pouring with rain and my plan to leave early and spend the day riding was already delayed because I had forgotten the bike’s documents at my parent’s home. Oh, and I did not have a driving license…
I live in a flat in the very center of the city and my motorbike sleeps in the street – that is one of the reasons I bought a second hand one and not a brand new top of the range GS – so the logistics of the trip are not easy. I cannot work on the bike there nor, for that matter, walk up and down the stairs of my apartment with all the equipment I need and strap it to the bike one or two things at a time – it might get stolen while I go back up to get the rest. So when I need to service it or install things, as I have been doing these past few months, I use my parent’s place. They live in a nice big house 30 minutes away from my place and have a front yard I can roll the bike into and work in it, so on Friday morning I attached the panniers (which can be locked) at home and then took the tank bag and rack bag down the street and off I went. At my parent’s I removed the top case, which I am not taking on the trip, installed the tire rack I had made the week before, strapped the tires in place, put the bike cover and the food bag inside the tires, strapped the rack bag on top of the tires and attached the jerrycan, chain cleaner, oil and water bottles to the panniers.
I ran into the first obstacle right outside my parent’s gate. A new school is being built right across the street, and construction work is almost done, so the enormous crane they were using had to be dismantled, and can guess which day they had picked to do so? That’s right. Friday. When I arrived there was this rather big telescopic crane truck parked in front of the gate, but as they had not started work yet, I was able to ride onto the sidewalk and into the yard. Now, however, they seemed to have finished lunch and got down to it, and the crane had rotated to start lowering the sections of the other crane and its huge counterweights were barely half a meter from the gate. I started work in half an hour, so I had to find a way out of there or I risked a bunch of unhappy students, and they’re not kids but workers from a pharmaceutical company. Fortunately, the counterweights were quite high and there was just enough space under them for me to back the bike out, turn and ride on the sidewalk between the truck and the houses while they were moving.
The reason I was going to work with a fully loaded bike was, again, logistics. I work on the outskirts and finish at 10 pm, and on top of that I was spending the night at my girlfriend’s, who also lives away from Barcelona, and hitting the road early on Saturday morning. As I did not want to have to get up at 5 am or set off rather late, this meant taking everything with me on Friday. Well, that would be the first test – leaving the bike out in front of my work and see if anything got stolen.
Fortunately, nothing did, not at work and not during the night, and at eight o’clock on Saturday morning I was ready to leave despite the rain… when it dawned on me that the bike’s documents were in the top case in my parent’s garage. Damn.
An hour later I was on the motorway, happily leaving the city behind. I had the documents and the rain had stopped, it even looked as if the sun might come out. I had not solved the driving license issue, mind you, but that was something I already knew – I had had the bike for two years, ever since I got my license, but as it was my first license, it was an A2 type, meaning I could only ride bikes up to a certain power. Mine was limited and I wanted to have it derestricted for the trip this summer, so I had taken the course a week before. At the end of the course they took my license and was told I would have the new one in a week… but I didn’t. It looked as if I was going to have to take the risk and go away for the weekend without one.
I wanted to test the camping and cooking gear, and the GPS, into which I had programmed the route using BaseCamp, but most importantly, I wanted to see how far I could ride on bad roads before I got tired and whether I would be rested enough to ride back the following day, so I soon left the motorway and headed for smaller roads; just past Igualada I took a smaller road heading for Santa Coloma de Queralt and Poblet. I knew this bit of road, and I knew which way I wanted to go – there are a lot of backroads – so I had programmed several waypoints into the GPS. I was surprised then to find that it did not seem to know exactly where it was going… I have never really liked these devices, and have never owned one until now. I considered I needed one to make the best use of the excellent waypoints Walter Colebatch from HUBB has complied for Northern Asia, but I have always preferred to rely on a good old paper map. I had to stop several times to correct it, selecting the next waypoint manually instead of letting if follow the whole route. I changed some settings and preferences and eventually got it to work. I admit that it was probably my lack of experience with the device that was to blame, but I did not find it intuitive to use at all. On one of the stops I made I put the thermal lining back on the jacket as it was quite cold even if it was not raining. I had stuffed it under the lid of the left side pannier, together with a the pants lining and pair of winter gloves for easy access. They will stay there for the trip.
Past Poblet the road began to climb and wind its way to Prades and I was starting to have fun. The bike handled really well despite all the extra bulk, and it did not feel underpowered on the way up. I rode south-east along the Serra delMontsant, enjoying the wonderful views and the empty roads, and on the way down to Falset I spotted a big extension of empty clear land to the left of the road. Thinking it would be a good place to start practising my off-road riding skills, I pulled by and rode into it. The ground was a combination of gravel from the road construction, mud and some small bushes. I rode into it and the front of the bike slid a bit, but unlike the last time I had tried to ride on conditions like this, I relaxed me arm and let it do its thing, opening the throttle slightly to keep it straight. Even fully loaded and on road tires, it behaved well, inspiring confidence. Obviously, I was not going to charge down dirt tracks at 100 km/h as if I was taking part in the Dakar rally, but I felt confident I could travel on dirt roads for longer distances, the plan was to take the trip easy, anyway.
By midday I rode out onto a main A-road and followed the Ebro river up to Flix and Ascó. The weather had held and by now it was even a bit sunny, so I decided to stop for lunch and see if the old second hand Coleman stove I had bought on-line worked. I found a nice picnic area by the road, sat down on a wooden table, took out the food and the cooking gear and got the stove ready. I poured some fuel in it and following the instructions, I pumped it 20 times, opened the valve and put a match to the burner. Nothing. I pumped a bit more, making sure the I had previously turned the pump handle to the right position, but it still refused to light up. Then I noticed I had some fuel on my hand and quickly put out the match, images of my hand lighting up in flames flashing through my mind. It seemed that fuel was spilling out of the base of the burner assembly, where it attaches to the fuel canister. No warm meal then… I cleaned the spilt fuel, emptied the canister, put everything back on the bike and set off again in search of a place to have lunch, with my mood darkened. To make things worse, just a few kilometres down the road it started to rain. I wanted to find a roadside bar or café where I could eat and keep an eye on the bike, but there did not seem to be any nearby. After about 20 minutes riding I started to be quite hungry and my mood worsened, as it usually does when I have not eaten for a while. With the skies as dark as if it was night, I spotted a camp site by the river and pulled into it. Bingo! They had a small restaurant and sure enough, I could park the bike right in front of it. I got off and went for a meal without bothering to even remove the GPS from its cradle.
With my stomach satisfyingly full, rode away and when I was climbing the TV-7411 road past Riba-Roja the sun came out and I enjoyed the beautiful view from the hills overlooking the Ebro river. When I reached the top I saw a dirt road to the right of the road and a sign that read “Civil war fort and trenches”. This area was where one of the worst battles of that time took place – the battle of Ebro – so I decided to visit that and get some more off-road practice. The track was about 2 km long, dry and rock this time, and I was more confident. I rode faster, standing on the pegs, and soon I had got to the end. There was a small car park, although I think a regular saloon might have had some difficulty getting there, and a small marked path leading around a ridge where the trenches and the remains of the fort were.
The trenches were still easy to make out, but there was not much left of the fort, just a couple of concrete walls.
From this position, the troops must have had a great view over the surrounding area and an advantageous position in battle. I found out from the explanation displays that a whole system of trenches and forts had been secretly built in that area to stop the national troops advance, but a lack of coordination and worse, of knowledge of the existence of the system, combined with a very rapid advance from the national troops meant that they were not put to good use. One can only wonder whether things would have been different if they had.
When I got back on the bike I decided to test how it felt to ride with music on. I know this is illegal, at least in my country, but I very much doubt anyone cares in the middle of nowhere in Kazakhstan or Mongolia, and it is a good way to ward off boredom in long distances. It was a good moment to test it too, this part of the trip was taking me through some largely unpopulated areas, so the chances of being stopped by the police were minimal. I put the headphones on, turned the music up and rode the track back to the road. The moment was perfect: good music, great views… I got a bit carried away and rode the track faster than on the way there, and it was alright – both me and the bike managed it without any problems.
A while later I got to a bigger road and stopped to remove the headphones and sent a message from the SPOT tracker. I had been testing it since I set off from Barcelona, sending check in and personalised messages, as well as tracking the route. I had considered buying a cradle to have it on the handlebars, but it was 20€ and the instructions said it had to be at least 12 inches from another GPS device, and it would have been another thing to remove from the bike every time I stopped, so I simply strapped it to my arm. It is comfortable and it gets signal without problems, so it is staying there.
The road took me through Caspe, Alcañiz and to Calanda, where I turned off again, heading for the Sierra del Maestrazgo in search of smaller roads. This is an area of great natural beauty, and I enjoyed it thoroughly, riding up and down hills, on roads that had more potholes and patches than tarmac, seeing the sun break through the clouds. The GPS seemed to be working better and I switched from the Garmin European maps that came with it to the OSM ones I had downloaded. Both seemed to work fine, but there were roads that simply did not appear on either of them, so to the GPS I was riding off-road.
After the last such road, I came out onto the N-420 and had to make a decision. There is this small town south of Teruel where I sometimes spend my holidays, and I knew there were a couple of great camping spots. I really wanted to get there, but it was still far, and it was getting late. Not only that, there were menacing clouds in the sky, so I could either press on and try to get there before dark in time to set up camp, or I could try to find a place to sleep where I was. I decided to ride on.
The roads were good here, long corners and smooth tarmac that allowed me to make good progress. Once I got there, I had to ride up a dirt track to get to where I wanted to camp. It was not raining when I turned off the road and onto the track, but it seemed it had been raining all day and the ground was muddy. I had a couple of scary moments, when the front wheel found soft mud and skid, but I was able to keep it under control and I got to the top of the hill just as the sun was setting.
It was a fantastic spot, but the ground was rocky and muddy, and there was nowhere to put up the tent, so I rode back down the track – more carefully in the mud this time – and went to see if the second spot was better. It was, a nice field of grass next to a stream. I got there when it was almost dark, and started putting up the tent on the grass. Fortunately it was easy and was quickly done, and by the time it was dark I had already finished and had dinner. What I did not have time to do, though, was clean and grease the chain and write this entry for the blog, I just went straight to bed.
Sleeping well is important when you spend most of your day on the motorbike and have to do the same the following day and the next and the one after that, so I had tried to get a good sleeping system – I bought an ExpedSynMat 7 and a pillow pump. It was fast and easy to inflate, and much more comfortable than anything I had slept on in a tent before. The sleeping bag was a lightweight one from Decathlon – I had considered taking another one I already have that is warm at temperatures below zero, but I thought that I would only encounter those circumstances some night in Mongolia and most of the rest of time it would be rather hot, so I decided not to. However, I took a bivouac sack in case it got cold, and on this occasion, it proved to be useful. I slept in my thermal shirt and pants, and inside the sack, and managed to spend quite a good night, although my nose – I am endowed with quite a big one – stuck out and felt the cold so badly I woke up several times.
It did not rain that night, but in the morning the tent and the bike cover had a fine layer of frozen dew over them, so I had to hang them in the sun while I had breakfast to try and dry them a bit before packing. I got up at sunrise, so I had plenty of time to put everything back on the bike before hitting the road again. It feels great to get up knowing you have the whole day ahead of you, no work, no deadlines, no stress.
Knowing that it would be another long day and that my stove did not work, I stopped at the first town I found, walked into a bar and ordered a huge sandwich to get the energy I needed. Happily fed, I started the way back.
It was a glorious day, and I headed for the roads that crossed the forests over the hills between the area where I was and Teruel. After about an hour riding through pine trees I arrived in Teruel and seeing that I was making good progress, I decided to take the small roads across the Maestrazgo region instead of taking the more direct way back. By the time I left the area and came down to Mequinenza it was 4 pm and I was starting to get tired of all the shaking and bumping on such bad roads, but I could not be happier. I had some bread and cheese for a late lunch and took the motorway for the last 200 km home.
About a hundred kilometres from Barcelona I stopped at a service station and gave the bike a good pressure wash to get rid of all the mud it had accumulated over the weekend. Needless to say, five minutes later the skies opened and there was heavy rain all the way back home. I got to my parent’s at about 7 pm, it was still raining and I had to remove the panniers, the tires and the tire rack from the bike, put the top case back on to go to work on Monday morning and head home, all under the rain. When I finally got home I was exhausted, but happy to see that I was dry in spite of the rain, and more importantly, so was all my luggage.
It was a long weekend – 670 km on the way there and 560 km on the way back, most of it on narrow, winding, potholed roads, some of it on dirt tracks and the last bit on the motorway, but it was perfectly doable and the stints I have planned for my trip are shorter than that. The motorbike has performed flawlessly and so has all the gear (except for the stove). I will relocate a couple of things for easier access and buy a few others (clothes line, another towel, a PacSafe net…) but overall the result of the weekend test is very positive. The bike and the equipment are ready, now it is time for me to get ready! I’ll need to work out this last month.
Good news from Madrid
My sister has just picked up my kazakh visa from the consulate in Madrid, and there have been no problems despite not having included any addresses for my stay in the country nor a letter of invitation from a travel agency. It seems that the simplified visa application process for Spanish citizens really does work.
This Friday the great Jenson Button will hand me the passport, since he is paying a visit to Barcelona this weekend to see his love.
p.s. Ok, not Jenson Button himself, but a friend from Madrid who looks very much like him…
Couchsurfing
First of all, my apologies for having neglected the blog for so long, I’m on the final weeks before departure and things are getting hectic! I need to make sure everything is ready, plan the route in detail, sort out accommodation, make a final check on the bike, etc.
I had figured that the most expensive part of the journey is going to be Europe, so I have decided to try to use CouchSurfing. As many of you know, it is a system that puts in touch people looking for a place to sleep and people who offer a place to stay (a couch) at their homes. There are two reasons why I have decided to couchsurf: first, to keep costs down, secondly and most importantly, I think it is the best way of meeting locals and getting to know the people and the cities I am going to be visiting. I have spent long hours these last weeks sitting in front of the computer and sending lots of requests, and I have to say that I am pleasantly surprised at the result. I have been offered a place to stay at most cities I am going to ride through in Europe, and I am really looking forward to the experience.
The stove works!
As you might remember from the post on the test weekend, I had some problems with my Coleman stove – I could not get it going and it seemed to leak some fuel – so I was facing the prospect of cold meals or learning to make a fire in the wild. Eating in restaurants or buying a new dual fuel stove were out of the question, I have spent all the money I had budgeted for the preparation, and “in the wild” usually means it’s either windy, wet and behind a run-down industrial park or surrounded by children at a family campsite, wondering why that man dressed in robocop gear is not using a Camping Gaz stove like dad’s.
So after having left the stove at my father’s home (he’s got a nice workshop in the basement) with the intention of taking it apart when I had a moment, I was very glad when he told me it was working.
It turns out there was nothing wrong with it, aside from the fact that I got it second-hand it did not come with instructions (other than the few basic steps written on the label next to the ‘read the instructions carefully before use’ warning) and I was using it wrong, pouring too much fuel into it and not operating the pump properly. Once everything was set up correctly, it burnt nicely for a really long time on a very small quantity of fuel, and it only took a few minutes to bring a big pot of water to a boil. Wonderful.
Final check on the bike
Last week I took the motorbike to a Suzuki dealer near home in Barcelona for a final service before setting off. There were some things that had to be done before starting the trip, like changing the ECU to de-restrict the engine (I was still riding with my A2 license, I got the A one a month ago), checking and adjusting valve clearance and replacing the brake fluid. I also still had not got round to installing a 12V socket, and that was essential. I could have done the latter myself, and maybe even the brake fluid, but I am running out of days and I wanted to have a professional mechanic have a good look at the bike, so I took it to Hamamatsu Motor.
The chief mechanic, Macari, did a great job – he kept the bike for a little longer to make sure everything was ready, charged me less than he should have for labour and issued the certificate I need to modify the bike’s documents now that it is back on full power free of charge, so I guess it is kind of a small sponsorship.
The bike works wonderfully well after having the timing and injection adjusted and the regular ECU installed. It is smoother, the engine breathes more easily and the revs climb without any problem to the red line. I have got an appointment tomorrow at the MoT centre near my work to have the corresponding paperwork done.
MoT passed
As I said yesterday, this morning I took the bike to its MoT (or rather, the Spanish equivalent of an MoT, called ITV here). I had to get it done for two reasons – one, it was due (it is every two years) and two, I had to get the paperwork for the change of ECU.
I booked the inspection at a center near my place of work, not only because it was convenient, but also because I had seen it recommended in the owner’s website. There are lots of potential problems with accessories in these kinds of inspections, even with the most common ones such as a higher windscreen or luggage racks, and I had been told that they were quite easy-going in this respect. It turns out it is true – they checked the bike’s brakes, lights, emissions and noise and asked for the dealer’s certificate regarding the change of the ECU and that was that. Passed!
So if anyone in or around Barcelona needs to pass their MoT, I highly recommend this center.
Last minute man
“Nothing would ever get done if it weren’t for the last minute” read a poster a friend of mine had in his studio. An it could not be more right. I am indeed a last minute man. Less than a week to go and at the beginning of this week I still did not have my international driving permit, the insurance green card nor the motorbike’s registration documents.
Fortunately, I got them all on Tuesday morning, and today I went shopping for the few last things I needed to get, that is some oil, chain lube, bulbs and fuses and a long chain to attach the bike to trees or lamposts when I park it overnight in dodgy places.
This weekend is going to be a bit stressful: I’m trying to arrange for a friend to take care of my car while I’m away, emptying my bedroom because I am trying to rent it out while I am away, spending time with the loved ones, goodbye party, finals week at the school…
It is only now that the fact that I am going away starts to sink in, but I still feel strangely calm.
And now, the time has come…
It’s ten minutes to eleven and I’m sitting in a garden in Tiana, 20 minutes away from my flat, which I have already emptied and left this morning, trying to relax and to get some much needed rest before setting off tomorrow morning at seven.
This is it, I realize. I have spent so much time these last weeks lost away in preparations that I had not realised how nervous I was, and it all has hit me today, as I was saying my goodbyes to my flatmate, my parents, my sister, her boyfriend, my grandmother… I am leaving and not coming back for two months. I’ll spend most of my time on the road. I feel sad leaving so many loved people behind, but at the same time I am really excited, looking forward to all the places I will see, people I will meet, problems I will have, experiences I will live.
Before hitting the road tomorrow morning, I would like to thank all the people that has been near me this last year. Thank you all for your support, advice, interest, inspiration, help, for patiently listening to me rambling on and on about this trip and for following me on this blog.
I will see you on the road.
