Got the Russian visa!

The most difficult one is done! In fact, it has been much easier than expected – money obviously helps… This one was supposed to be complicated, as I needed a multi-entry business visa, which meant I had to be invited by a Russian company, but I just paid for an invitation letter and to have all my paperwork done through Central de Visados Rusos, in Barcelona, and they sorted out everything with no fuss at all. In ten days I had my visa! Now I can enter and leave Russia as many times as I want from July to December.

Since I had got my passport back and still had an hour before going to work, I decided to start the process of getting my Mongol visa. The Mongol Consulate in Barcelona is not far from the offices where I got the Russian visa, so I took the bike and went down there.

They are located at the end of Rocafort street, near Paral·lel, and their premises could not be more different from the mansion in Pearson Avenue.

2013-04-23 10.25.20

2013-04-23 10.24.49You walk through a dark and damp entrance hall on the ground floor of a typical Eixample building to an inner court where there are a few small houses, among which is the consulate.

2013-04-23 10.24.05

The girl there was much, much nicer than the staff at the Russian consulate and after going through the paperwork she told me that there would be no problem to issue a tourist visa, but that it was still too early, as I will not be reaching the border until late July or early August, so she advised me to get any other visas I needed and then go back.

So, on the the Kazakh visa, then!

Advertisement

Adventure MotoStuff engine guard

I received my engine guard today! I had checked out a lot of different models (see this list – in Spanish) but in the end the only one that I found convincing was the one manufactured in the USA by Adventure MotoStuff.

2013-04-18 11.38.04

All the other options had some shortcomings – they were too narrow at the top and exposed part of the oil radiator; they requiered the oil radiator to be moved to a higher position; they had exposed screws at the bottom; they had access holes at the bottom (handy for servicing the bike, but leaves some parts more exposed); they were build of different parts screwed or welded together, some of them being too thin; etc.

The Adventure MotoStuff one is made of one thick, solid piece of metal, it covers the oil radiator, can be attached to the Hepco & Becker crash bars I already have and has a perfectly clean underside, withouth protruding bolts or screws. The mounting bracket also looks very sturdy.

2013-04-18 11.38.262013-04-18 11.39.21

It took about a week and a half to arrive, and my only complaint is that I had to pay import VAT, which had never happened before with anything else I had ordered online. I guess this time I was unlucky and the parcel was inspected at the border.

Customer service at Adventure MotoStuff was great, I emailed them some questions and they replied promptly with clear and useful answers.

Russian Visa and the Russian consulate

I have read a lot about Russian bureocracy in all the adventure travel discussion forums I have visited, so when I started looking for information on the kind of visa I would need to enter Russia multiple times on a motorbike, without exact dates of entry or exit, hotel reservations or letters of invitation, I already expected a certain degree of difficulty.

After reading about different types of visas, requierments and companies that do all the paperwork for you, I decided to try and do it myself in order to save a few euros, so I went to the Russian consulate on Barcelona.

As you would expect from such a country, the consulate is not an office on the second floor of a building in the center, but an impressive mansion in the high part of the city. Their web site clearly states that it is impossible to visit it without an appointment, so I logged in and filled in the necessary information to get one. The system turned out to be rigidly Russian: the only option available on the list of reasons to visit the consulate is ‘visas’. I guess you need to be somebody and know the right people to visit the consulate for any other business. I got an appointment for a Thursday morning, and when the day came, I went there hoping to get first hand information on exactly what kind of visa I needed for such a trip, and if whoever was there was nice enough, maybe some information on border crossings, state of the roads, etc. How wrong I was!

The entrance to the front court of the building consisted of a two-door cage system, with security cameras, an intercom and a burly security guard who was letting somebody out and quickly closed the door behind her as he saw me approaching. When I reached the first door he blurted out something in Russian and I told him I had an appointment (in Spanish, of course, my Russian is non-existent and if the guy is stationed in the Consulate in Barcelona, I expected him to understand the local language…) and he said ‘name?’ I gave him my name and ID number and he proceeded to check a printout he had on a folder. He nodded and pressed a button that let me through the first door and into the cage. I had to wait for the first door to close and then somebody opened the second one from somewhere else. He pointed at the main entrance to the mansion and said ‘left’.

The arched door opened into a roomy entarnce hall, where some people were sitting, apparently waiting to be called. The door leading from the hall into the building was open, and I caught a glimpse of some people on desks and guys in suits walking around. I was wondering whether they also had had to make an appointment through the web site and how they had managed to get some other option than ‘visas’ on the menu when the voice of the security guy saying ‘left’ again brought me back to real life. He was behind me, pointing at a smaller door to the left of the hall. I walked in and found a small room with a couple of tables to fill in forms on and a tiny window to the right. It was obvious that the rest of the mansion was not accessible to mere mortals.

There was nobody queuing at the window, so I walked to it. Behind bullet-proof glass was a bored looking soviet civil servant stamping visas. He raised his sight, saw me and said ‘papers?’ I started explaining my story – travelling on a bike, entering several times into the country, no invitation, blah, blah, and I think he was overwhelmed by the sheer number of words I was wasting; everyone I had met so far in the building seemed to use only one word at a time. He said ‘they’ll inform you’ and pointed behind me. I turned around hoping to find a smiling young Russian girl sitting behind an information desk, but there was no one else in the room. I looked at him and he pointed again. This time I realised he was pointing at a notice board on the wall where there was a poster advertising a company called Central de Visados Rusos which arranged visas. I had seen other companies online, and several people had recommended using Real Russia, but I wanted to avoid paying a company to do the paperwork if I could do it myself. However, it was clear that was all the information I was going to get in the consulate, and the offices of the company were near my home, so I decided to go and see if they could shed some light on how to get the visa I needed.

There was no security guard on my way out, so I approached the first door and pressed the button on the intercom. Someone barked a few words in Russian and I replied ‘I want to get out.’ The first door buzzed opened and I walk into the cage. Once the first door had closed, the second one buzzed. I pushed it, but it would not open. I waited for them to unlock it again, but it refused to move. There was nobody in the front court and I was stuck in between doors. Great. I pressed the intercom button and asked to be let out again. The same voice yelled something in Russian and the door buzzed again, but it refused to open, no matter how hard I pushed. I was starting to feel a bit stupid trapped between doors when a woman walked up to the door from the street, said something in Russian to the intercom and the door buzzed one more time. She pulled it effortlessly from the outside and walked in, as I took the chance to leave that charming building.

I did find the smiling young Russian girl I was hoping for in the visa company. She listened to what I wanted to do and explained that the only multy entry visa for Russia is a business one, the tourist visa only allows people to enter the country twice in a period of one month, a business one allows multiple trips over a period of three months. She said that it did not matter that I was not going to go there on business, I only needed a letter of invitation from a Russian company in order to obtain a visa. When I asked her how I would get one without contacts, she smiled, handed me a form and said ‘we provide them for 50€’.

It was becoming clear that I was not going to be able to do the whole application process myself, and on top of that, they were the only company that the Russian consulate in Barcelona had officially approved to handle visa applications, and I still had to apply for the visas for Kazakhstan and Mongolia, so I decided to save time and use their services.

2013-04-11 12.07.28

After having my picture taken, taking out travel insurance in one of their approved companies, filling in a request for an invitation letter and the form downloaded from their website and making sure my passport didn’t expire in the next six months and had at least two consecutive blank pages, I finally handed in all the paperwork needed this week, and by Tuesday next week I should have a multy entry business visa for Russia.

Travel insurance

It’s now only three months to departure and this week I wanted to start sorting out the visas, since each application will take around 10 days and I want to make sure everything is ready on time.

I decided to start with the Russian one, the most difficult, as I need to get a business visa. Apparently, tourist visas only allow two entries to the country, and I need three over a period of three months, because I’ll be entering the country from Ukraine, Kazakhstan and Mongolia.

However, before I apply for any visa, I need to get travel insurance, since all consulates ask for a certificate to prove that I have travel insurance for the duration of the stay in their country. I checked out prices and coverage with different companies, and in the end settled for Europ Assistance because the price was fair, the coverage reasonable, it is on the list of insurance companies approved by the Russian consulate in Barcelona and last but not least, their offices are around the corner from my flat.

2013-04-09 11.51.51

So now that I have my insurance and three separate certificates (one for each visa), I can start the process. I have already completet and downloaded the application form fo the Russian one, so if I have time tomorrow morning, I’ll get started on it.


Hepco & Becker crash bars

A huge parcel arrived yesterday morning! It was early and I still hadn’t got dressed so I opened the door in my dressing gown, unshaven, with great bed hair and a mug of coffee in my hand… Must have made a great impression on the delivery guy.

Anyways, after opening the box and removing a looooooot of air bags,I found my new crash bars! I have the original Suzuki ones (still for sale, by the way), but they are too low and while they protect the plastic fairings in the event of a silly fall on tarmac – they have done their job well a couple of times – I’m afraid they won’t be enough if I drop the bike on rough terrain, so I wanted something beefier and that offers protection higher up than these ones.

2013-04-09 11.55.07

The Hepco & Becker crash bars look great, made from thick steel tubing and great attention to detail. They even have mounting points to install floodlights, nice detail. The only thing that worries me is that they fit both my bike and the later model (2011 onwards) and in the instructions pictures the bar that attaches one side to the other seems to be mounted lower on my model than on the new one – it seems to have slightly raised mounting points. In any case, neither of the bars pictured looks like the one that came with the set and the instructions make no difference between the two models, so it should be alright. I’ll report when I find a moment to install them.

The Consulate of Kazakhstan in Barcelona exists!

A month ago I started gathering information about the visas and all the paperwork they would require and visited the consulates in Barcelona. I need visas for Russia, Kazakhstan and Mongolia. I got all the information I needed in the consulates of Russia and Mongolia (more on that on another post), but I went to the consulate of Kazakhstan on three separate occasions only to find it closed, no matter what time or day.

Fortunately, today has been a very productive day and I have found a phone number for the consulate. I called this morning and they are indeed in Barcelona, but only receive people by appointment. They can issue visas, but they do it through the consulate in Madrid, and charge 120€ for the service. If I get the paperwork to Madrid myself, it will only cost 35€, so I’ll take advantage of the fact that my sister lives there and I have friends regularly coming and going between Barcelona and Madrid and try to do it myself.

In the meantime, I have downloaded these very official-looking forms:

2013-04-09 16.00.35

New springs, brake pads, tyres and rear brake disc

High on the long list of things to be done to the bike in preparation for the trip was upgrading the suspension, since it is one of the components that is going to suffer more due to the weight the bike will be carrying and the condition of the roads and dirt tracks I will be travelling through.

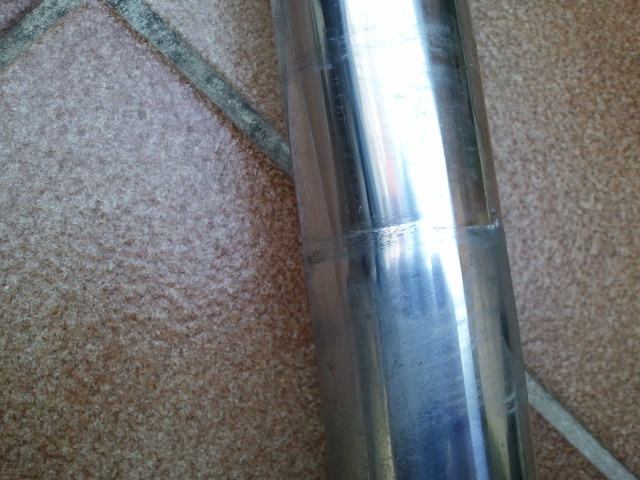
I had had a crash nine months ago and as a result of that the fork had bent. A friend of mine who had just opened a workshop managed to straighten it again and it was fine for on road riding, no vibration, no strange behaviour, but the repair was noticeable and I did not want to take the risk of putting a fork in such state to the test on the roads in Mongolia, so I decided to replace the bars, and since I was going to take the whole thing apart in the process, replace the springs as well.

I had originally intended to get all this suspension work done at the workshop, but I was lucky enough to find a pair of second-hand bars through the owner’s website in Spain, and then I thought that by doing the work myself I would save a lot of money, so I studied the service manuals and a good tutorial I found on the internet and got down to it.

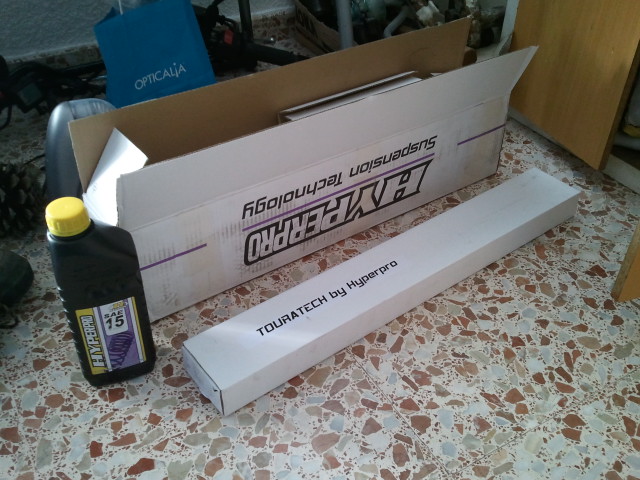
I got a set of stiffer, progressive springs made by HyperPro from Touratech. It included front and rear springs and fork oil. Annoyingly, it only included a litre of oil, and a V-Strom needs 538 ml of oil per tube, so a litre was not enough and I had to buy another litre… I also bought inner seals and dust seals.

2012-12-30 14.22.59

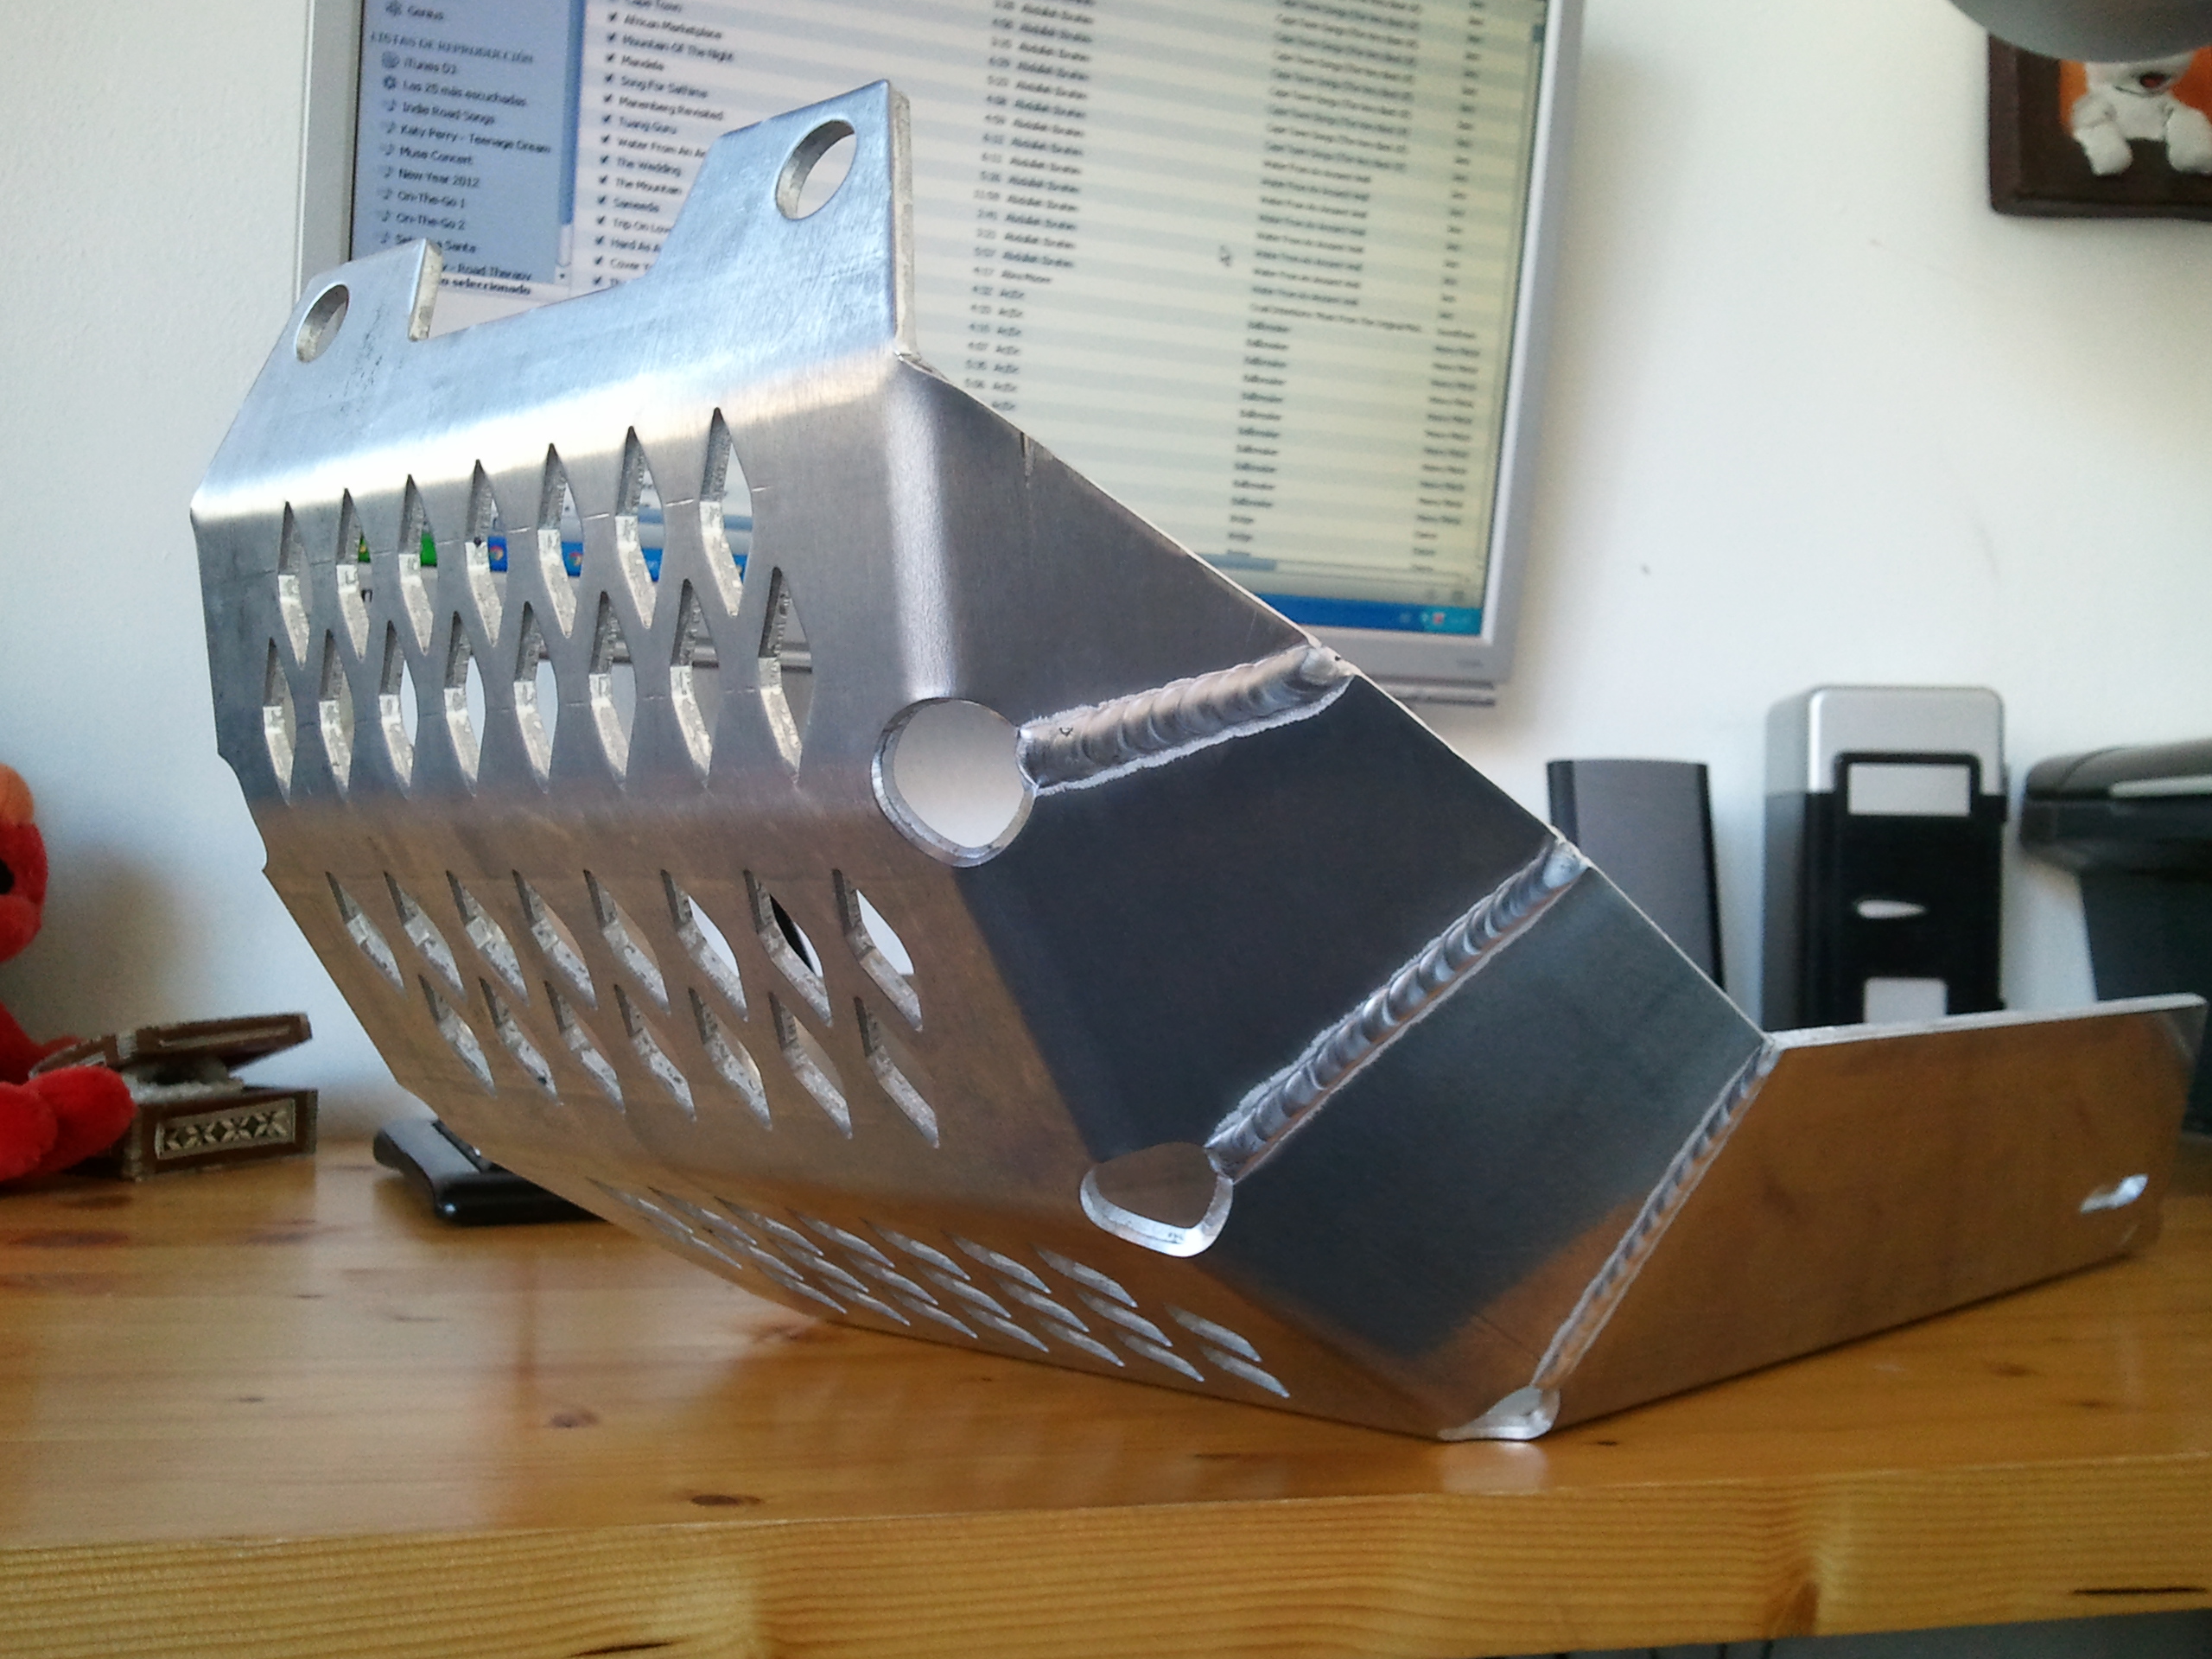
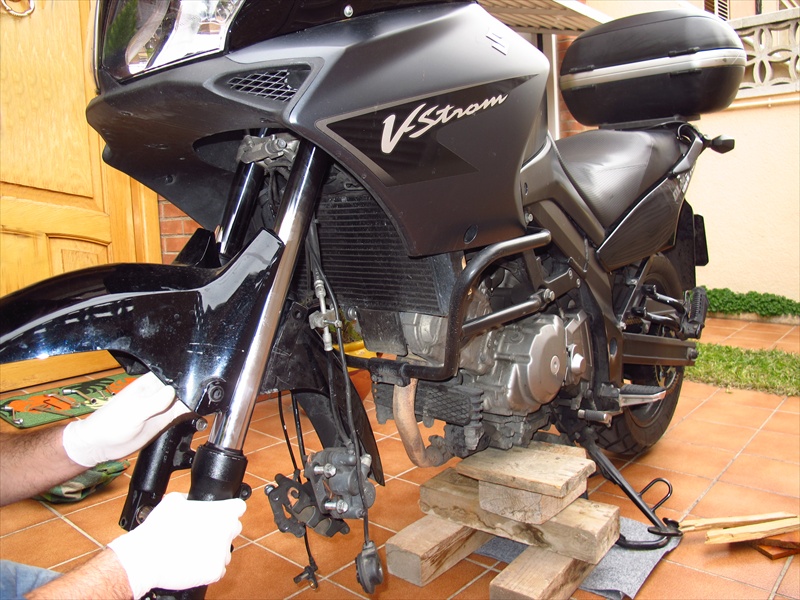
Taking the fork out of the bike was quite a straightforward task. I put it on a few blocks of wood under the engine block to lift the front wheel off the ground and proceeded to remove all the necessary parts, which was easier than I expected. The front wheel comes off after loosening the bolt at the bottom of the right bottle and removing the axe/bolt, The brake calipers are held in place by four bolts that came off easily, leaving them hanging on the brake lines and then I just had to remove the rest of parts attached to the suspension bottles, which included brake lines, speed and ABS sensor cables and the mudguard.

The former were a matter of removing a few small screws, the latter took a bit more work. It is possible to remove the front mudguard of a V-Strom without removing the fork, but it is hard and you risk scratching or worse, cracking it. So the easier way (and the one recommended in the workshop manual) is to loosen one suspension arm and remove it while holding the mudguard to prevent it from falling on the floor, and then it comes out easily.

IMG_4400

After that I removed the other arm and had them ready to be taken apart and rebuilt.

Once they were out I saw that the accident damage was very obvious and I was glad I had decided to change them.

2012-12-31 10.06.22

I unscrewed the suspension preload assembly from the top of both arms, took the old springs out and poured the oil into a plastic tray.

IMG_4392

IMG_4219

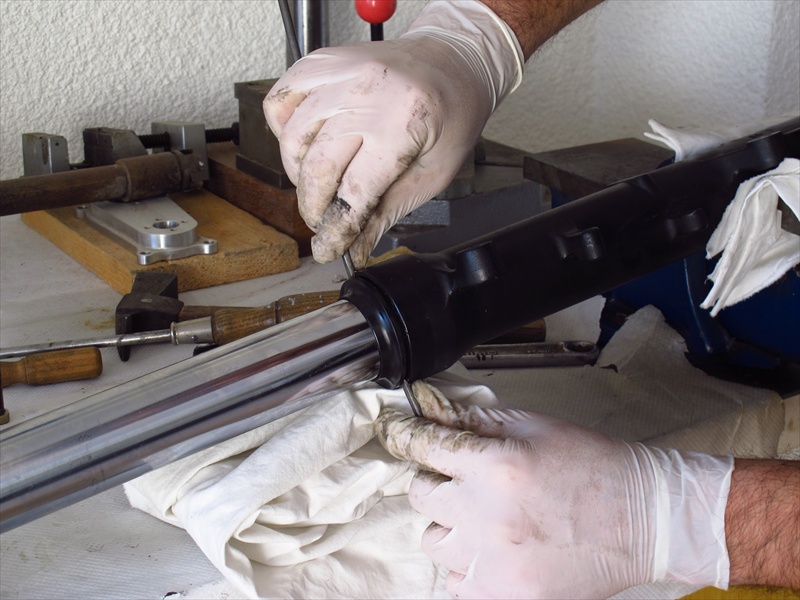
Then I removed the dust seals with a couple of small screwdrivers and the rings that hold the inner seals in place.

IMG_4214

IMG_4225

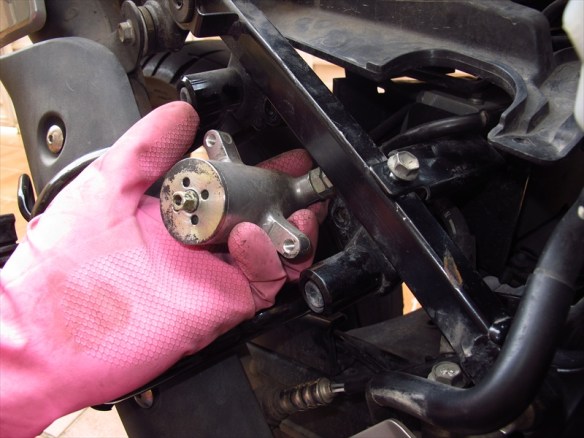
After that, the only thing left to do was to remove the bolts that hold the bottom of the suspension arms in place and prevent them from coming out. I had read that this was the hard part, as sometimes the arm might turn with the bolt, making it necessary to introduce a special tool into the bottle to hold everything in place (you can’t clamp the arm, as it is aluminium and therefore very easy to damage), but I had no problem and both bolts came out without offering any resistance.

IMG_4224

Now the arms were ready to be taken out of the bottles. It is just a matter of pulling out hard and suddenly. I had previously taken apart the second-hand fork I had bought, so I just had to take the arms from that one, fit all the seals and put everything back together.

IMG_4215

IMG_4227

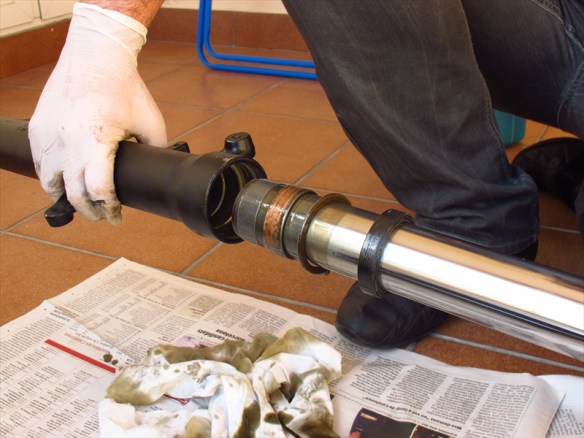
The other hard part is pushing the seals into place, and again, a specific tool is required, but I just manufactured one using a PVC pipe. It worked great!

IMG_4237

Once everything was in place and well screwed together, I filled each tube with the required amount of fork oil, pumped the air out, dropped the new springs inside and put the preload assembly back on top of everything. Now they were ready to be put back on the bike!

IMG_4241

IMG_4243

However, since I had removed the brake callipers, I took the chance to replace the brake pads as well, as they were quite worn out and it was something I did not want to have to carry with me on the road, so I changed both front and back brake pads.

And as usual, one thing leads to another… Both tyres needed replacing as well, and trying to find a good deal on the internet, I ran into a guy from the owner’s club who had had a write-off with his almost new bike, and I got a pair of Michelin Anakee 2 with only 3,000 km on them. As I was also looking for a new rear brake disc and the guy didn’t feel like removing the tyres from the rims, I got the whole assembly thrown into the deal, which was great! I also bought a fuel pump from him, just in case, as it is not the kind of thing you can easily find in the middle of nowhere and they are quite expensive. I still have to find the time to fit it and test it. I’ll report when it’s done.

IMG_4303

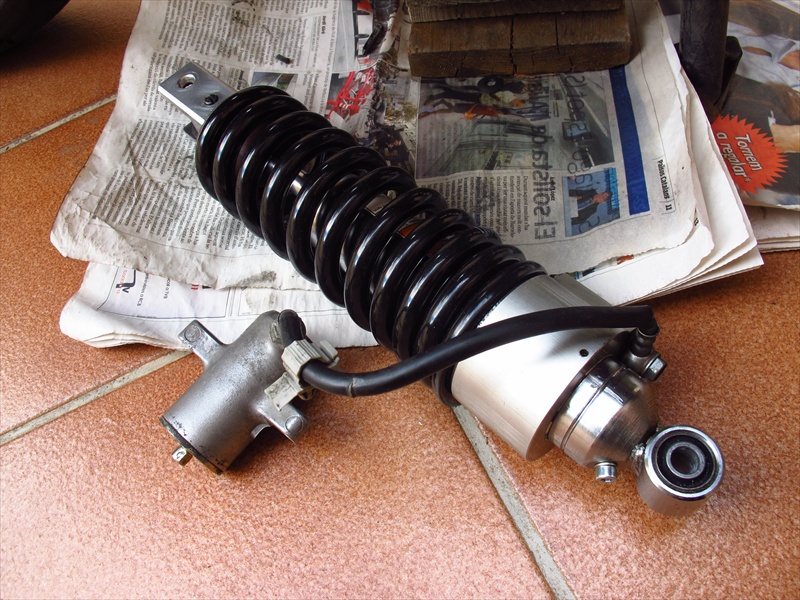
One last thing I needed to do was to replace the rear spring, but since my bike has quite high mileage, I also wanted to do something about the shock absorber. This is the part that will suffer more on a trip like this, so I started looking at what choices I had. Replacing it for a better one was horribly expensive, so I got a new spring and found a guy that rebuilt it for a fraction of the price. Now it is as good as new and with a stiffer spring. Removing the rear shock and preload adjust set from the bike was not an easy task though. To do this you’re supposed to remove the preload adjuster knob, but the bolt was in very bad condition and it was impossible, so I had to take half the bike apart and then twist, push, swear and swat to make it fit through the rear sub-frame.

IMG_4286

Once it was out I was able to put it on a proper work surface and replace that bolt. Putting everything back in was a much easier task.

IMG_4285

IMG_4287

At this point the bike had been off the road for over a week and as you can imagine, I was itching to go for a ride and test it. It was bound to feel completely different with new tyres, suspension and brakes! It did not disappoint, it feels like a new bike.
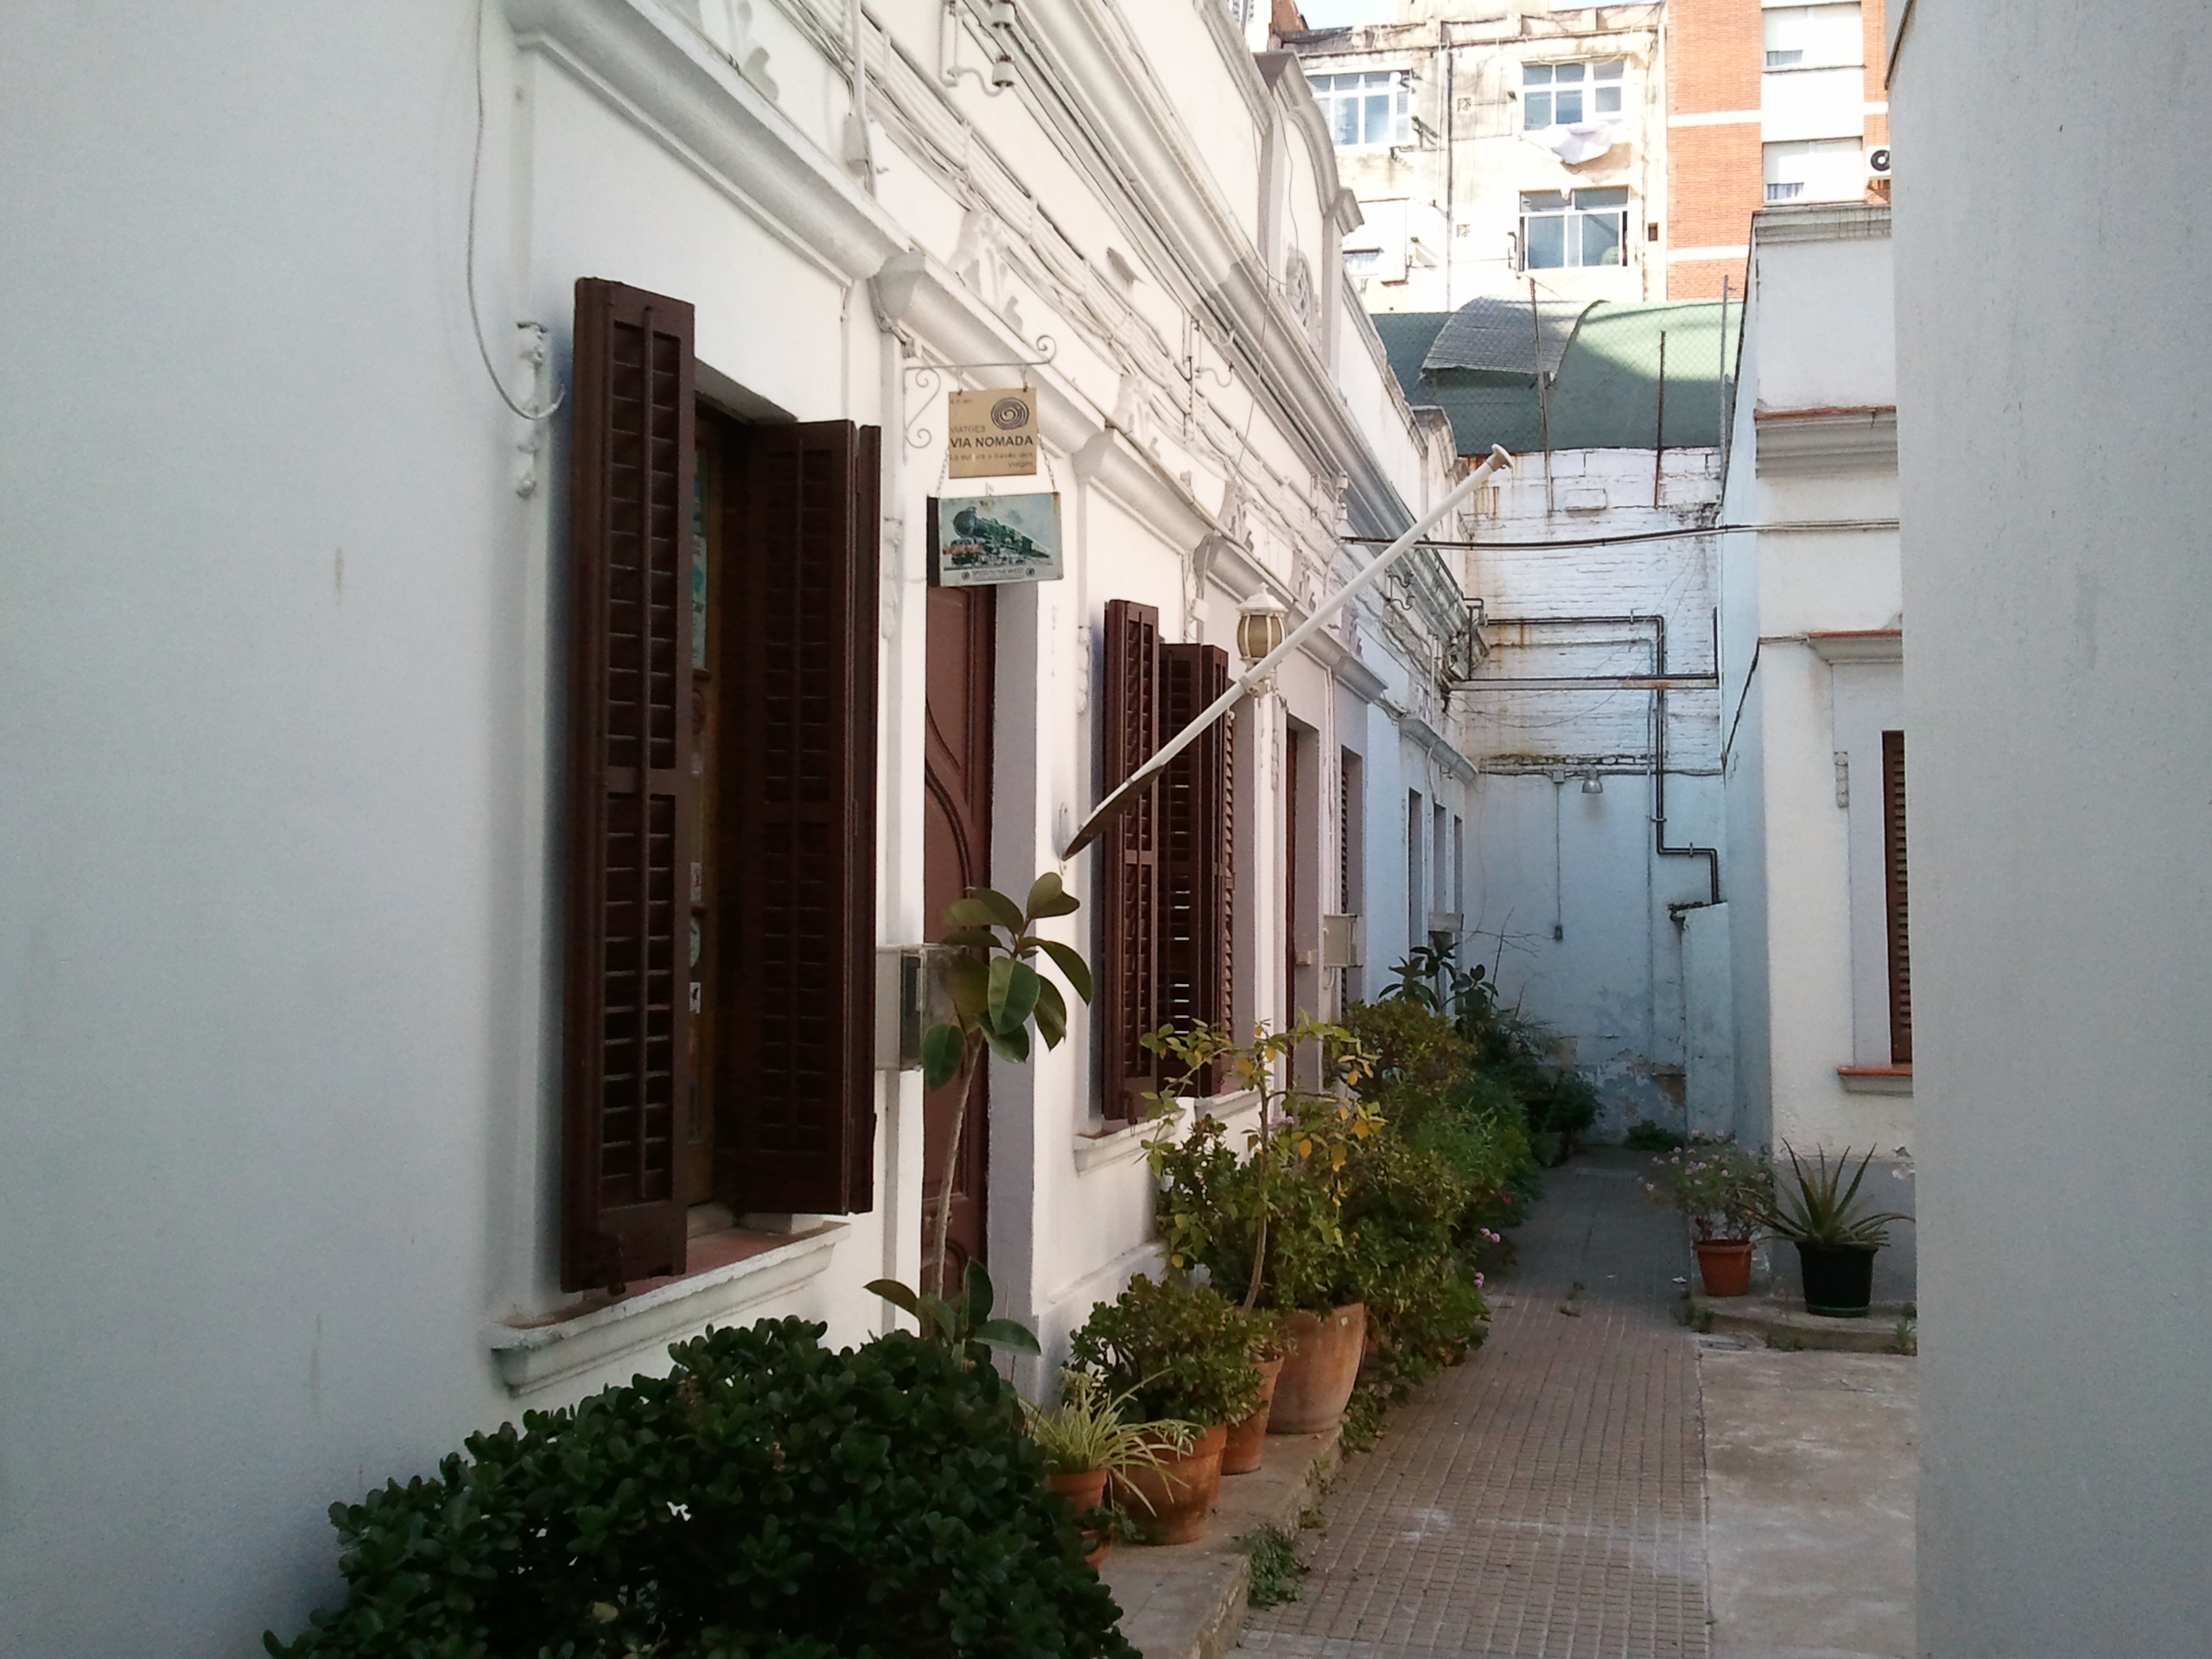