Most OEM handguards tend to do a very good job protecting from the wind and the rain, but do not usually offer much protection if any at all in the event of a fall, so you are more than likely to end up with a broken gear or clutch lever even if you drop the bike while moving it around (years ago some idiot knocked my V-Strom off while parking and the brake lever snapped).
The handguards on the AT look great, but offer the same level of crash protection as the ones on the V-Strom or the ST. The problem is that those ones were good at keeping your hand relatively dry and warm, but the ones on the AT are too small for that, so they are merely cosmetic additions to make the bike look more rugged.
Even before taking delivery of the AT I knew that I was going to fit it with a pair of Barkbusters like the ones I had on my V-Strom, which had proven themselves to be very efficient in a number of falls/drops. However, as I was comparing prices and trying to find a shop that had a specific kit for the AT, I saw some people on Adventure Rider and the Spanish AT forum that had fitted the Acerbis X-Factor ones.
I thought they would be more expensive, as the aluminum back bone they use is huge, but it turned out that not only were they cheaper than the Barkbusters, but they were available immediately, as no specific mounting kit is required for the AT.
I may not have considered Acerbis handguards for the V-Strom, as they look too ‘enduro’ for that bike, but on the pictures I had seen, they seem to suit the AT fine, so I got a pair.
I went for the black and white combination, as the OEM were also black and I was afraid the red ones might not match the shade of the bike. I got them in a week, and today I got down to fitting them, which is a very straightforward process.
Here it is:
First step is to remove the OEM handguards, including the weights both at the ends of the handlebars and the long ones inside.
Loosen the 5mm Allen bolts that hold the handlebar weights and pull the handguards mounts away from the weights.
Remove the bolts that hold the handguards to the brake and clutch lever mounts. Both nuts and bolts are 10mm, except the brake bolt, which is 12mm, annoyingly.
Remove the OEM handguards and put the lever bolts back in place. With the handguards removed they are a bit too long, but you can use the spacers that came with the handguards.
Now comes the difficult part – pulling out the inner weights. They are very long and have a couple of rubber rings, so they do not slide out easily. There is a small cylindrical plate that holds them to the handlebar weights bolts, but it is very easy for those to come apart. In fact, I pulled out the first one and then saw that the plate and the weight were still about 1cm inside the handlebar.
These cylindrical plates are fragile and can come out easily, be careful with them because of they do come out it is practically impossible to grab hold of the inner weight to pull it out. Having suffered this, when I removed the second one I unscrewed the handlebar weight bolt, then pulled gently but firmly until about 1cm of the inner weight emerged and then pulled it out with a pair of pliers.
To get the first one out, I used a pair of long thin pliers to hold the plate and pressed it with a screwdriver to prevent it from opening and coming apart from the weight.
With the most difficult part out of the way, it is time to fit the new handguards.
Do not try to put the expansion shell directly into the handlebars first, as there is a risk that the nut at the end comes loose from the shell and then you might push it further inside when inserting the bolt, making it very difficult to recover. Fit the shell to the aluminum backbone and then insert it in the handlebar.
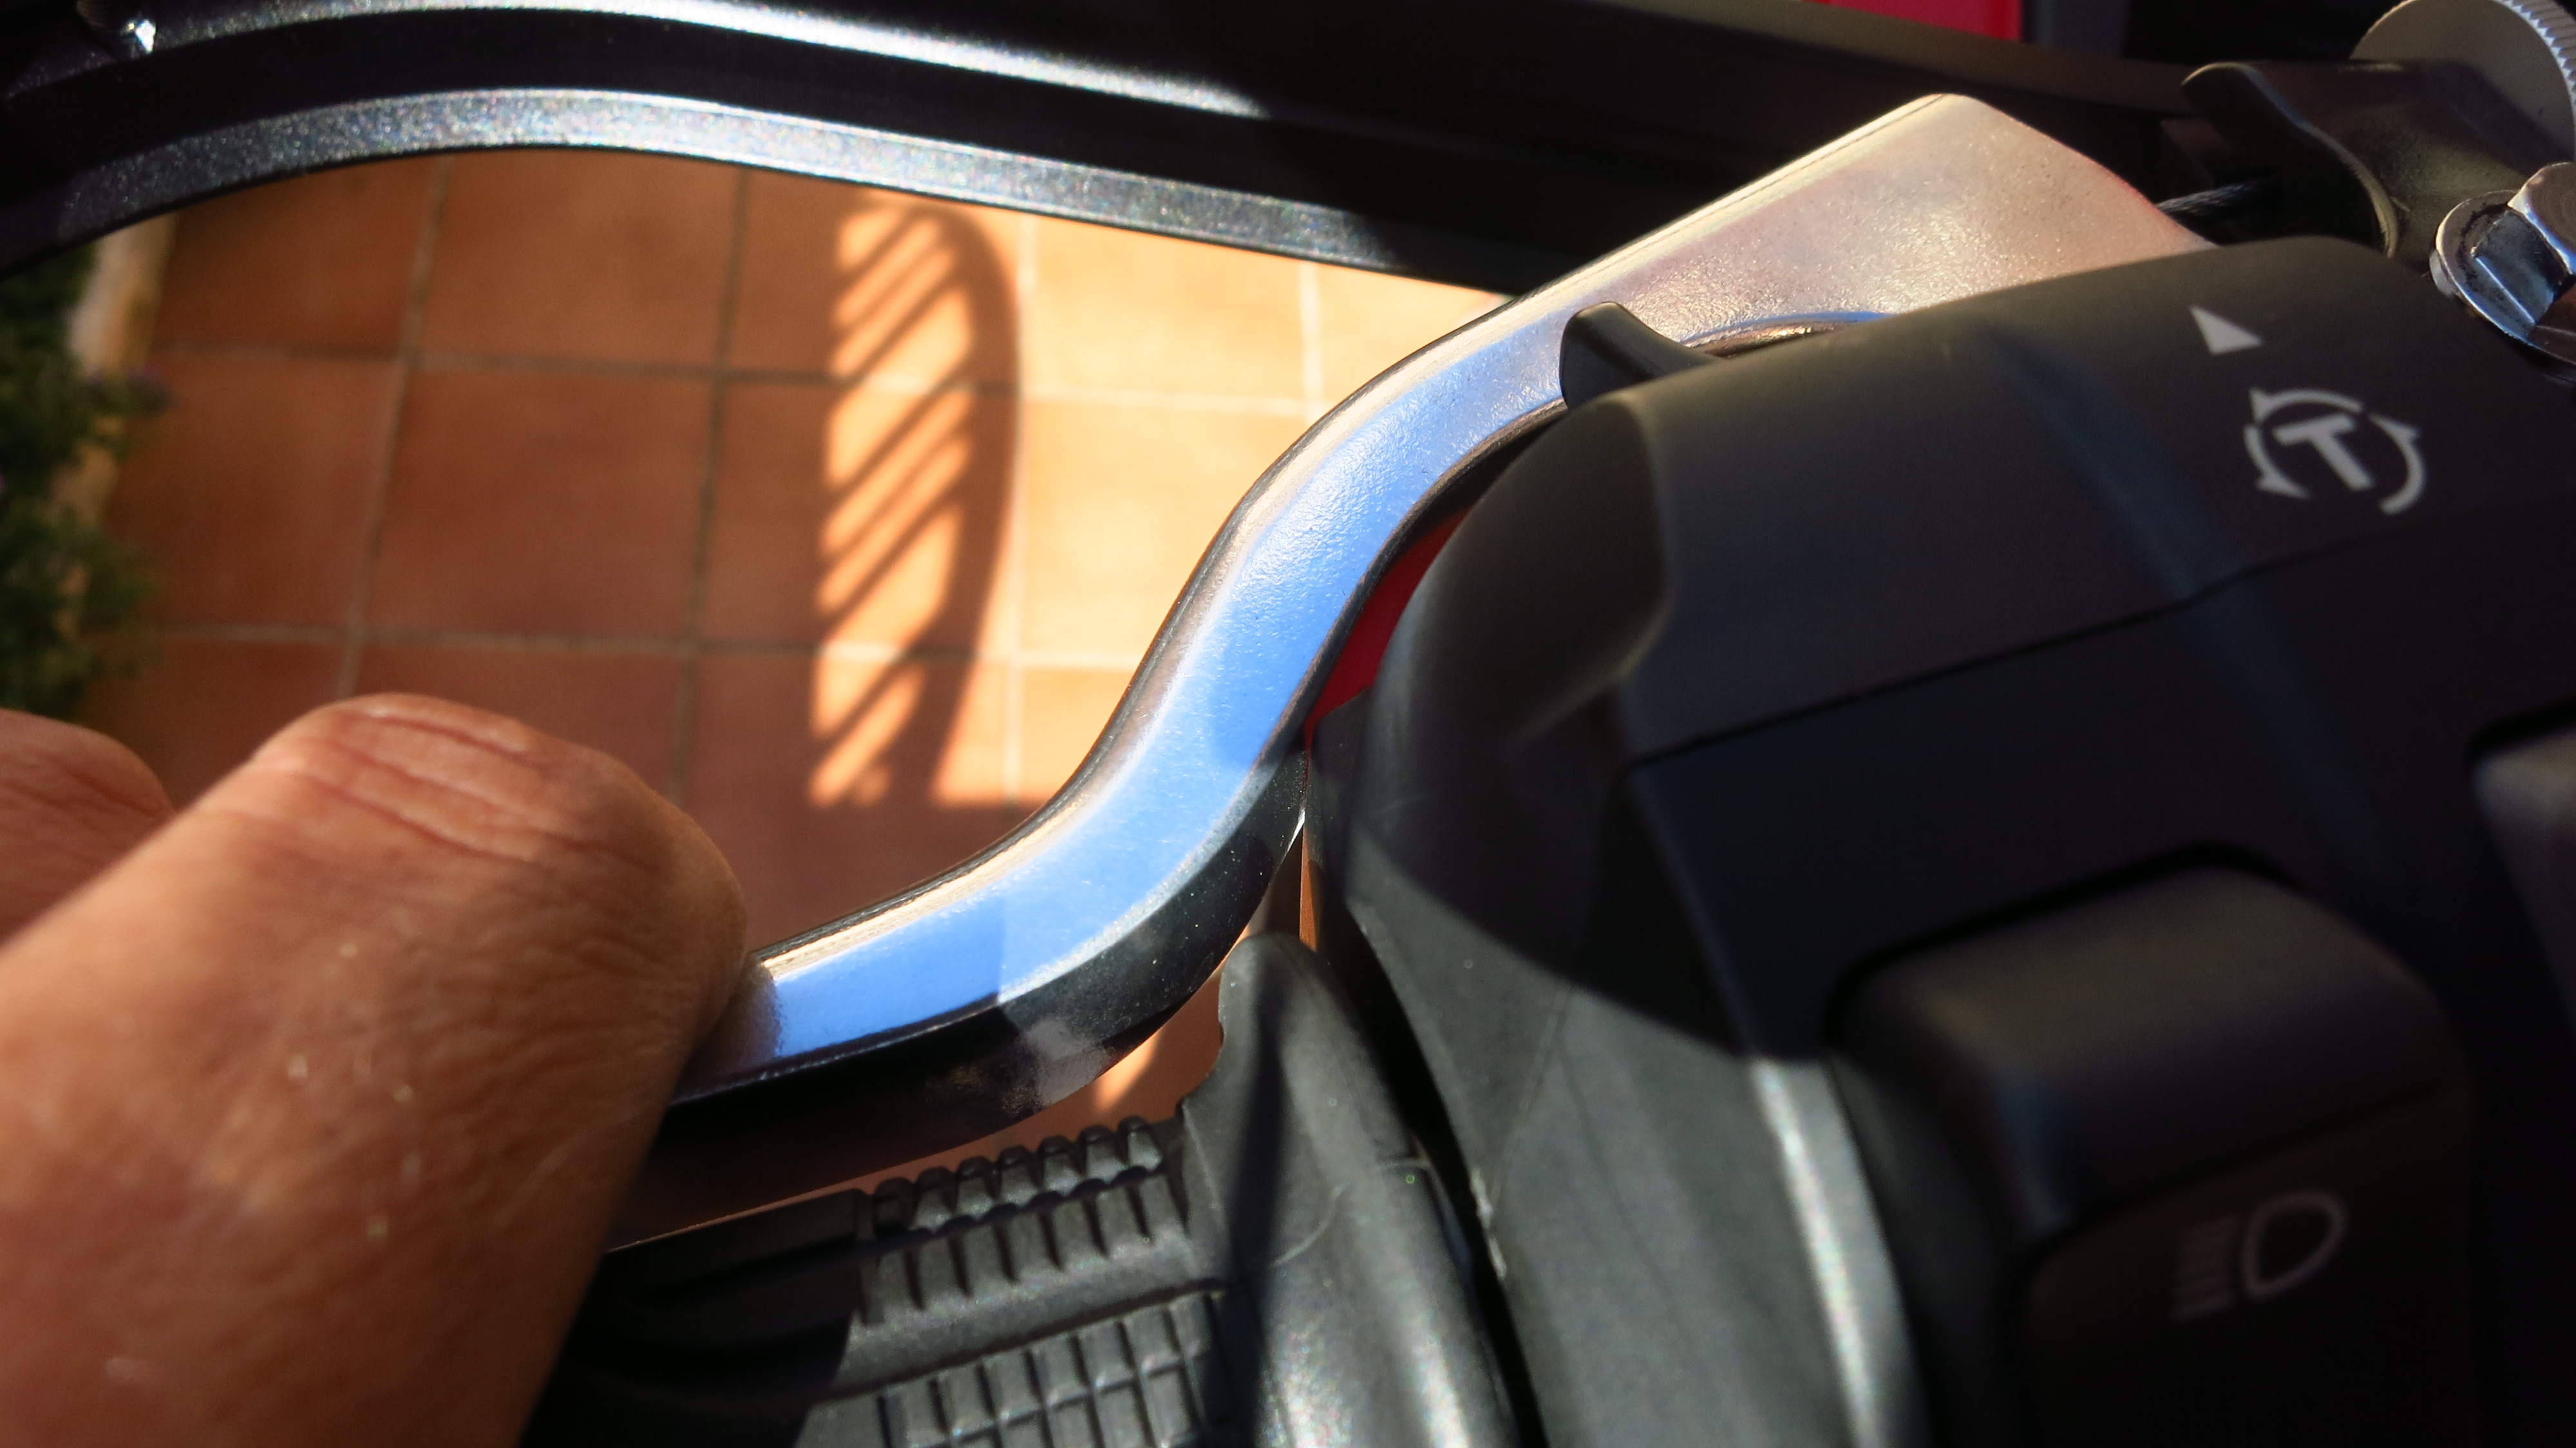
Then fit the support arms to the handlebar but do not tighten, as you’ll need to adjust the levers. It is necessary to move both brake and clutch lever assembly about 1.5cm to the inside to prevent them from touching the backbone when released. Be careful with the clutch lever, too far in and it will touch the switch assembly, too far out and it will touch the backbone. You need to find the sweet spot.
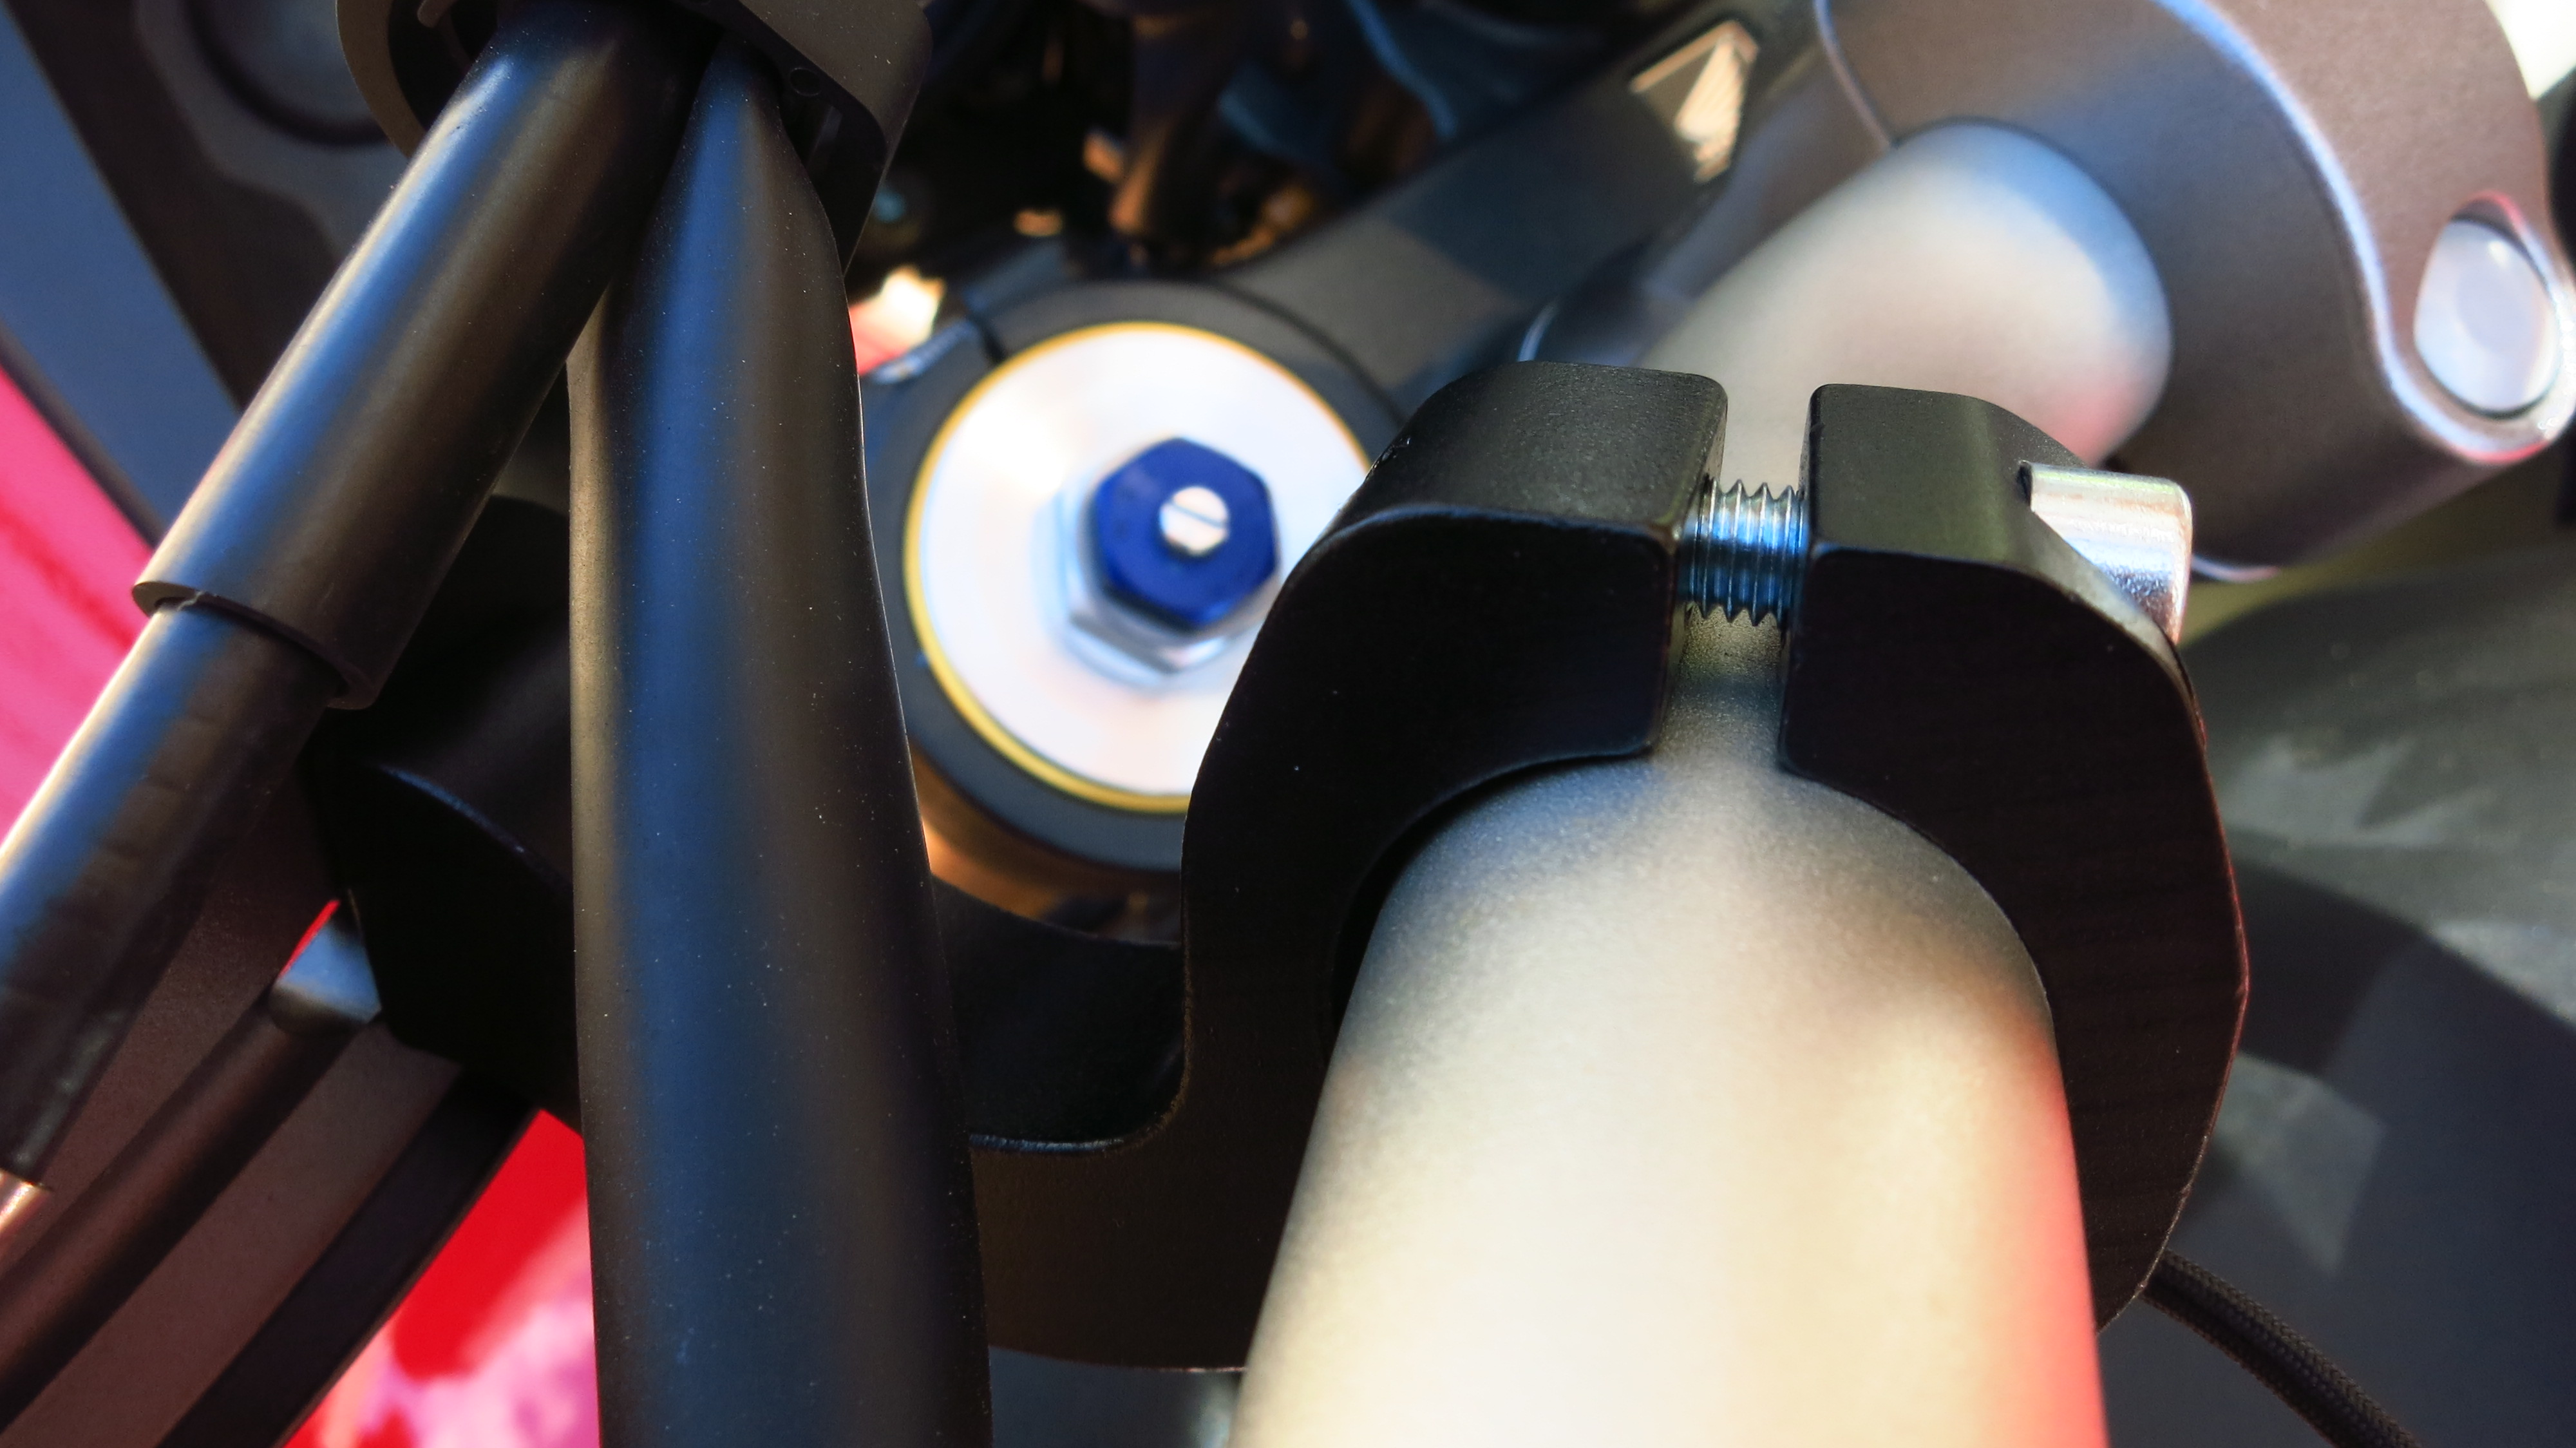
Once everything is in the position and angle you want, start tightening first the mounting arms and then the expansion shells. The mounting arms come with two sets of brackets to fit handlebars of different diameters. In my case I did not need to use either of them.
The bike looks great with the backbones only and it is tempting to keep that look, but I want more protection, not less, so the last touch is to fit the plastic covers, which are attached with three Allen bolts each. Done!
I know this is a matter of personal opinion, but I think the X-Factor handguards look great on the AT, particularly in black:
The lastest addition to the AT is a set of protective stickers to prevent the zippers on my riding jacket and pants from scratching the paint on the fuel tank.
Some people have complained on the Spanish AT forum that the lacquer on the sides of their tanks has started to show some minor damage very quickly, so before mine does too, I ordered this set on Ebay.
They come from Italy, and first impressions on the quality of the product and the service from the vendor were good. They were delivered within a week of ordering and are thick and well-finished.
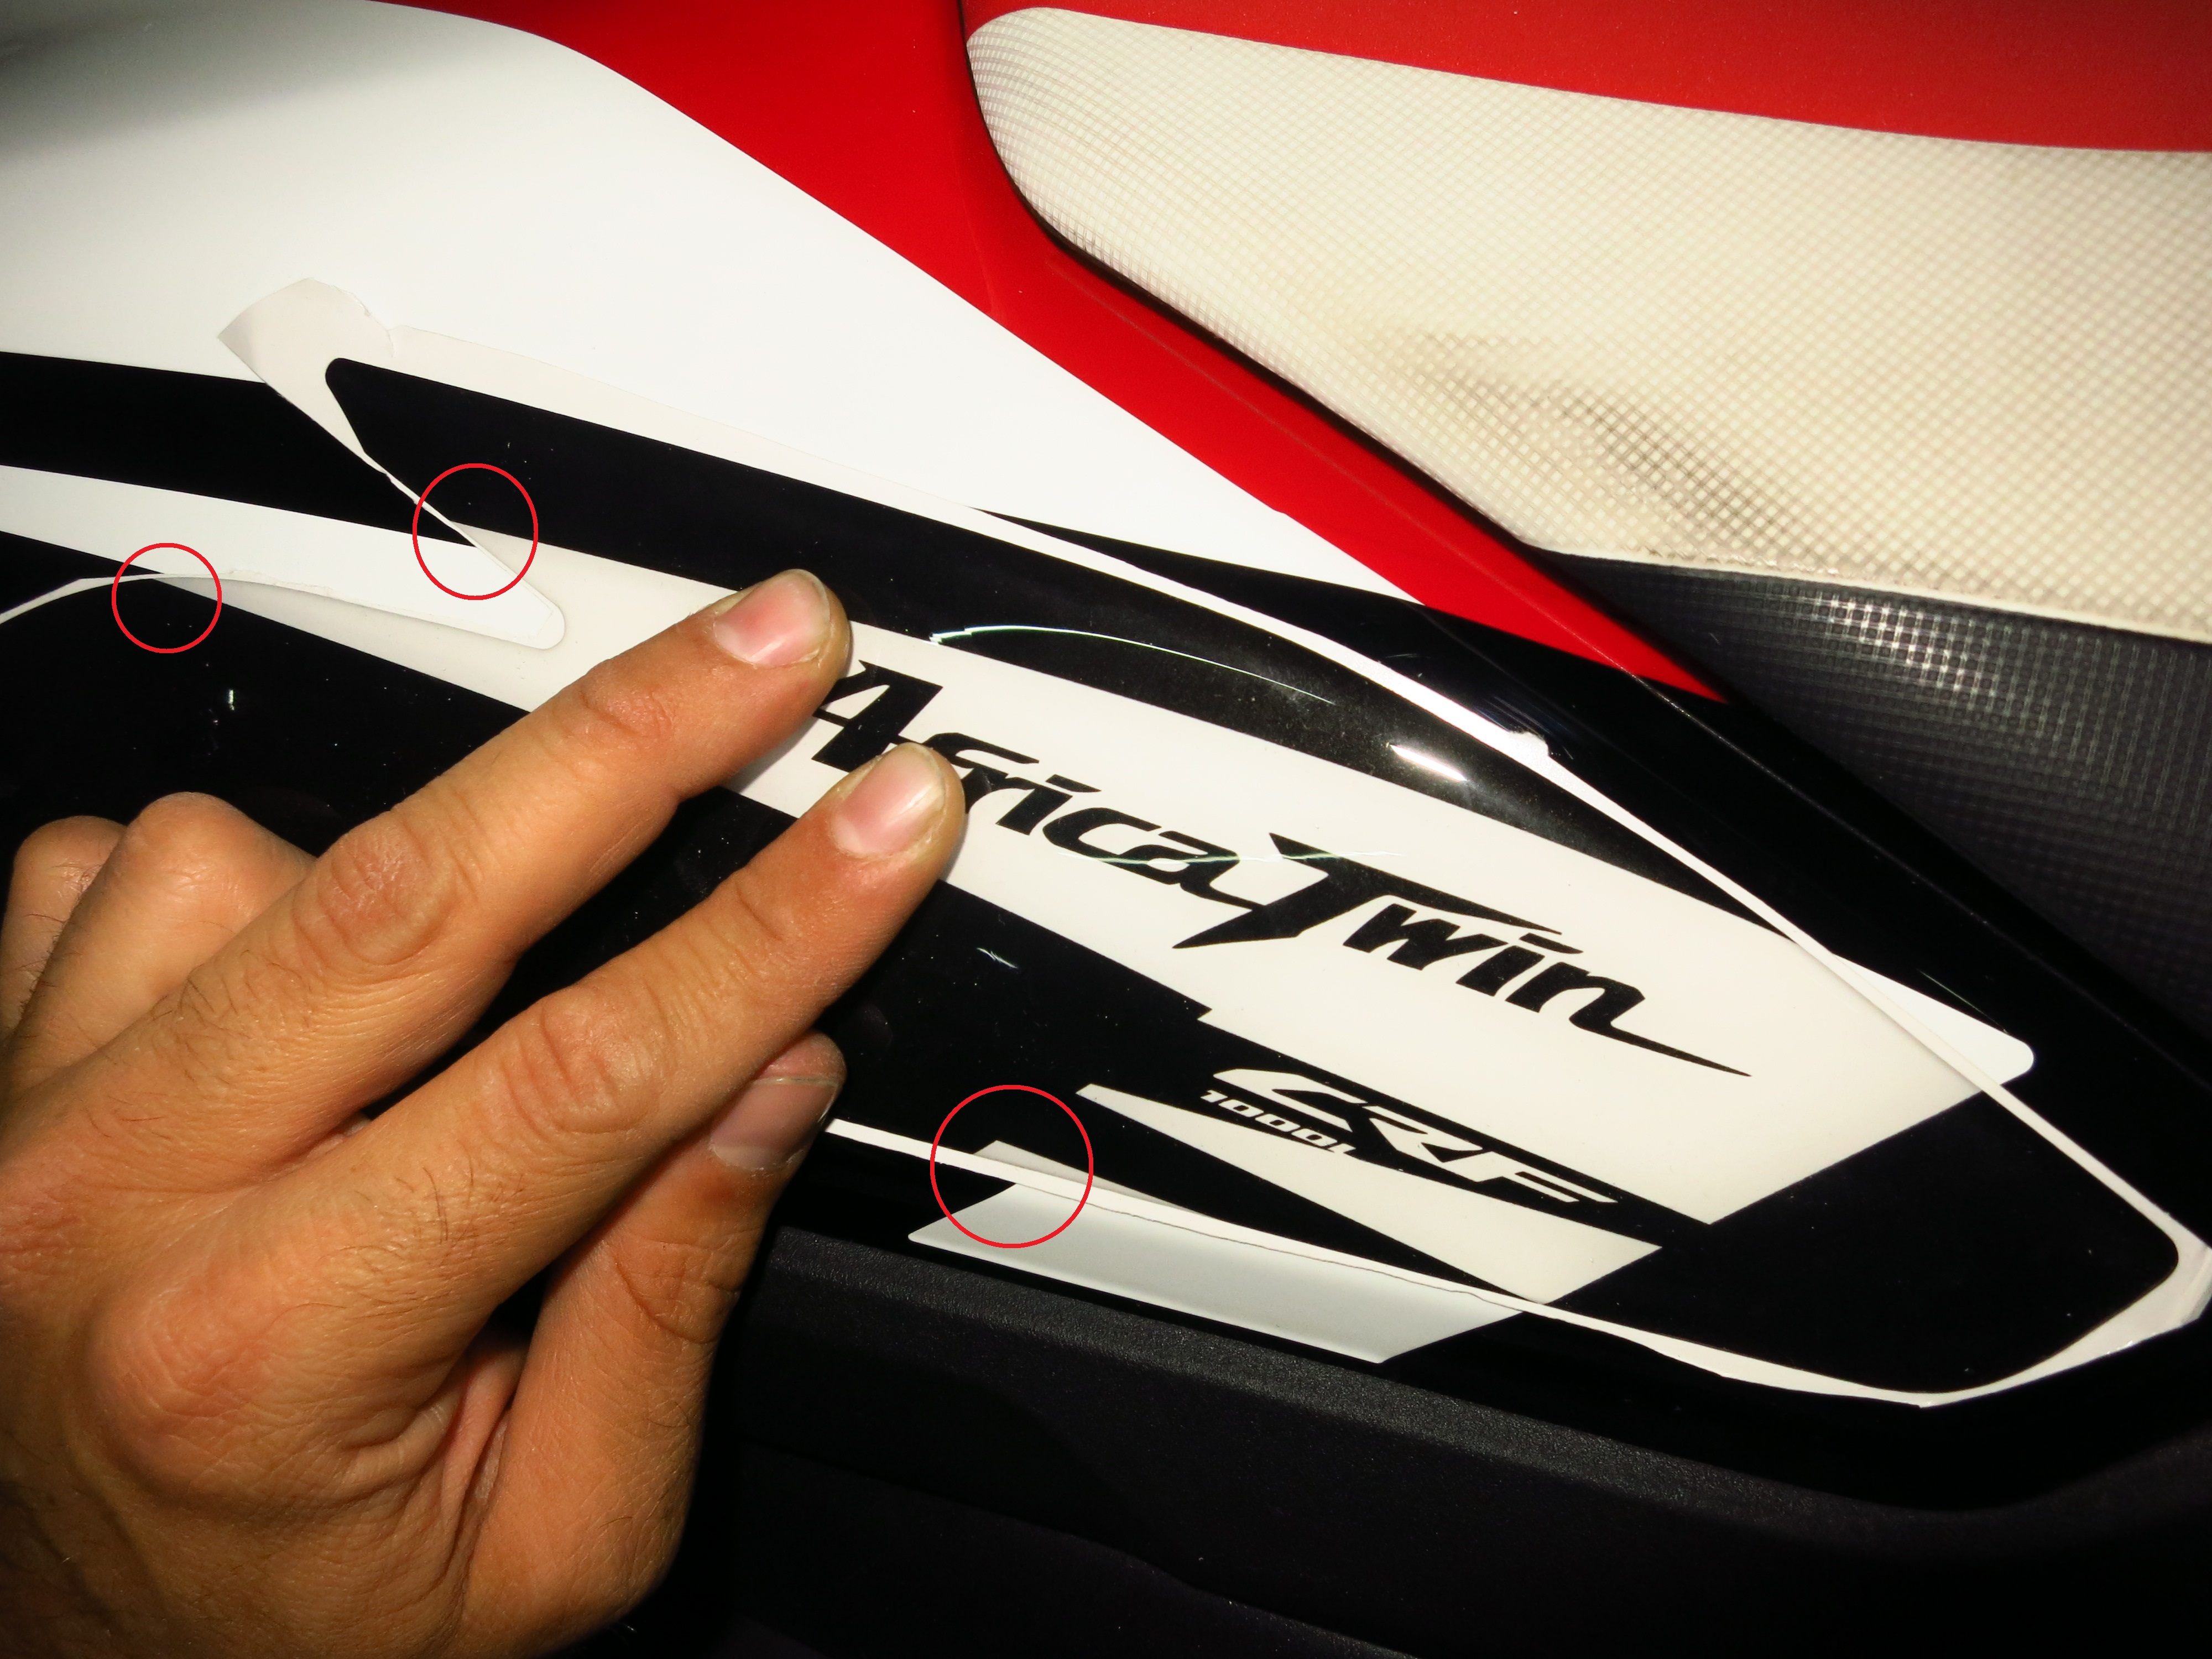
Things did not look so good when it came to putting them on the tank, however. These stickers are designed specifically for the Rally red paint scheme on the AT, the side stickers following the white stripe. When I lined them up against it, I saw that the white stripe on the sticker did not match the one on the bike at several points.
I sent a complaint to the vendor with these pictures attached, and got a reply in less than 24 hours: nothing wrong with the stickers, the white stripe is actually transparent to allow for differences in the paint in different bikes. What I saw white was actually the protective film behind the sticker. Well, that was embarrassing…
Back to the garage to get them on, then.
The tank protector that the previous owner had put on my old V-Strom was about 2cm off to the left, which drove me crazy for the five years I rode the bike, and that was black on black. Determined to do a proper job this time, I watched some tutorials online and followed the recommended method:
Step one: clean the surface with alcohol and let it dry.
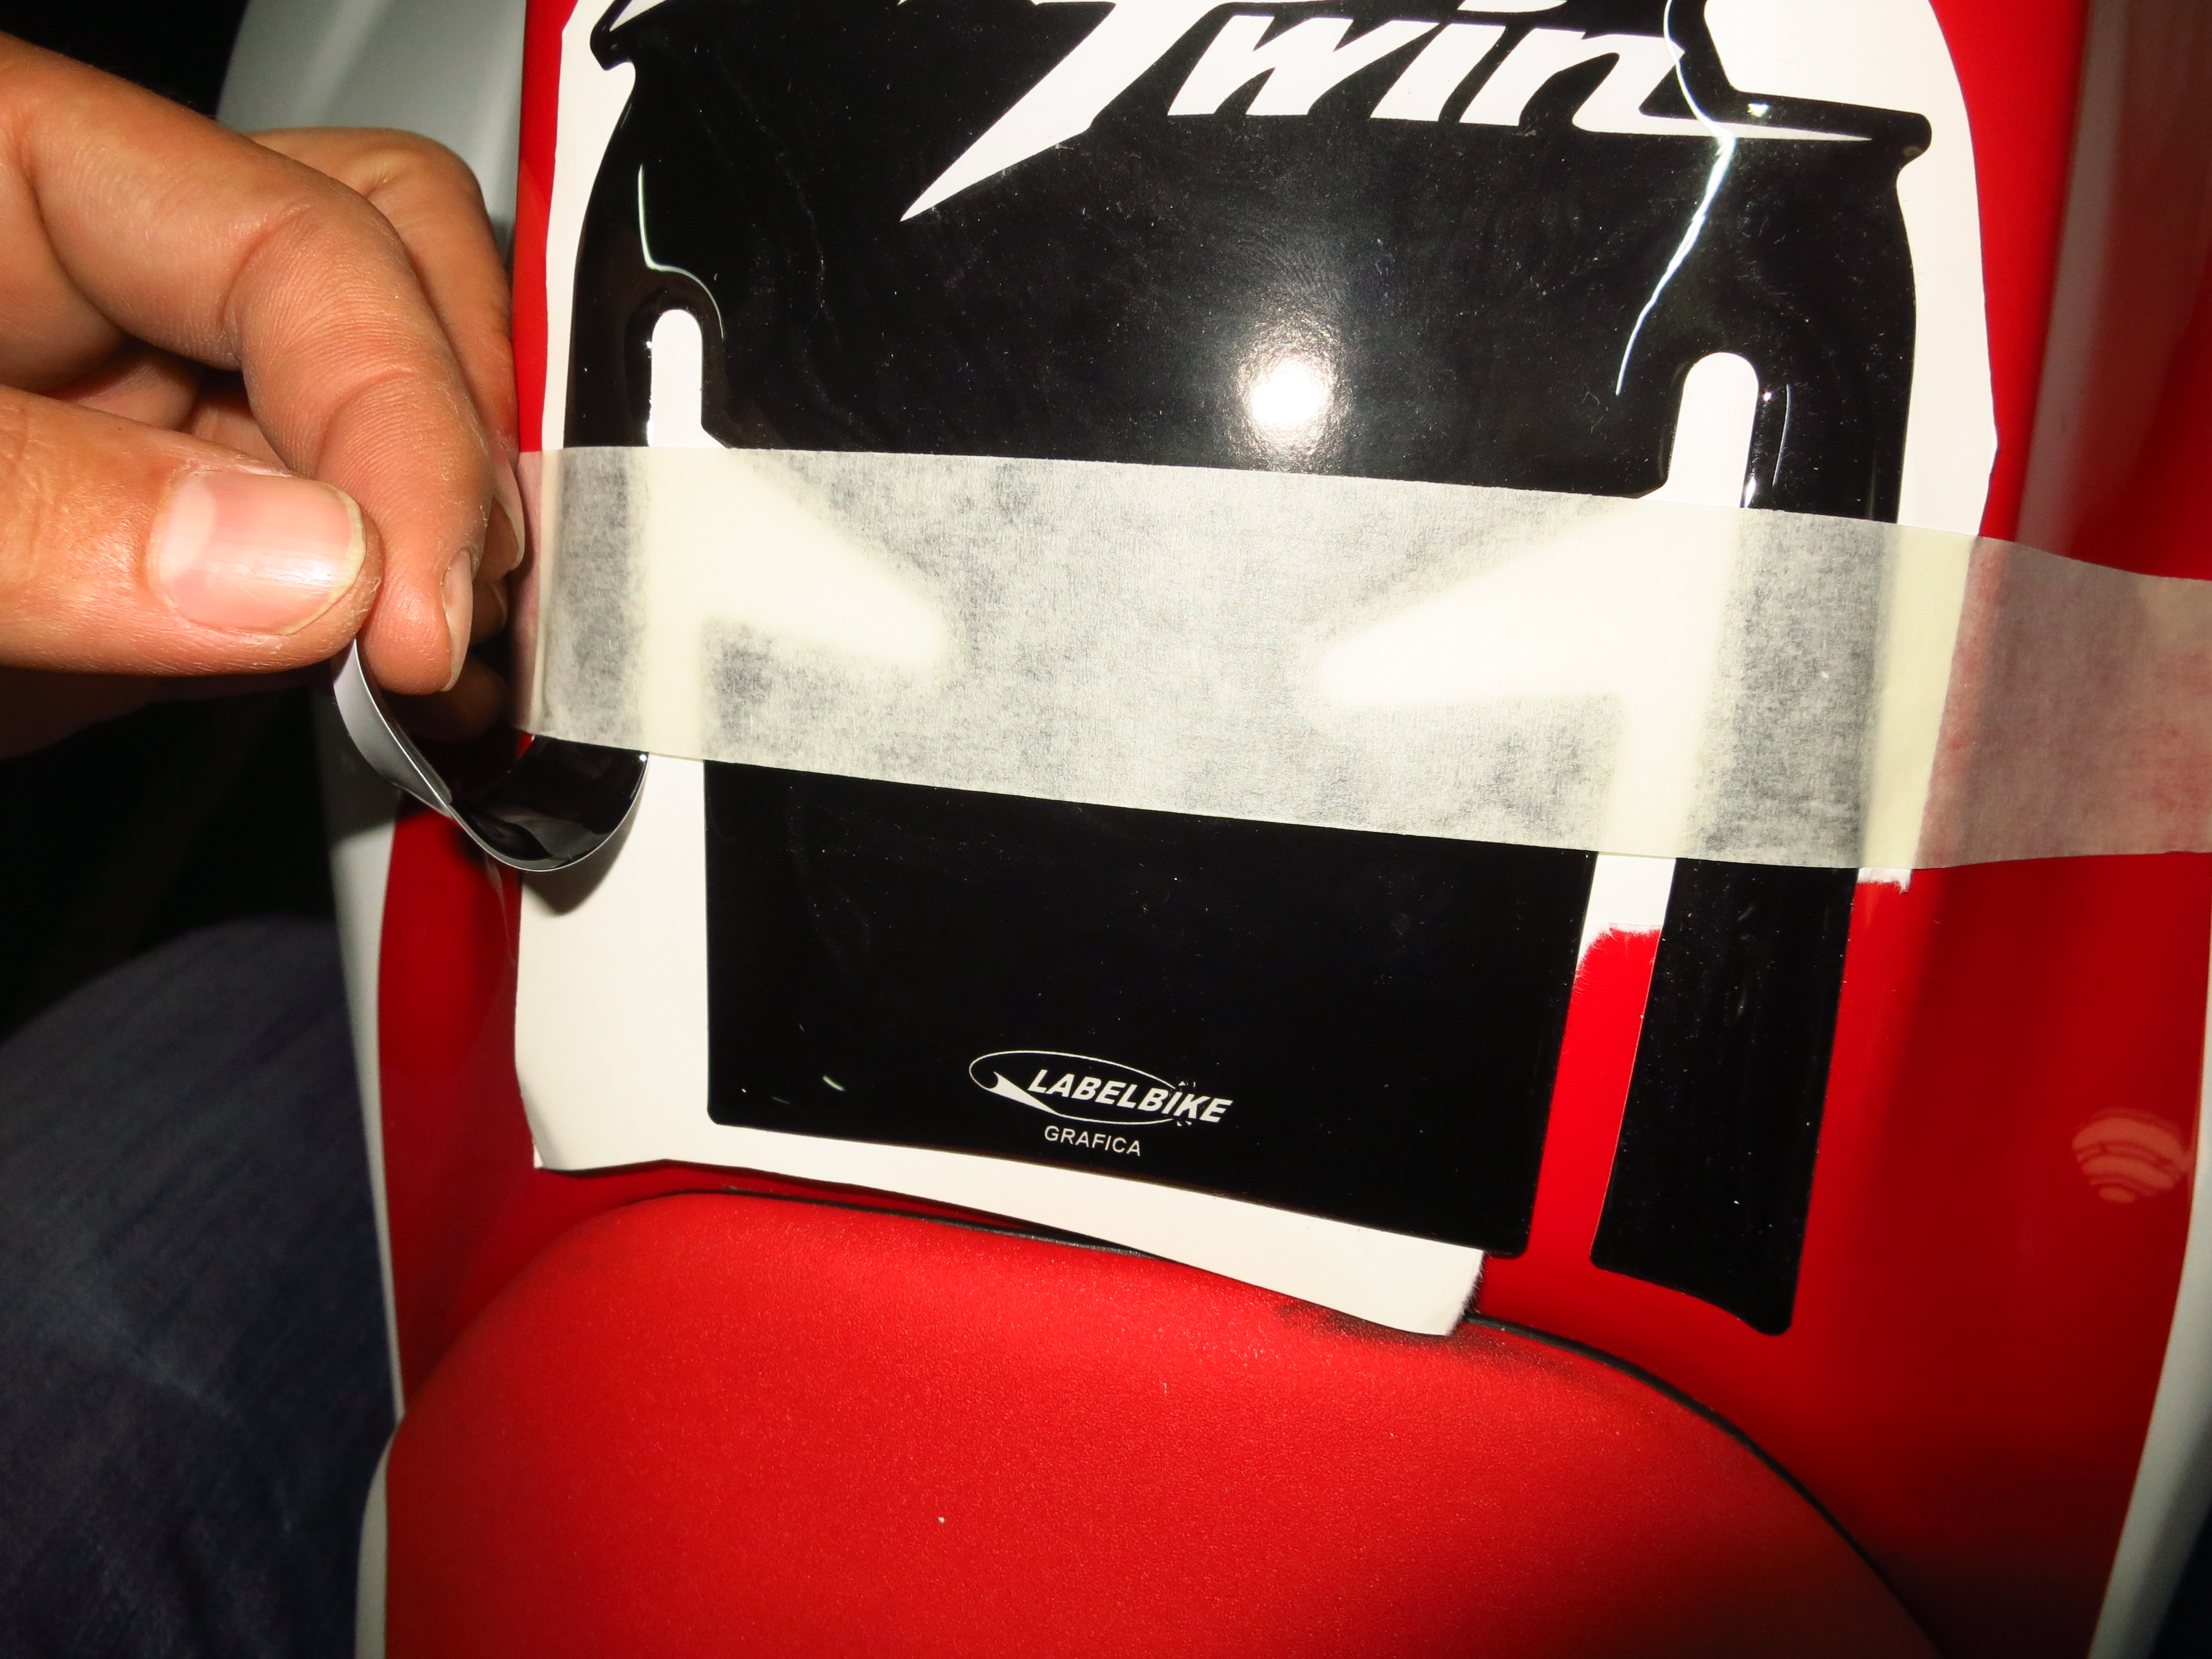
Step two: without removing the white paper at the back of the stickers, put them in the desired position, make sure everything lines up correctly and fix them in place with masking tape.
Step three: lift the sticker on either side of the masking tape, separate it from the white paper and cut the paper away. (Important tip here – you can tear the paper, but if there are transparent areas in the sticker, small shreds of paper might remain stuck to it and be visible, so it is better to cut it clean with a pair of scissors).
Press the sticker against the tank surface from the masking tape outwards, making sure there are no wrinkles or air bubbles. A plastic ice scratcher is a good tool to do that.
Step four: one third of the sticker securely in place, remove the masking tape, lift the other two thirds and repeat the process.
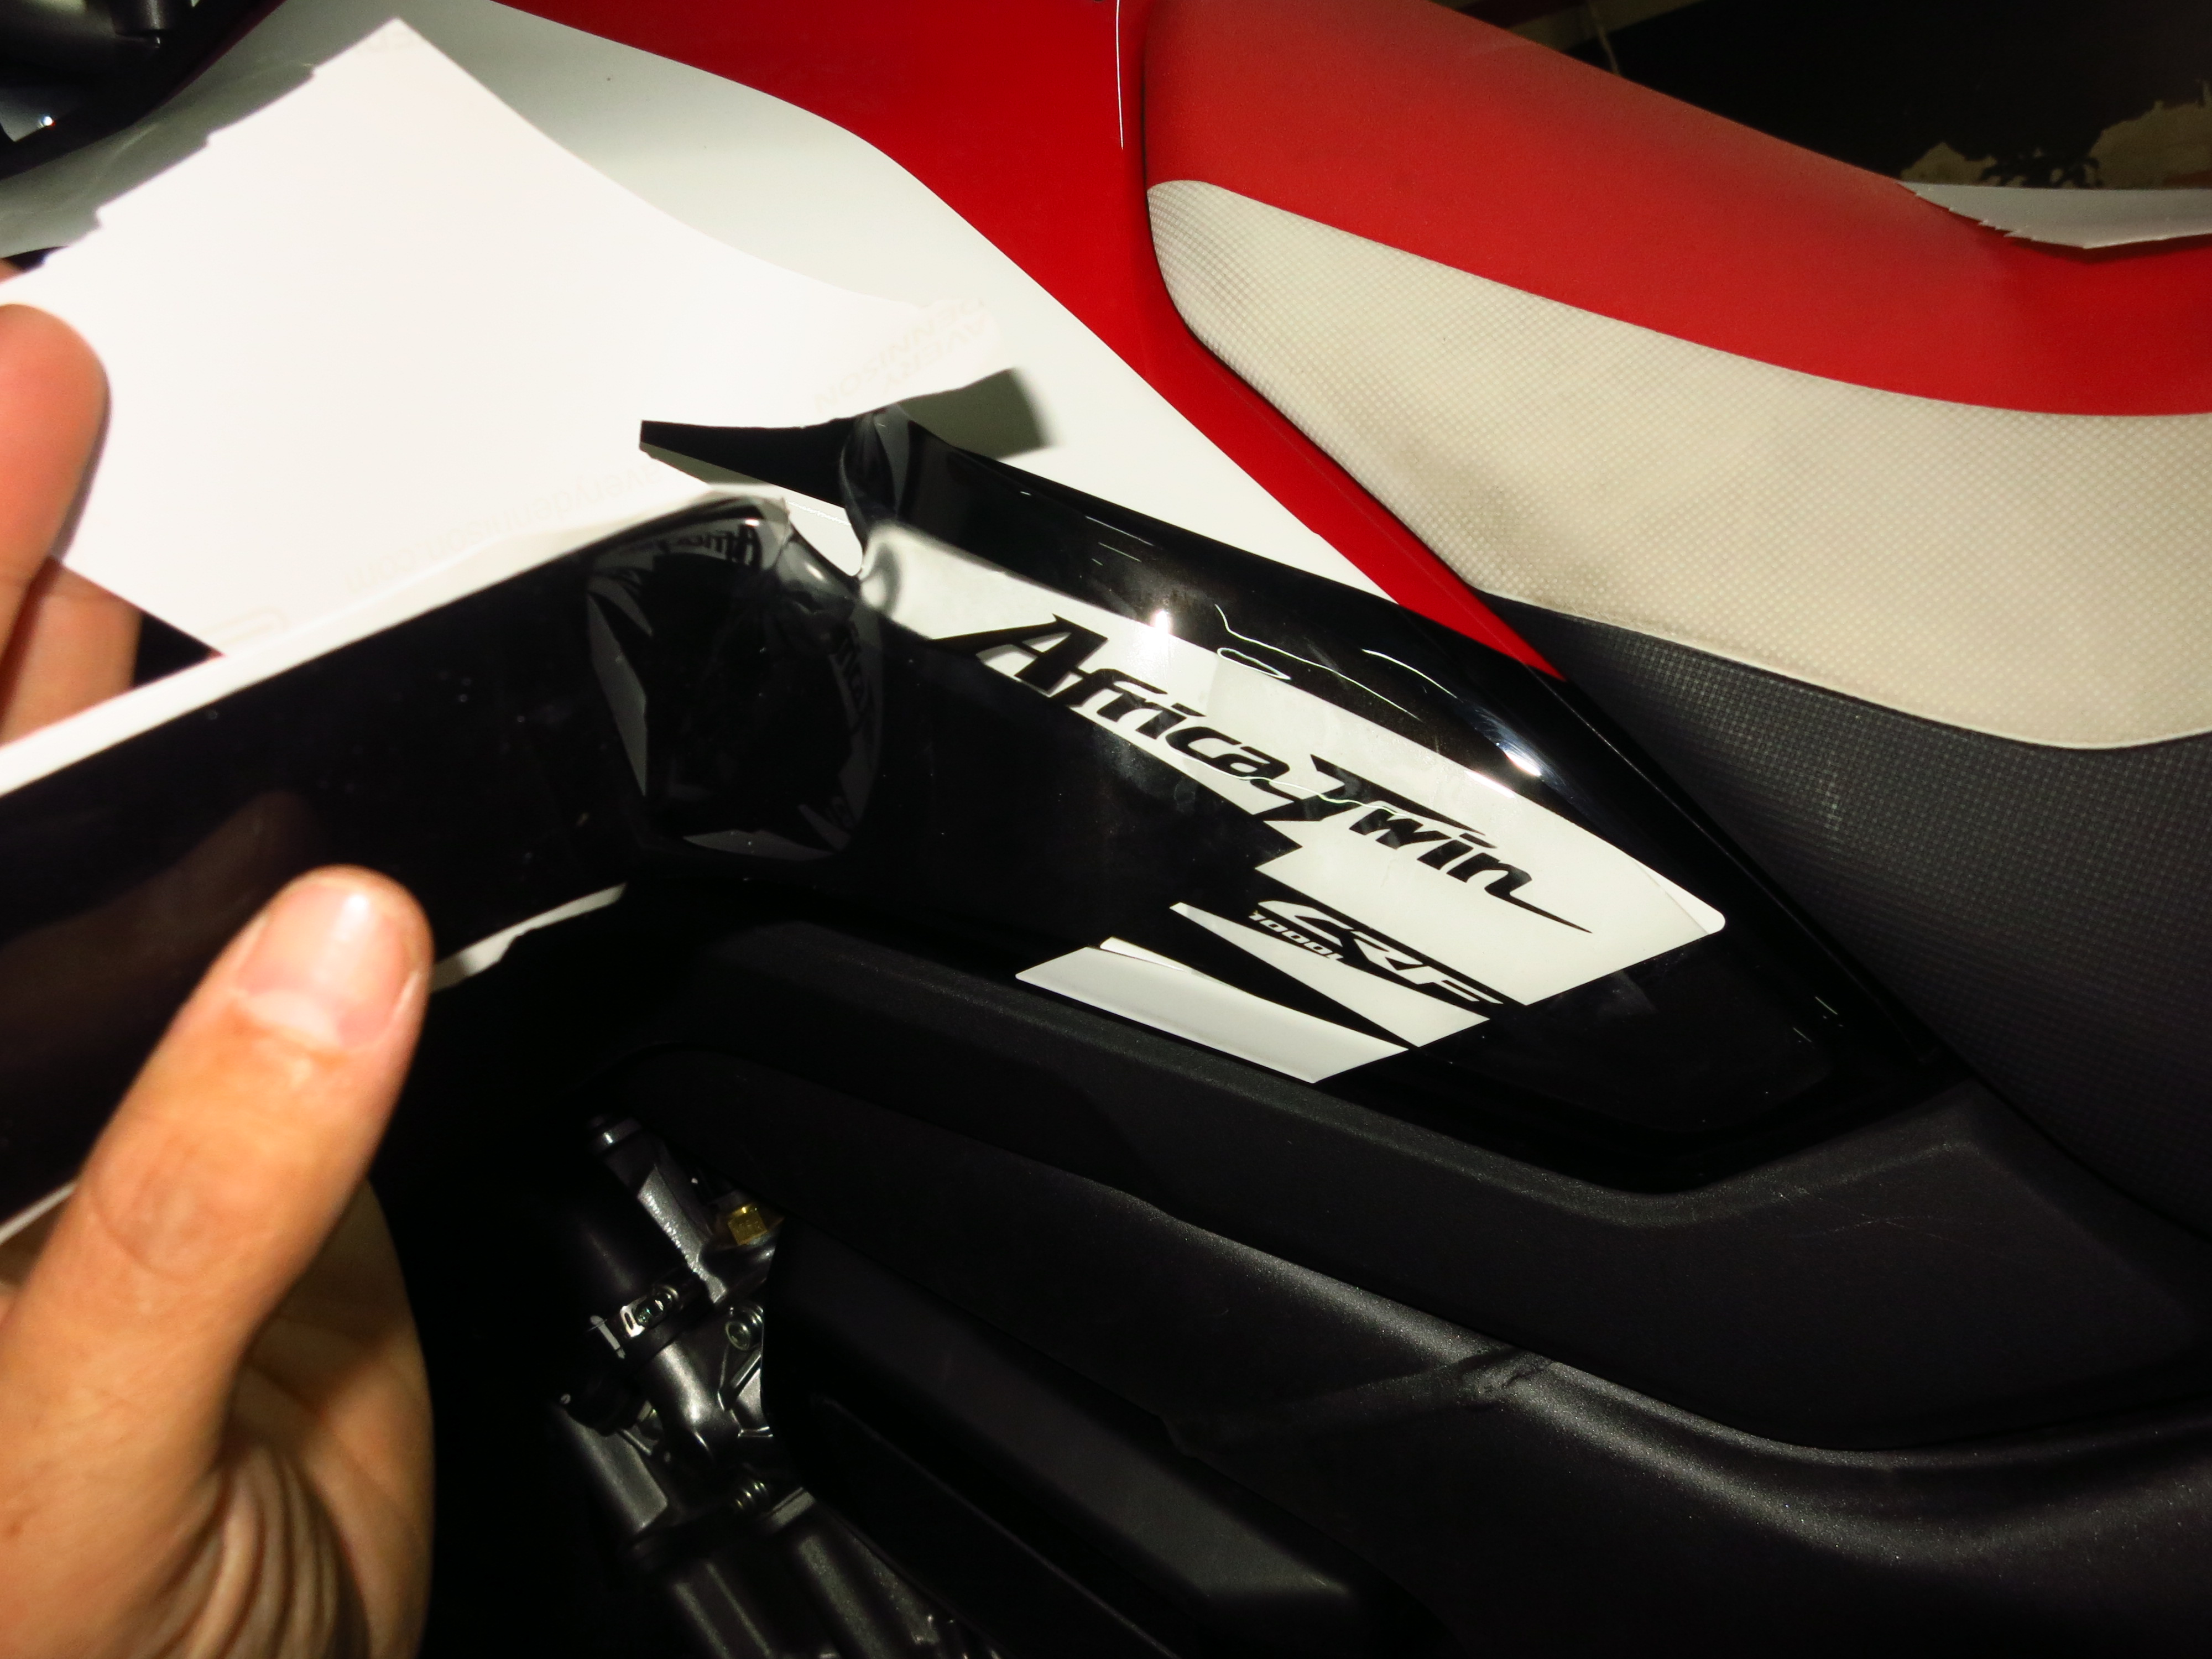
The result looks great:
The white lines you can see are reflections from the fluorescent tubes on the ceiling.
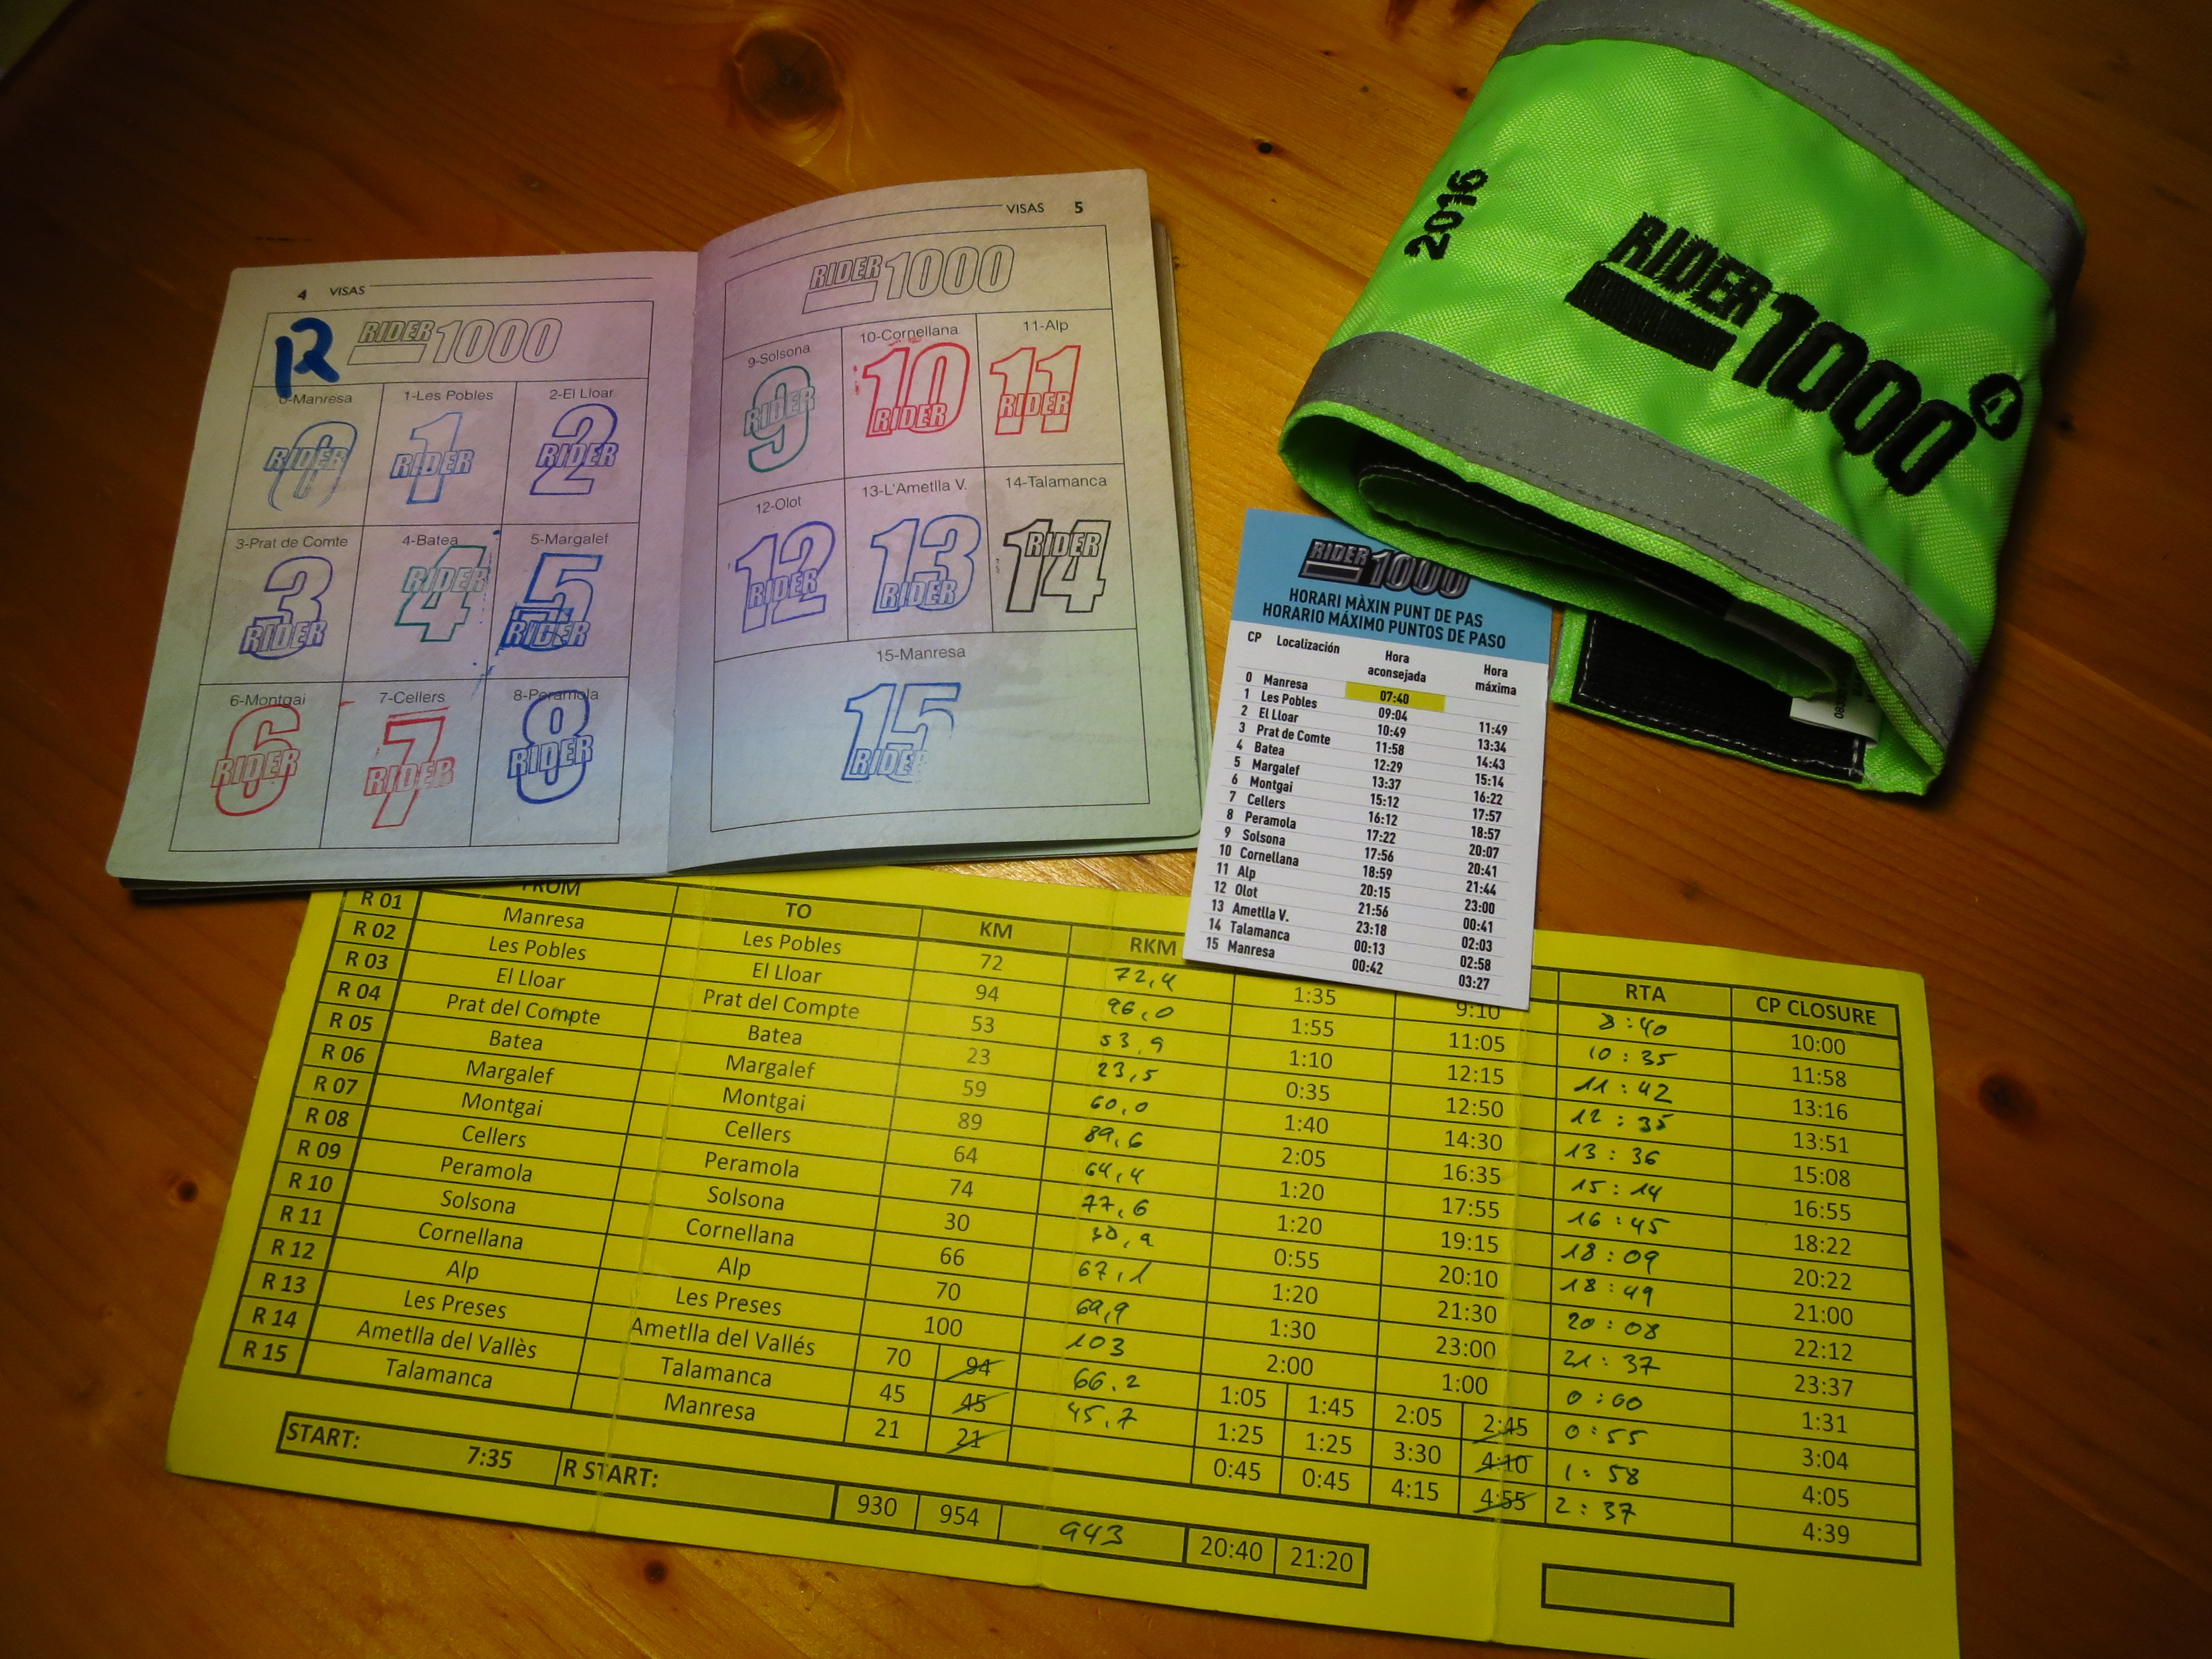
The Rider1000 is a non-competitive endurance riding event that consists in riding 1000 kilometers around Catalonia starting and finishing in the city of Manresa. The 4th edition was held over the past weekend, and I took part for the second time.
I heard about for the first time only a day before the inscriptions for the previous edition closed and I did not have time to convince anyone to take part with me. This year, however, I managed to convince two friends that it would be a great idea to get up before 6am and spend 20 hours riding almost non-stop in winding roads. Not only that, three more friends who are relatively new to riding decided to take part in the 500km version.
With more time to plan things we decided to try not to repeat some mistakes I made last year. First of all – enter the event early. Departures start at 6:00 in order of inscription, meaning that last year I was second to last to take mine, at 7:15. By the time the sun set I was just reaching the checkpoint in Horta de Sant Joan, the furthest point from the finishing line in Manresa and I had to ride for four and a half hours in the dark. I finished at 1:17. The second mistake was not booking accommodation for that night – I thought I would just go back home at the end, but riding an extra 50km on top of the 1000 already done was too much.
With that in mind, we tried to get an early start slot, but the Rider seems to be growing in popularity, and even though we entered it only two hours after inscriptions opened, we were given numbers 578 and 579 and scheduled to start at 7:35. Well, at least we addressed the second mistake and booked an apartment in Manresa for the night before and after.
There was rain forecast in the whole of Catalonia for Saturday. We woke up at 5:45 and when rode to the organization tent to get our breakfast the sky was overcast, but it was not raining. We had a sandwich and a coffee and then moved our bikes to the assigned departure lane.
A few minutes later, our turn came – the passports were stamped, our inscription numbers checked and noted, we had our picture taken in front of a sponsor board so fast that we did not even have time to strike a decent pose (I’m not going to post the result) and we lined up behind the starting line, ready for our turn. At precisely 7:35, we got on the starting ramp, waited a minute to allow a gap with the 6 previous riders, and were given the go!
It was 72km to the first checkpoint, the first bit on a fast national road, and like on the previous edition, the prospect of 850 eager riders let loose on the road was an opportunity that the police could not let escape – they set up a speed trap and at least one undercover patrol car on that bit of road. We got lucky and some riders coming in the opposite direction warned us to slow down, but we saw a few other riders who were not so fortunate and started the day 300€ lighter. The police must have made enough to buy a few new patrol cars.
Things got interesting quickly after that when we left the main road for a much narrower one in Queralt, with a 18% gradient that put our bikes to the test.
A lot of riders were in a hurry to get as many kilometers as possible done early in the day and some of them took too many risks overtaking. It was not long before we saw a bike in a ditch, its rider unharmed, fortunately.
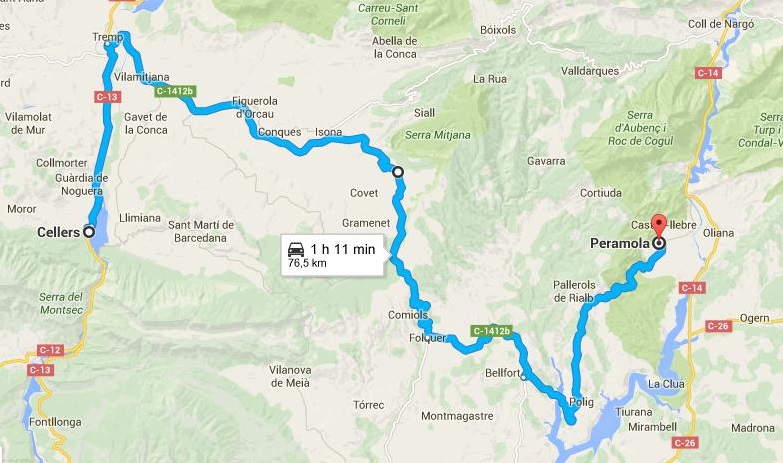
We got the first stamp on our passports in Les Pobles and headed off to the second longest stint of the day, 96km to El Lloar.
After a cold and cloudy start of the day, the sun came out and we enjoyed one of those rides where everything is just perfect – road, weather, scenery… we were in the heart of the Montsant mountains. We only stopped for a moment in the second checkpoint before pressing on another 53km to Prat del Compte, which we reached at 11:42, almost half an hour earlier than my original calculations, so we took the chance to rest for a moment.
While we were having breakfast we heard some guys on GSs talk about an accident that had just happened outside the village – it seems that shortly after leaving Prat del Compte the police had set another speed trap behind some bushes on a long straight. The first bike of a group had seen in time and he braked to avoid a fine, and some guy in a crotch rocket had rammed into one of the GSs. Fortunately he had managed to avoid rearending it full on, and the result was only a bent gear lever and side stand on the GS and two unharmed riders. The guy on the R got the worst part, though, he ended up on the ground with a lot of broken plastic on his bike. You could say that by setting up that speed trap on a perfectly safe straight bit of road with no junctions and long distance visibility the police had managed to cause an accident instead of preventing one. As we were leaving Prat del Compte – riding slowly, for sure – we saw the police car with the speed gun and next to it an unhappy looking rider and his now naked bike waiting for the recovery truck.
We turned right shortly after for the road that connects with Bot across the Pàndols mountains. Next checkpoint was a mere 23km away, but this was the most winding, narrowest bit of road we’d encounter all day.
So narrow in fact, that there were mirrors in some of the corners to check for incoming traffic! Luckily, the road was empty bar from the participants in the Rider, and we were all going in the same direction.
It was still sunny when we reached Batea, the most southwestern part of our journey, but when we hit the road again heading back northeast black clouds were looming ahead of us.
Most people think that the hardest part of the Rider1000 are the last 3 or 4 hundred kilometers, when it gets dark and you are still a long way from the finishing line, but I have found on both my times in the event that once you have passed the 500km mark your body just finds a groove and settles into a calm routine of riding no matter the conditions. No, the hardest part for me on this occasion was the moment between the 250-300km. It was not a particularly long stint to the next checkpoint (59km), we were on time, it wasn’t raining, it was not too cold, and the road was quite good, but my back started to ache – I had made the mistake of wearing a backpack with some food and a CamelBak instead of strapping it to the seat – my contact lenses were starting to get dry and I realized that we had barely covered a quarter of the whole distance. For the last 20km or so I rode behind a guy on a Kawasaki with an IXIL exhaust that made a horrendous noise, and he was riding at annoying speed that is too fast to overtake on a road with not a single straight stretch but too slow to get some distance between me and him. By the time we reached Margalef I had a slight headache, and to make matters worse I saw that I had forgotten the Ibuprofen I had packed for cases like this in the apartment. Damn.
The organization were providing lunch at the next checkpoint, so after putting on some eyedrops to hydrate my contacts we decided to press on to be able to eat at a decent time and to hit the road ahead of the Kawa.
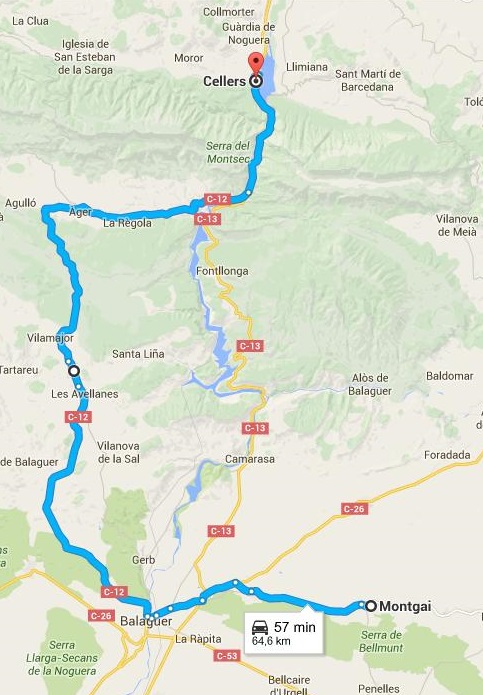
It is funny how fatigue works – for the next stint I was feeling just fine. Maybe it had been the noise from that guy’s exhaust, maybe I was looking forward to lunch, maybe an intermediate fuel stop helped, or maybe the roads were faster, with more flowing corners now, but even though it was 89km to Montgai, they felt very short and I was feeling fresh again.
The main street in Montgai was packed with all kinds of bikes, which was surprising because we had mostly been riding alone all morning, finding other participants only at the checkpoints. Either we had been getting very lucky with traffic or we were two of the few following the recommended route and not cutting between checkpoints using motorways and main roads. Anyway, we sat down for lunch with a rather big helping of fideuà – yes, a light meal before hitting the road – and enjoyed a rest in the sun, which had come out again.
There were menacing clouds in all directions, but we seemed to be following the very few sunny gaps in the clouds all across the country.
It was time to head north now, towards the Pyrenees. If there was going to be rain after all, this was where we were most likely to find it – a high mountain range in the afternoon-evening.
The next 64km to Cellers, on the banks of the Terradets reservoir, were a fast road, and everybody took the chance to make up some time in this stint. It felt so short that we had the after lunch coffee there, less than an hour from the previous checkpoint. And still no rain.
We were not going to reach the Pyrenees just yet, oh no, they were going to make us work for it. After Cellers the route headed straight east in Tremp, then south in Isona and east again until we reached the checkpoint in Peramola, opposite Oliana across the river Segre.
It was just past 6pm and we were still shy of the halfway mark. It was here that my phone ran out of battery – my mistake, I should have kept it in airplane mode and use it only to update the Facebook page at the checkpoints, but I did not think of it. As it turns out, most of the route took us across vast areas with no phone signal and it kept searching, thus drying the battery much sooner than expected. To make matters worse, I still had not had time to fit a 12V socket to the AT, so that was the end of my live report on Facebook. Sorry about that, I promise better logistics next year.
It was on the 30km between Peramola and Solsona when the rain finally caught up with us. Fortunately, it was just a light drizzle, and it had died down by the time we reached the 10th checkpoint and the equator of the ride. It was here that we learned that well over half the participants had already gone through the checkpoint, confirming our suspicions that some people were taking faster routes. Oh well, to hell with the clock, we were having a blast on the winding roads and were not going to stop now.
Next bit was going to be interesting – it was not raining, but the temperature was dropping and we were heading straight north to La Seu d’Urgell on tiny roads across Port del Compte. It was here that I made my only planning mistake – we should have cut across the skiing slopes instead of going around them, as we had to ride down the mountain around the southeast and then back up on the northwest side and we must have lost some valuable time there. Nevermind, the scenery was stunning, so it more than made up for the mistake.
It was 66km to the checkpoint in Cornellana, in the middle of nowhere in the mountains, and then another 30km down to the main road in La Seu.
Our bikes were quite low on fuel for this last bit, and there was not a single petrol station in any of the small villages and hamlets we rode across.
The sun set as we were making our way down to the main road, but the clouds robbed us of what could have been a spectacular sunset over the snow-capped mountains. Once on the main road, we hurried to a petrol station between La Seu and Alp, the 12th checkpoint of the day. On the way there emerged from a tunnel into a very thick cloud of smoke. At first I thought it was a burning car, maybe an accident, but then we saw it was a diesel Volvo whose engine had started burning oil and was self-destroying at full throttle. A family were standing as far from the car as possible, looking terrified and possibly without a clue as to what was happening to their car. My friend later told me that the only way to stop such thing is to block the admission of the engine to choke it, but unless you know exactly where it is and can do it quickly, I would not put my hand in that engine bay.
It was already dark when we stopped at Alp, and we had a sandwich for dinner near one of the paraffin stoves they had lit up to keep warm. We only saw about five or six other bikes at this checkpoint, and wondered how many were there left behind us.
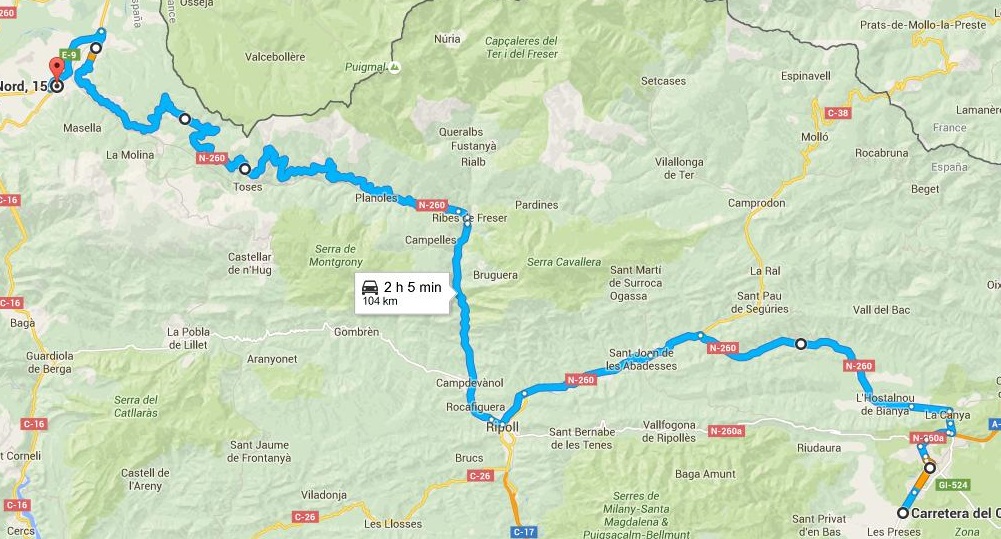
The night time ride was about to begin. We still had a very long ride with four more checkpoints to go and it started with crossing La Collada de Toses, one of the country’s most famous mountain passes. In complete darkness. At this point we could have taken a shortcut through La Molina skiing resort, but we were feeling brave. Time for the energy drink I had been carrying all day.
It went much better than expected, temperature only dropped to 5ºC at the top of the pass, and the LED headlights on the AT are rather excellent. On roads like this, however, I still missed having a pair of fog lamps to light up the sides of the roads, as in really tight corners I was basically turning into complete darkness. Not very confidence-inspiring… at least we could see the headlights of incoming traffic. Not that there was much, mind you, we only saw three cars, and that was on the way down, almost at the end.
This was the longest stint of the day, 100km between Alp and the next checkpoint in Les Preses, just past Olot. Fortunately, after coming down from La Collada the road became much faster and we were able to keep up a good pace for the last 50km. We found the RODI workshop where the checkpoint was almost deserted, it was midnight and they told us that there were about 300 riders left to go through. Well, we were not doing that bad, we were numbers 578 and 579 out of 850, remember. After filling up for the last time (just in case, the bikes only took five litres) we hit the road.
We had now 70km of main national road, and we made good time to the next checkpoint. I was surprised to see many bikes coming from the opposite direction and heading to the checkpoint we had just left. I guess thay had taken the tunnel to avoid La Collada pass, but that meant a huge detour, even if it was on main roads.
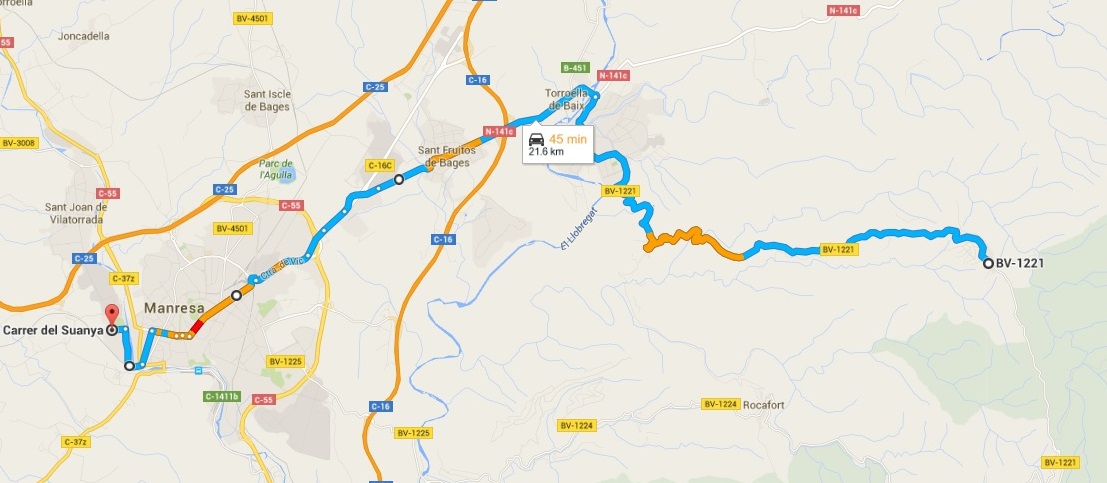
We turned off the C-17 road and into L’Ametlla at 0:55. Only one more checkpoint to get to Manresa and the finishing line. Here most people kept heading south on the main road and the motorway and took a route that was 80km long and took about less than an hour. We thought we would do it properly and cut straight across the Sant Llorenç mountains, only 45km, but ‘to cut straight’ might be an optimistic way of putting it, as that road was everything but straight.
We found no other riders coming the same way. We reached the last checkpoint at 1:58, the girls that stamped our passport so bored by now that they had been putting stamps on each other’s faces.
Only 21km to the finish line now. We made our way down the mountain with Manresa city lights already visible below, and many bikers coming in the opposite direction from the motorway to get their last stamp before heading back down the same way.
At 2:37 we turned into the car park we had left that morning, 19 hours earlier down to the minute, and crossed the finishing line.
The Rider1000 is a long, grueling challenge, most of those 1000km are done on mountain roads with 2nd and 3rd gear corners, they are not relaxed motorway kilometers. Our average speed on the move was only 63km/h, and we did not spend long on the stops. Despite all this, it is totally worth it, an amazing ride through some of the best roads and landscapes (at least until it gets dark!) in Catalonia. We will be back next year!
Next weekend some friends and I are taking part in the Rider1000, so it was imperative that I found some time to fit the Touratech GPS cradle for my Garmin, since I still do not have a 12V socket to plug the unit in. If you ride alone often and use a GPS, one of these lockable cradles is a good investment, it allows you to pop into a shop or pay for gas and leave the motorbike unattended for a few minutes without having to remove the unit which could otherwise get stolen very easily. Mind you, if someone really wants to steal it, they will still find a way fairly quickly…
On my old V-Strom I wired the cradle directly to the battery, but this time I wanted to do a more professional job and connect it to a switched power source. That, the fact that compared to the V space is at a premium here and my intention to fit more accessories that require wiring in the future (12V socket, heated grips, fog lamps…) made me decide to fit a fuse box to simplify wiring and keep relays to a minimum.
The first one I considered was the Rowe Electronics PDM60. It offers lots of interesting features – very tough design, no fuses (it’s electronic), highly customizable (you can set contact delay times, select power, and choose switched or constant power for each of the six circuits), and can deal with a total of 60A.
There were a few drawbacks, however – it is very expensive, if it fails you are left with no fuse protection, and availability (at the moment of buying, it was not in stock anywhere). So I bought a fuse box from Fuzeblocks. It cost half the price, was available immediately and is a simple yet practical design – it consists of a connection box with six fused circuits and a relay that powers the whole box. Depending on the position of each fuse, its circuit is constant or switched power, and the relay it uses is a simple automotive relay that can be easily found in case it fails. It can handle up to 30A, which is enough for my needs.
A friend who works at an engineering company offered to go to his job on Saturday, where we would have access to tools, connectors, soldering equipment, etc. Having the proper tools for the job makes things much easier, but it still took us three hours and a half to get it done.
First of all, removing the seat, fairings, windscreen and battery. I have always complained that the V-Strom had too much plastic to remove, that the tank had to be completely taken off the bike to access the air filter… Well, the AT is even worse. Removing both front fairings, the plastic fascia around the headlights and the windscreen takes a good while. And that is before I fit crash bars… we will see what happens then. I am not going to post instructions here, as other people have already done a very good job of it, if you want to see how to remove the fairings, here is an excellent video:
Even after removing all this plastic you do not get full access to all the wiring in the front part of the bike, but in our case it was enough for what we wanted to do.
The Fuzeblock box was going to be installed in the only place there is space for it, under the seat. There is a very nice flat surface that seems to have been specially designed for it. It needs three wires – positive and ground directly from the battery and a switched positive to activate the relay.
The first step was to find a switched power source, which was an easy task thanks to the author of the video above. There is a six-pin connector under the passenger seat for the OEM alarm system. The bottom left corner wire (facing the connector) only receives tension with the contact on, which was what we were looking for. It is the most accessible point, and the closer one to the Fuzeblock.
Next step was to route two wires to the battery. I had not been able to find instructions on how to remove the fuel tank, nor did we have time to try, but we found that we could route the wires to the battery on the left side of the tank, behind the frame and we protected them with heat-shrink tubing.
With the Fuzeblock installed and wired, it was time to route the wire from there to the GPS cradle, which proved to be more complicated than we thought. The end of the wire that mounts in the cradle has a square connector that was too big to go through some gaps, and the other end has a control box that was simply impossible to fit through anything. To make matters worse, the wire was not long enough to reach the Fuzeblock.
Well, always look on the bright side of life, they say, so since we had to cut the wire to extend it, we were able to route following the main wiring inside the fascia, down over the radiator, above the battery, through the very narrow gap between the frame and the petrol tank and into the space under the seat.
We then soldered the extension and covered it with more heat-shrink tubing. Last step was find some space for the control box (no more space left under the seat now) and tidy all the wiring a bit.
Putting the fairing back on was also harder than anticipated. Most instructions just say ‘put them back on’, or ‘follow the reverse process’, but it seems that everybody forgets to mention how many small plastic tabs and lips there are, and everything has to line up perfectly at the same time before you can start putting the clips back on.
Fortunately, with 12,000km service intervals I will not need to remove the fairings too often, but there is the matter of all the other accessories that I still want to install. Some things I already have, some things are ordered, some others I am saving for, but I am going to wait until I have everything ready and install everything over one single weekend. Wish me luck!
Thanks very much to my friend Jorge for his help and the equipment he provided.
I got a Honda Plus Card when I bought the AT, meaning that on top of an extended warranty and a 20% discount on accessories, I also have free use of a replacement motorbike each time I took mine to the garage.
When I took the AT for her first service, predictably, the replacement “motorbike” was a scooter. At least it was a 300cc one, so I could still ride to work without much trouble.
Even though I have no love for such contraptions, the scooter in question was not one to snigger at. The Honda Scoopy SH, both the 125 and the 300cc version, is one of the all-time best sellers in Barcelona, ranking high in the sales lists year after year and swarming the streets of the city in the thousands. As a consequence, it also holds the more dubious honour of being the most stolen vehicle, but that is a different story. With such credentials, I must admit that I was curious to see what was all about.
Finished in matte dark grey, the SH300 looks understated but undeniably classy, and sports a gadget that I found very practical: keyless start. As long as you have the keys on you, you simple walk to the scooter, press a knob located where the key hole normally is and when it lights up in blue, turn it to unlock and then start the bike. There is a position before that to unlock the button next to it to lift the seat.
Fit and finish is up to the standards one would expect from a brand like Honda, and other nice touches include a full LED headlight that proved to be surprisingly effective at night.
The only let downs were the lack of illumination under the seat, the absence of a 12V or USB socket and the usual gripe with lack of space for my helmet.
The engine is very smooth and there is no lack of acceleration to get away from the rest of traffic at the lights, it feels more nimble and eager to gain speed in the city than the other 300cc scooter I have tried, the Kawasaki J300. On the motorway, however, the Kawa maintained speed with more ease. The suspension is rather comfortable, but short travel means it still crashes over the bigger potholes and irregularities and a good turning radius and very low centre of gravity make it a doodle to move both in traffic and when stopped.
On the whole, I was surprised at how competent this scooter is. It is does what it says on the tin effectively, with absolutely no fuss and using very little fuel in the process (I averaged 78mpg on my usual commute). Being a Honda, I can assume that maintenance is low and reliability excellent, so I can hardly think of a better tool for getting round in the city.
I would not use a scooter to get anywhere that required riding at more than 80 km/h. Wind protection is poor and the sitting-on-the-toilet riding position gets very tiring fast with wind hitting the chest hard. The handlebars are too close to the body for my liking and the general position feels too cramped after 20 minutes on it. That said, if I had the money and I did not have to ride outside Barcelona I might consider one. The problem is that they are expensive to replace each time they get stolen…
Almost three years ago, I rode across Ukraine on my motorbike. A lot has changed since. I travelled through the Donbass region, spent two nights in Luhansk and crossed the border into Russia. This would be unthinkable today, the region has been ravaged by war and the border with Russia is sealed. I do not know when I will be able to visit the area again – soon, I hope, but might still be some time. Far from this conflict zone, to the north of the country, lurks another enemy that will take much, much longer to defeat.
This week marks the 30th anniversary of the Chernobyl nuclear disaster. The night of 26th April, 1986, a fatal combination of human error and design faults led to the worst nuclear catastrophe in history. The story of the exact events that caused the explosion, despite being rather technical, has been told many times. The disintegration of the USSR and the difficulties in doing accurate research meant that less is known about the long term effects that the radioactive fallout had – whole areas rendered uninhabitable, displaced population, contaminated crops and water sources, an increase in several types of cancer, particularly thyroid, genetic disorders… in one way or another, the disaster directly affected the lives of at least 300,000 people.
Unfortunately, as is often the case with disasters that seem to be far from us, the world has long turned its regard away from Chernobyl. The area was put under military control, the remains of the reactor were sealed and we forgot about it.
But the danger is far from over. There are still 16 tonnes of uranium and plutonium inside the reactor, among many other radioactive materials. One milligram is enough to be lethal to a person. You do the math.
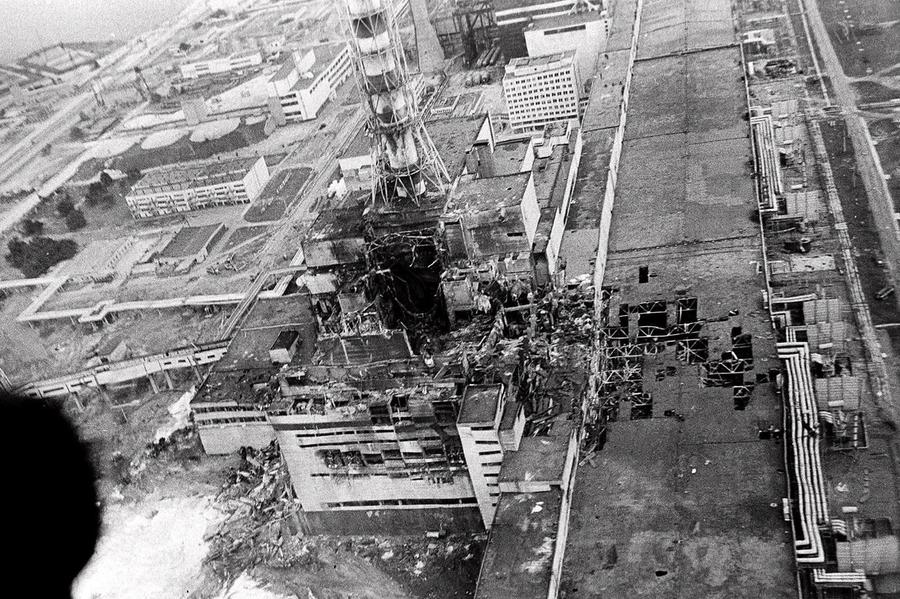
In the immediate aftermath of the accident, once the fire in the core had been put under control the main priority was to seal off the remains of the reactor to prevent the spread of radioactive dust and smoke into the atmosphere – remember that the extent of the catastrophe only became clear when the radioactive cloud reached Sweden and set off the alarms of a nuclear power plant there – but it was impossible to work near the building as radiation levels were high enough to kill a person in a matter of minutes and leave lethal long-term effects in a matter of seconds.
Building a structure to seal a building that was not only enormous, but partially destroyed and surrounded by debris without approaching it more than it was strictly necessary was not an easy task. The area around it needed to be cleared to lay off the foundations to the structure, ways of putting the structure into place without endangering the lives or workers needed to be found, and everything needed to happen as soon as possible.
Remote controlled bulldozers were used to clear the surrounding area. The debris and the first layer of soil were dug up and buried in deep trenches that were immediately covered in concrete. Most of the structure for the sarcophagus was built on remote sites and then transported and moved into position using enormous remote controlled cranes. The display of ingenuity and technology was staggering.
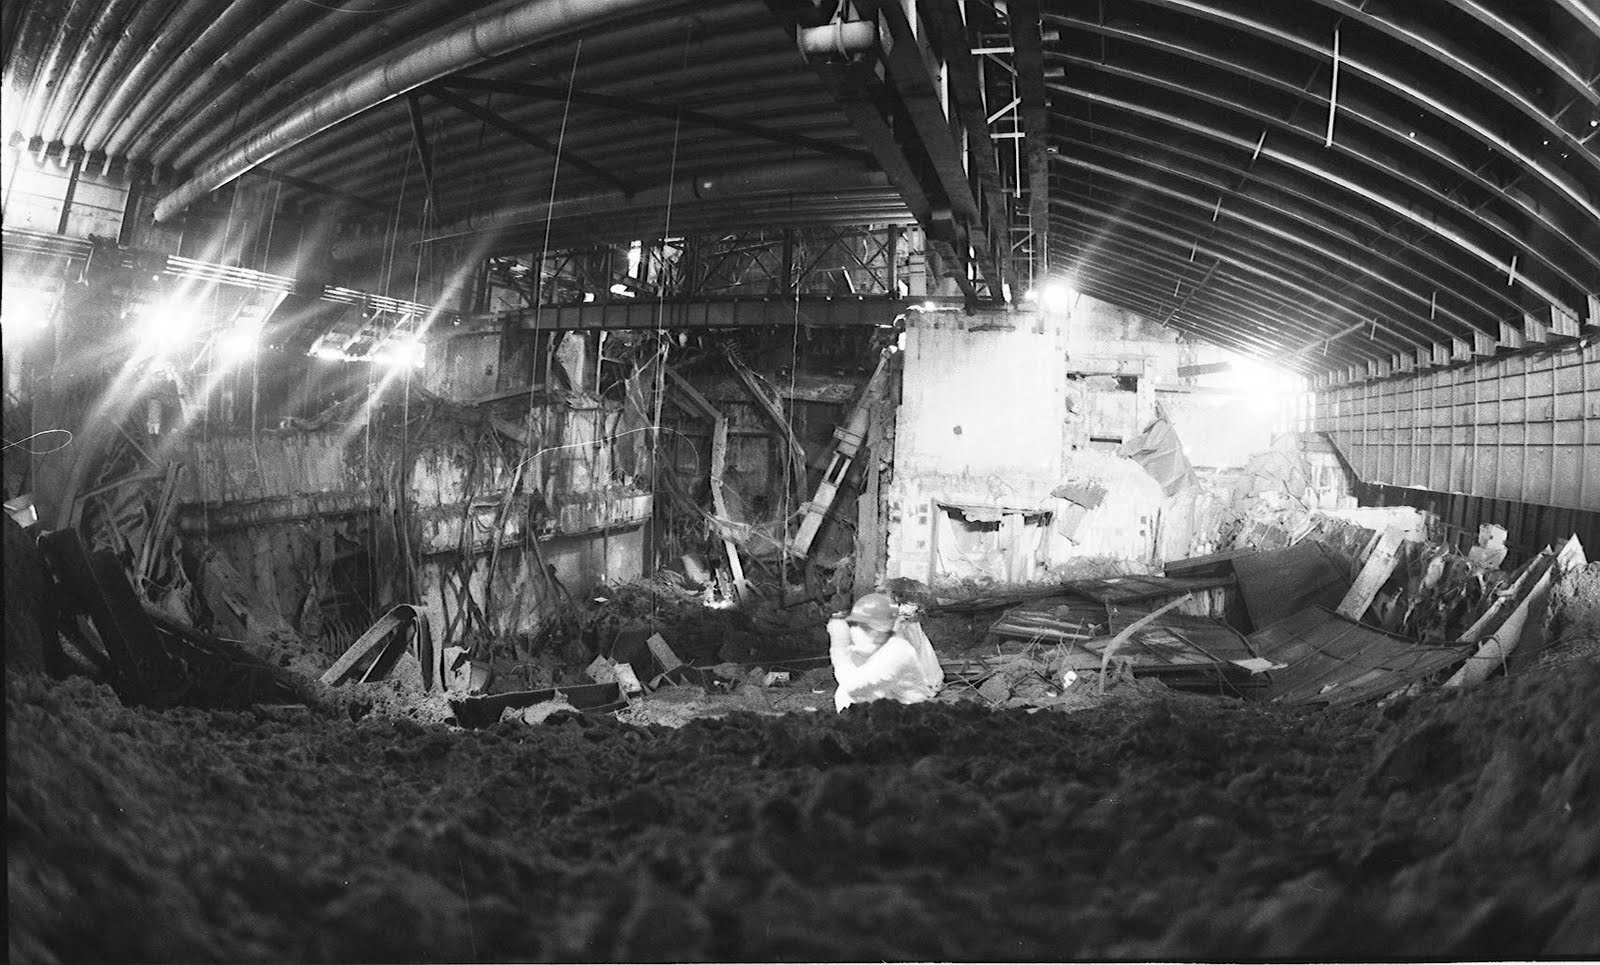
Even so, building such structure remotely still posed high challenges. The roof structure rests not on newly built pillars or walls, but on remains of the ventilation shafts of the reactor, which were damaged in the explosion. The 2000-tonne slab of concrete that covered the reactor fell into an unstable, almost vertical position; if it moved, it would stir up highly contaminated dust or damage the structure around it. The welding and riveting of the sarcophagus had to be done remotely, so they were not as accurate as it would be desirable, and on top of it all the whole structure has been suffering the effects of the harsh climate ever since.
It was designed to last for thirty years and it was supposed to keep radiation levels low enough to allow work in the construction of a better, more permanent structure. However, the disintegration of the USSR meant that the problem was now in Ukraine territory, and neither Ukraine nor Russia had the money to undertake such operation.
10 years after construction ended, the structure showed cracks and gaping holes, and water was pouring in and leaking to subsoil. Radiation levels inside the sarcophagus were still very high and it was concluded that it would not be possible to repair it from the inside.
As soon as 1992, the Ukranian government held an international competition for a design proposal of a structure to replace the existing one, but it was not until 2004 that the design was completed. The start of actual construction work on the site would have to wait another six years, until 2010. In 2006, the Designed Stabilisation Steel Structure, which had been built next to the western wall to relieve some of the roof’s weight off the damaged concrete wall on which it rests, was extended to support up to 50% of the load. This was said to make the structure stable for another 15 years, but other parts of the sarcophagus were still unstable – in February 2013 part of the roof of the turbine hall collapsed, and workers had to be evacuated. The collapse was later attributed to poor quality repair work and deterioration of the structure.
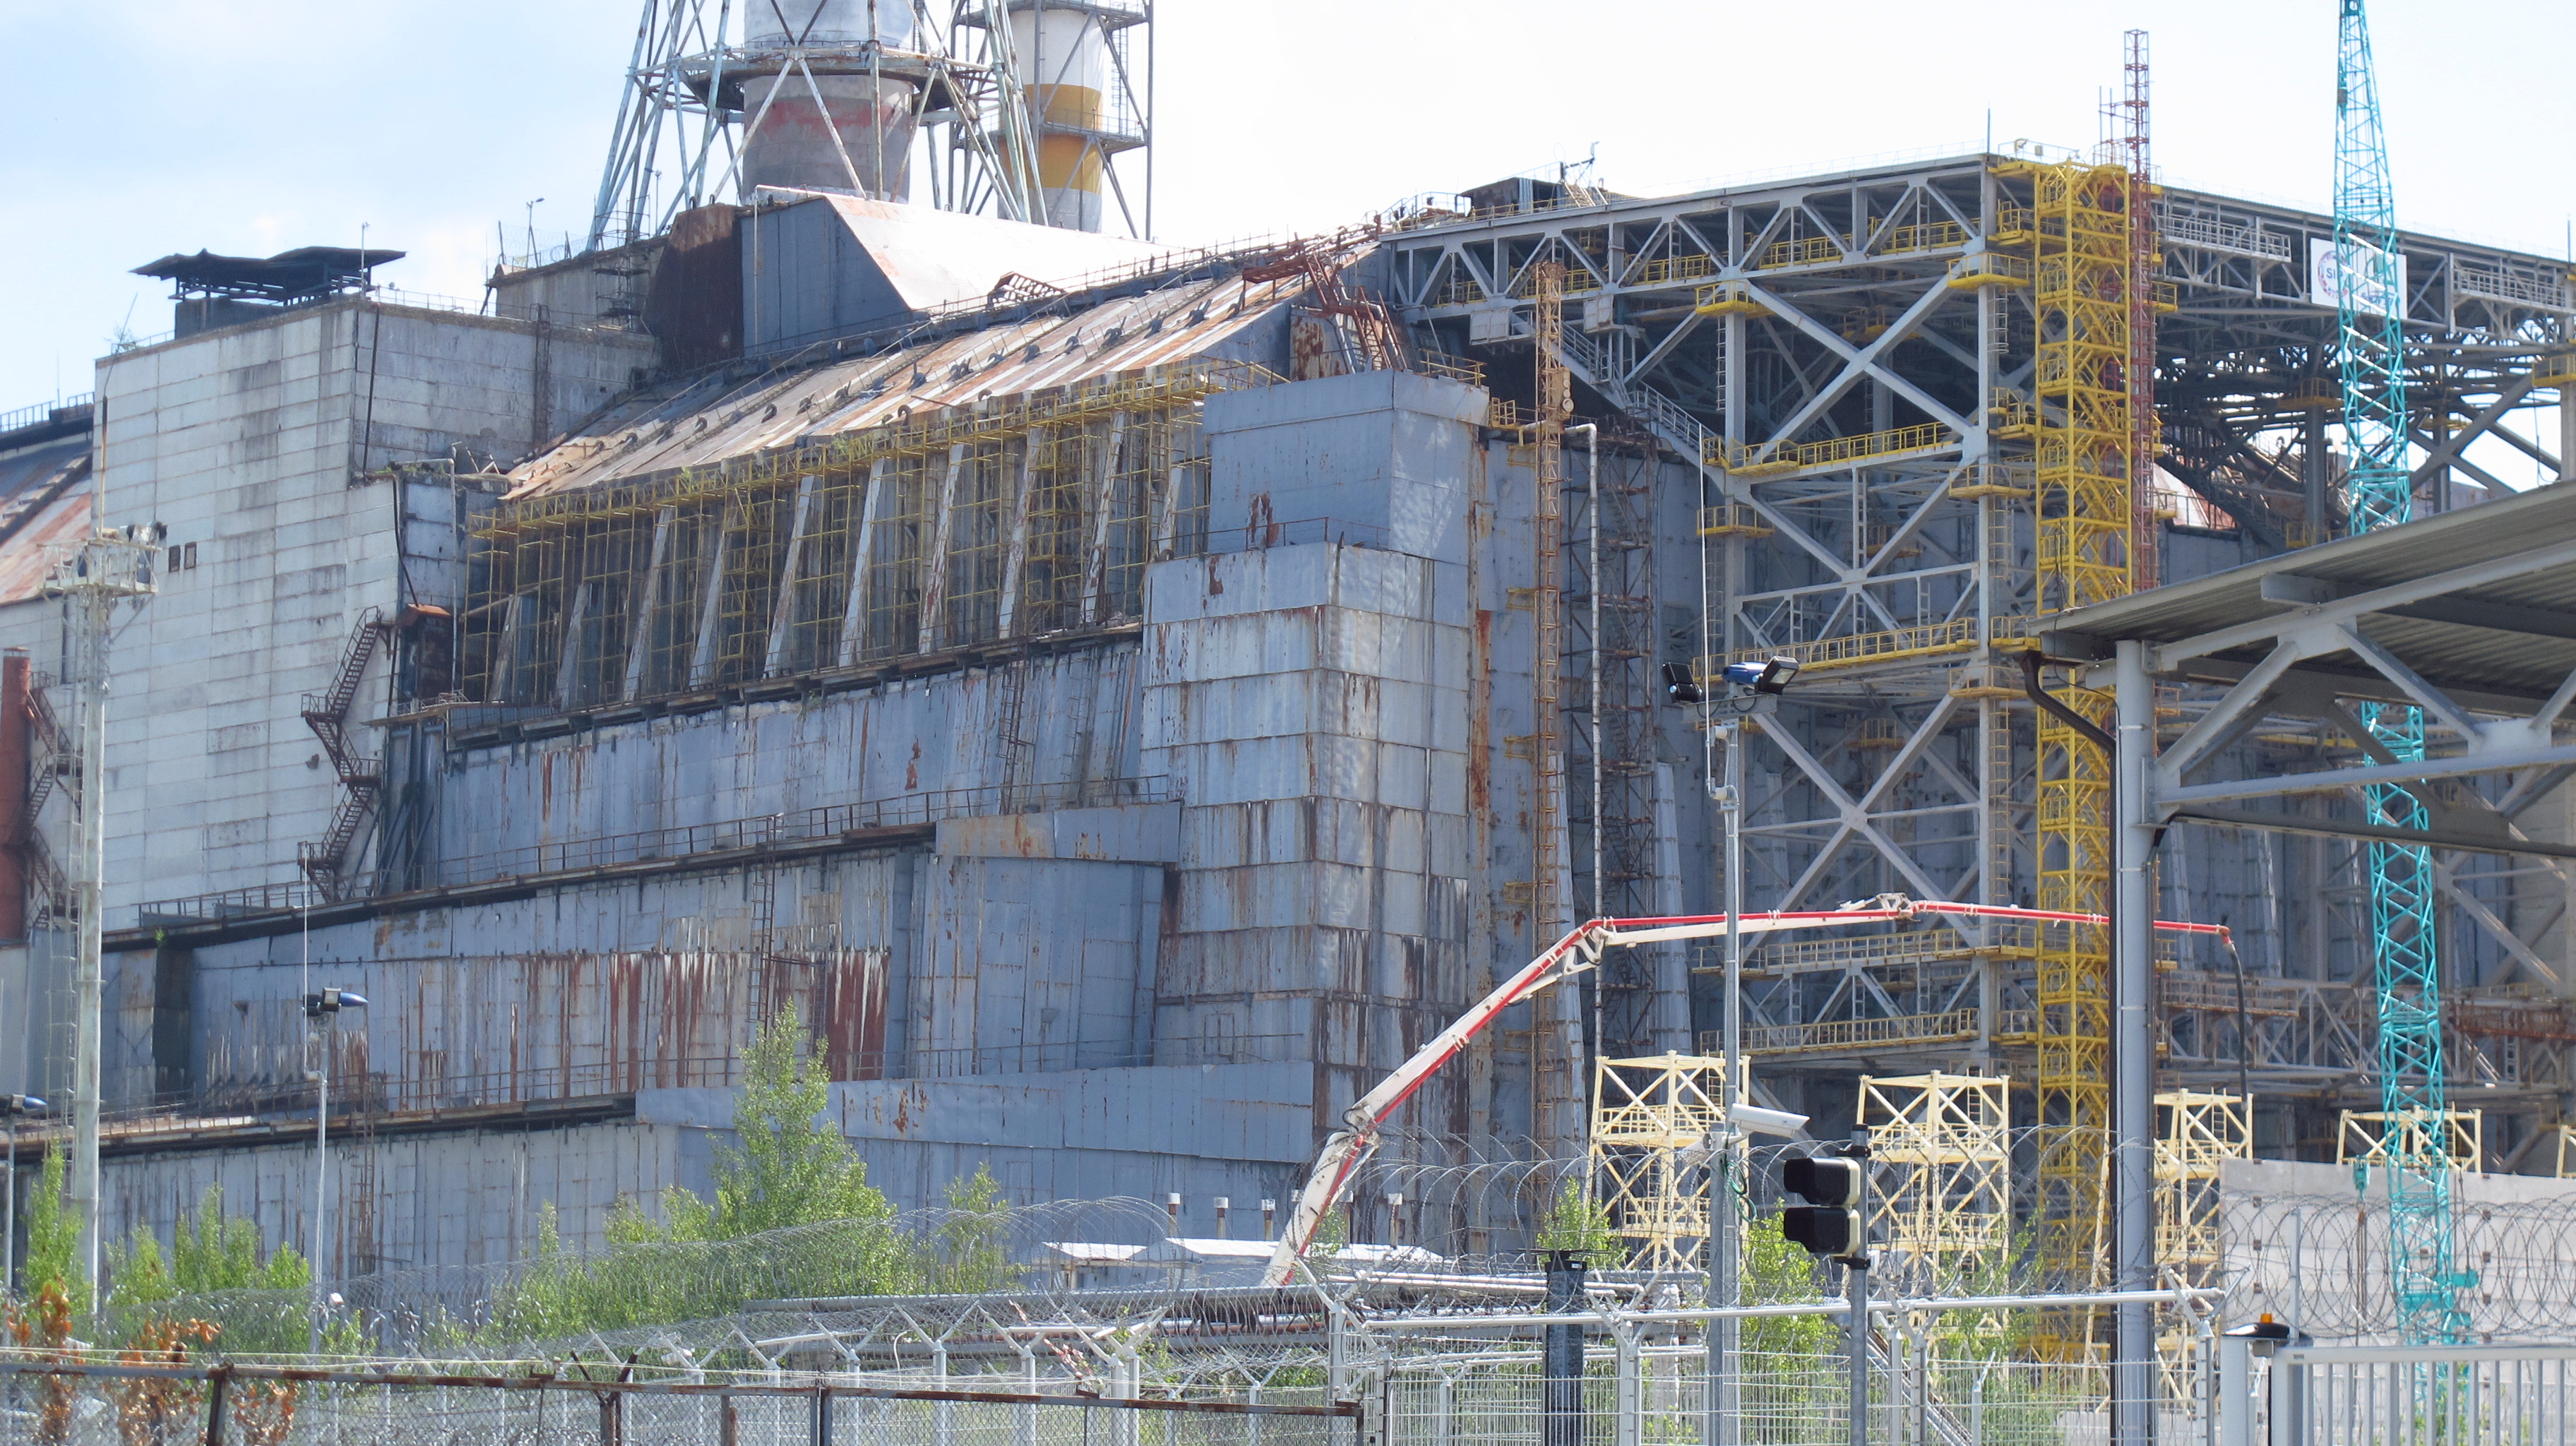
I visited the site in July that same year, and progress in the construction of the new sarcophagus, called New Safe Confinement, was well underway, even though the project had been originally announced to be completed by 2005. The NSC is designed as an enormous arch that will cover the old sarcophagus completely. It is more than 100 metres tall, 150 meters long and has an inner span of 245 meters. It contains two cranes and all the necessary equipment not only to seal the old reactor, but to start dismantling it and removing the remaining fuel inside. Once complete, it will slide on two rails into its position over the old sarcophagus
A 180 meters to the east of the construction site of the NSC, the old structure stood much taller than the photographs I had seen might lead to believe. We were only allowed there for a few minutes, but it was enough to appreciate how badly needed a new sarcophagus is.
As I write these lines, construction of the NSC has been completed. All that remains now is for it to be moved into position and permanently sealed, 30 years after the catastrophe.
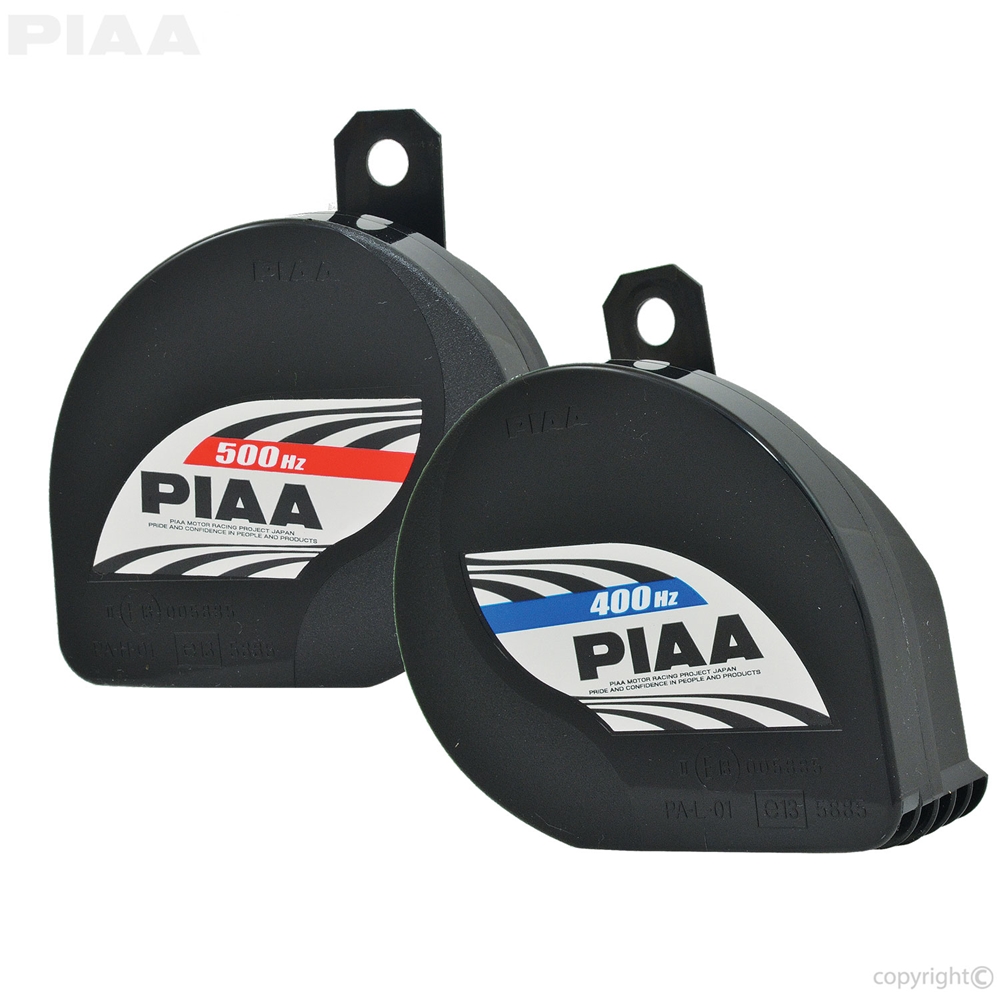
Making yourself heard in traffic is essential, but the horn that comes as standard in most motorbikes sounds little better than the puny one in a scooter, which means that at speed or in heavy inner city traffic cagers might not hear you when you most need to make them aware of your presence.
Replacing the horn in the V-Strom was something that was on my to-do list forever but I never got round to do it even though it was one of the easiest bikes in which to install one of everyone’s favourite horns – the Stebel Nautilus, as it has plenty of room.
Then I got the Super Ténéré and the horn was even more ridiculous, which turned out to be not because it was complete rubbish as I thought but because it was on its way out. It died about a month after I bought the bike. Time to finally fit a proper horn, then.
Space in the Super was a lot more restricted than in the V, and after some thorough research on several forums I choose the PIAA Powersports Slim Line horn. It was a straight replacement for the standard horn, a simple matter of unscrewing and unplugging the OEM one and bolting in the PIAA in the same place and connecting it to the same wires. Current draw is not high, so there was no need to wire in a relay. It made a world of difference, maybe not in volume, but tone was a lot more car-like, so cagers do pay more attention when you sound it.
Happy with the product, I decided to get another one for the AT, and this time I was lucky to find a pack including two horns – 400Hz and 500Hz. The idea is that the combination of both frequencies produces a louder, deeper sound. I found the 500Hz one on the Super to be more than enough, but since I found the pack on Ebay for the same price I had paid for a single 500Hz one, I ordered it.
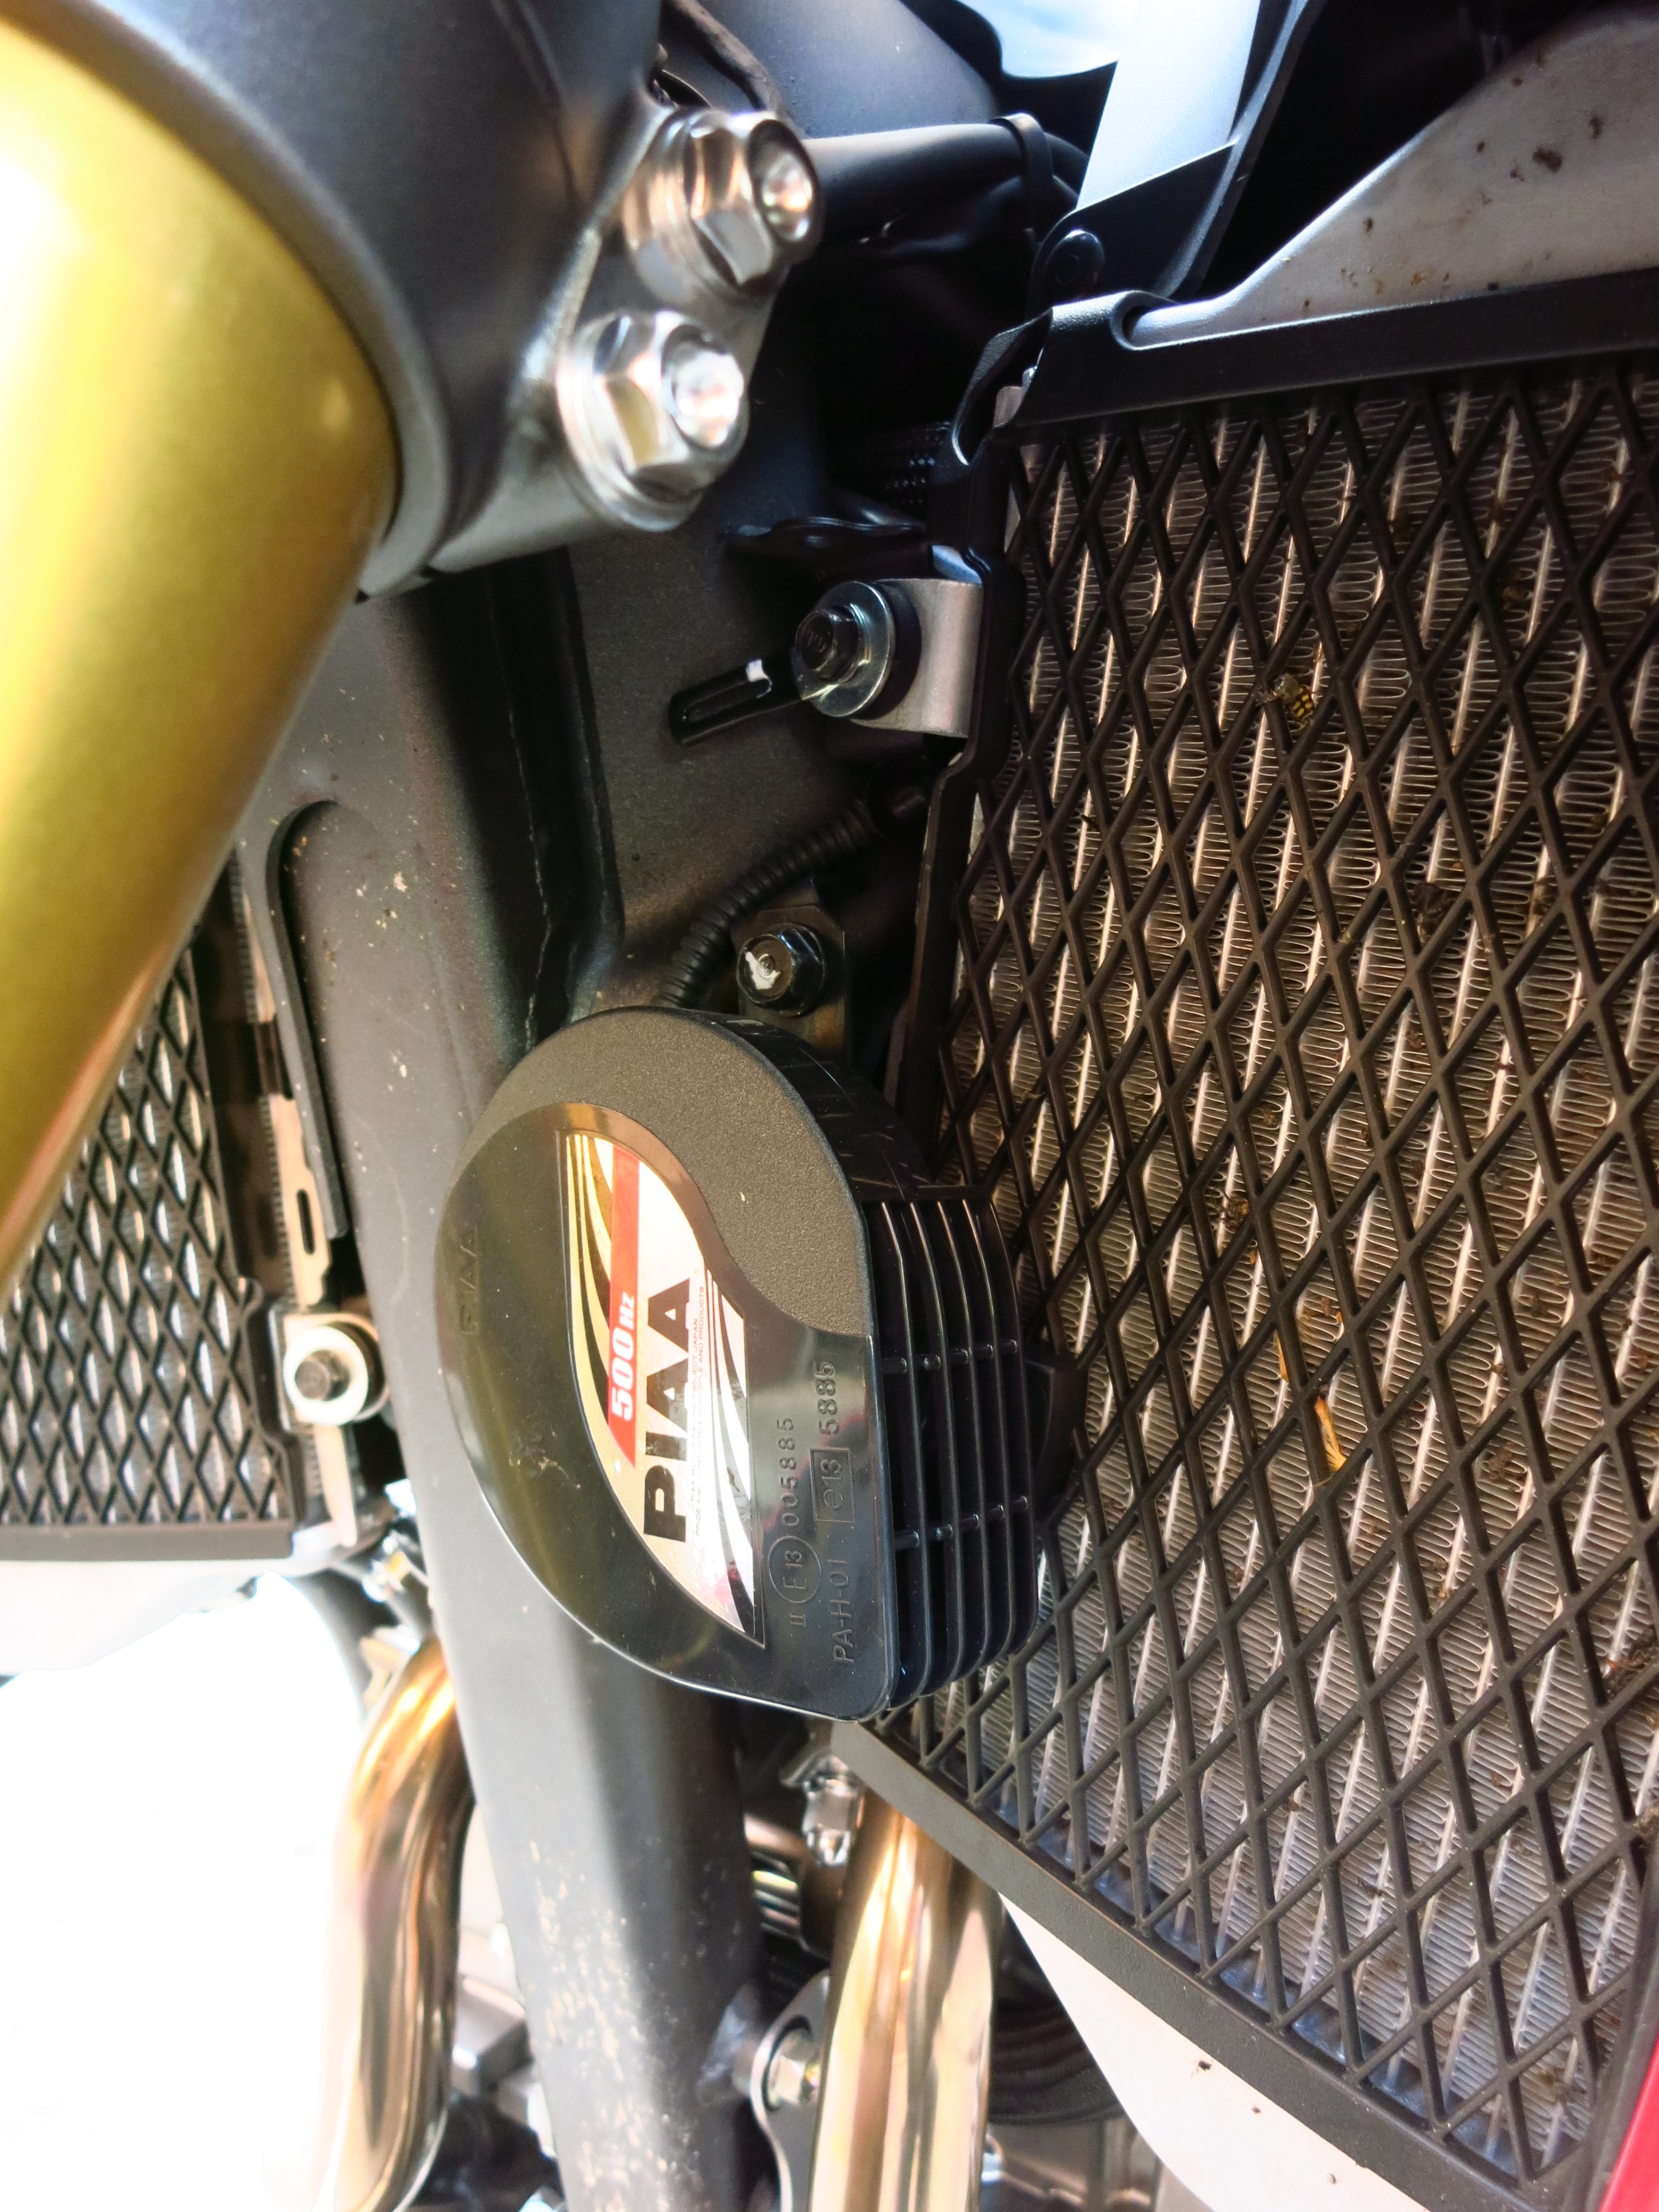
The problem came when I tried to find a place to install them in the AT. Space is even more restricted on the Honda, and after trying different combinations, it was clear that the only easy option was to fit only the 500Hz in the same place as the OEM horn. The PIAA is quite compact, but still larger both in diameter and depth than the standard horn, so a couple of little modifications were required to install it properly.
First, to make sure it fitted as close as possible to the radiator and the grill was not directly facing the frame, which might have stifled the sound a bit, I rotated the mounting plate of the horn 180 degrees. This can easily be done by loosening the bolt that attaches it to the horn and rotating it as desired. Careful though, the nut might be stuck due to the paint, so make sure you hold the horn formly. There is a little etch at the bottom of the plate and four little plastic protuberances to secure it in different positions in increments of 90 degrees.
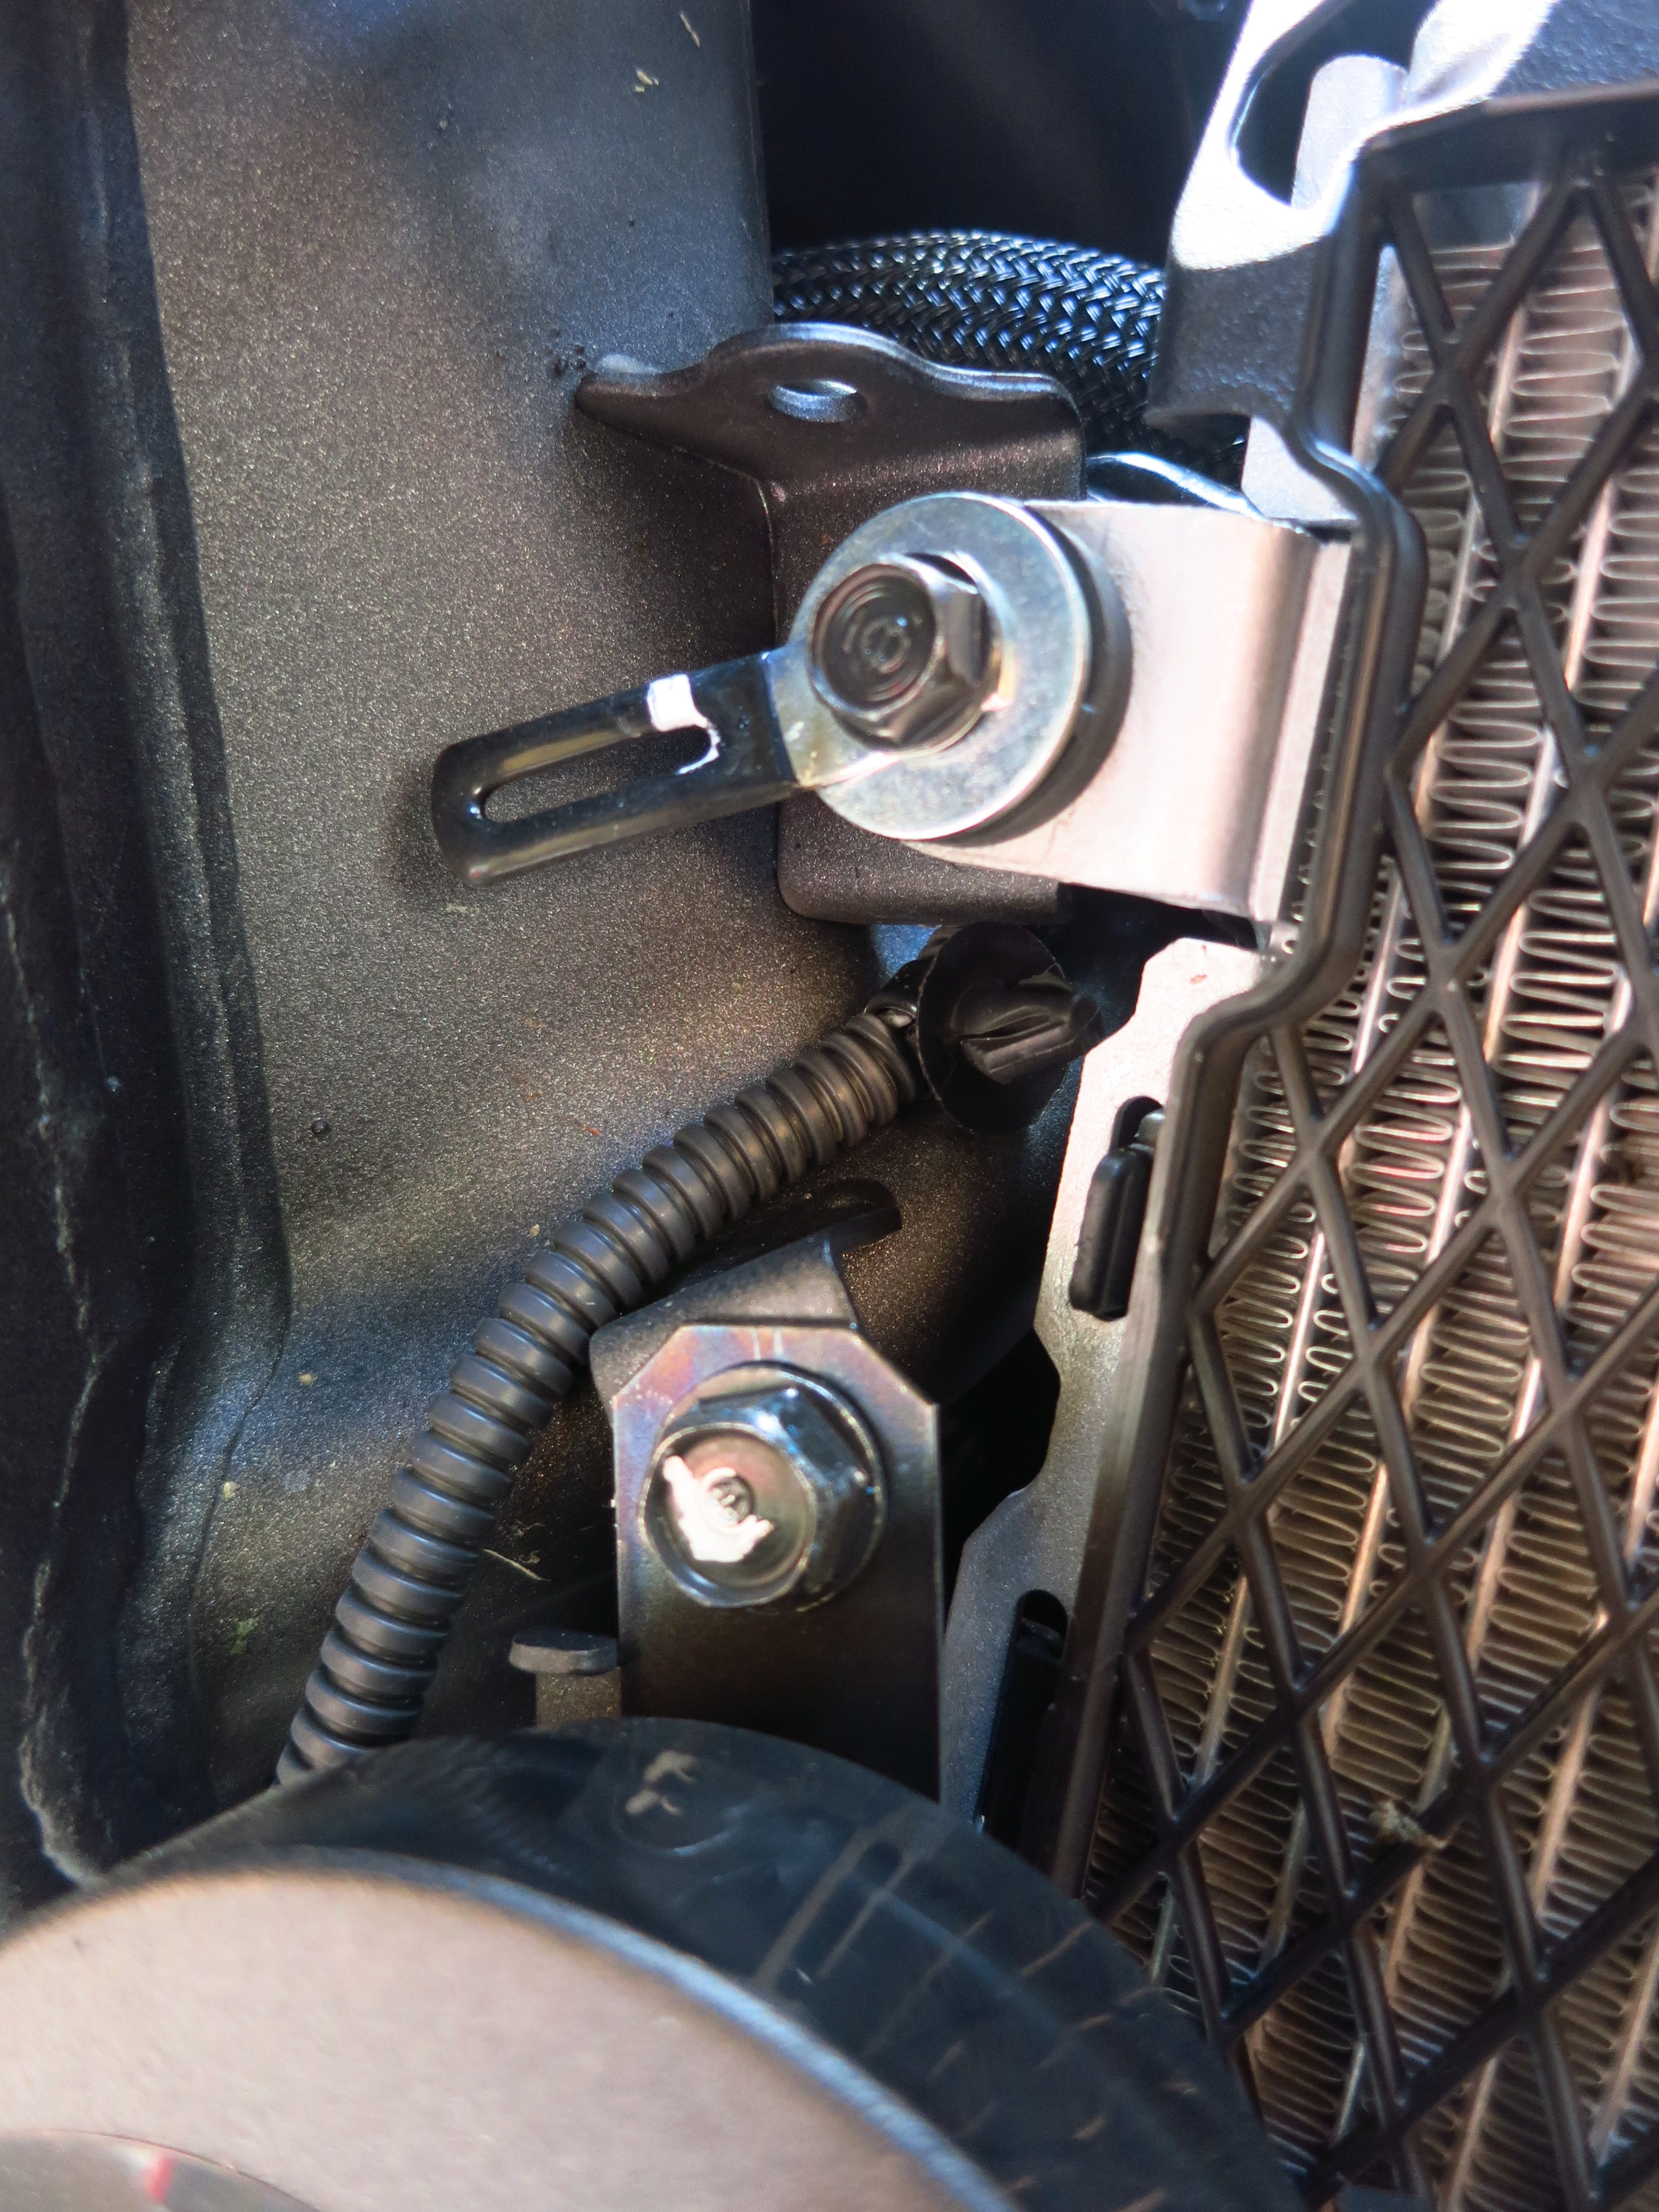
That left the connectors further down that the ones in the original horn, too low for the standard wires to reach them. You can simply buy or make an extension, but it is only a matter of a couple of inches, and a job well done would include covering them in heat-shrink tubing to protect it properly. After a bit of fiddling, I discovered that it was possible to re-route the bike wiring by unclipping it from the mount next to the radiator and then passing it under the mount. It has a heat shield and even in the new position it did not get much closer to the radiator, so there was no risk of damage and now it was possible to connect the horn without further modifications.
It is a very tight fit, clear of the bottom of the triple clamps by only a couple of millimetres when in full left lock. I took measurements to ensure that the mudguard would not touch it under compression, and it seems that the only possible situation in which that might happen would be fully bottoming out with the wheel turned right full lock, which is highly unlikely to happen in normal use.
I might have been able to install the second horn on the other side if I made a bracket myself to attach it to one of the radiator mounts, but I still have not installed the crash bars and they use those mounting points, as do the radiator protectors I also want to fit. I will wait and see if it is possible once everything is in place.
With a draw of 2.7 amps I do not think that a relay is necessary, so all in all it a is a pretty straightforward installation and the gain in safety is considerable.
Even the most oblivious mum changing lanes in a monster SUV while sending text messages with one hand and fighting kids in the back seat with another is bound to hear me now.
Well, not exactly… after a weekend away running the bike in, it was more like 1,245km.
When I bought the bike I also got the Honda Plus card, which extends the warranty to four years and gives you the right to the use of a replacement bike while yours is being serviced, which is great for me as I need the bike daily to go to work. I booked the 1,000km service the same day I picked up the AT to make sure that the replacement bike would be available, and on Wednesday she went in for her first visit to the dealer’s workshop.
They took the AT in the moment I arrived and asked how everything was going. I told them about the problem with the 6th gear – occasionally it was difficult to change up into it and then it would jump into neutral – and they assured me they would look into it.
I filled in some paperwork and was given, as I feared, a replacement scooter… Well, at least it was not that bad, it was a brand new SH300 and even though I do not like scooters I have to admit that this one made a pretty convincing city runabout. I will go into my riding impressions more into detail in an upcoming post, for the moment suffice to say that it was more than adequate to take to work outside the city until I could pick up the AT the following day.
In fact, the bike was ready on the same day, but since I did not finish work until 22:00 I could not pick it up until Thursday. The first service came at 143.64€ and included an oil and filter change and greasing and checking the chain. I had been hoping they would also clean the bike, but they did not… I am going to have to remove the mosquitoes from the weekend myself.
The head mechanic told me that he tested the bike himself but having changed the oil he found nothing wrong with the 6th gear. He said that these issues tend to disappear with fresh oil and a bit on running in, and another owner on the local AT forum told me that that after 2,000km the gearbox on his bike had become noticeably smoother. I must say that the problem has not happened a single time since then.
All in all, I was quite satisfied with the quality of the service and the price, which was within the average of what I have read about in the forum. Since I was there, took the opportunity to order the tall screen as well. We will see how wind protection improves with it, and if it is not enough, I will fit a deflector on top of it, which was the definitive solution on the Super Ténéré.
After clocking 150,000km on her last trip to work on Friday, the V-Strom was safely tucked away in the garage and I started to get ready for the run-in trip over the weekend.
The AT is, you could say, stark naked. Apart from the centre stand, not a single accessory has been fitted to it yet, so packing for the weekend was the first challenge – not that I needed a lot of things for a couple of days over which most time would be spent on the bike, but when you start counting, it adds to quite a few items: rain suit, winter and summer gloves and scarf, cameras, batteries, food, water, etc. In the end it all fit neatly into a small Ortlieb bag strapped to the rack and a backpack.
At a quarter to seven I walked into the car park and fired the AT for her first big trip. The engine roared to life instantly, happy to know it was going to be taken for a proper ride – it is curious how motorbikes sound different when they know you are taking them out on the open road instead of on the daily commute.
I met a friend of mine who has recently joined the biker world and was adamant that we took it easy, so it was a perfect chance to run the AT in gently. Looking forward to a good weekend of riding practice, he led the way out of the city on his Bandit and we started the first leg of our journey on the motorway.
With a lot more time to assess the motorbike, this first stint revealed that the AT is a very good long distance touring bike – the engine is smooth and relaxed at a steady motorway cruise, and I found wind protection to be rather good, particularly around the legs, which I had not expected on a bike that is a bit on the narrow side. On the other hand, while the screen works definitely better than other screens fitted as standard, it is too short for me, so that is one thing that will need changing as soon as possible. My other complaint regarding wind protection were the hand guards – they do not extend low enough to cover the tips of your fingers, and on such a chilly morning, my hands got cold fast. They are attached to the brake and clutch lever mounts, so they cannot be rotated down without the levers also moving. Again, it is not a big issue since I was planning on replacing them with Barkbusters anyway as they are merely cosmetic, they do not offer any real protection for the levers in case of a fall.
After a stop in La Panadella to put on some extra warm clothes – it was 5ºC – I started to regret not having fitted the heated grips. I thought I could postpone that investment now that summer was coming, but I was already missing them sorely on this trip. The day did not get warmer until we turned off the motorway and took the C-12 heading south to our first fuel stop in the town of Maials. Fuel consumption had been surprisingly low for an engine that was still tight, and on the fast, undulating 30km of C-12 leading here the AT felt light and eager to gain speed even though I was keeping the revs below 4,000 and sticking to gentle throttle openings.
Time to turn to the back roads, then! From Maials we took a road that was little more than a paved dirt road – I cannot even give you the road number because Google Maps does not list it as a road – and it revealed that the AT suspension was a bit on the hard side.
I was amazed at how agile a bike with such suspension geometry and a 21” front wheel was and how well it behaved on the road. Now, I must confess I am close to a complete illiterate when it comes to suspension set up – my V-Strom has a simple system and other than fitting stiffer progressive springs my experience in fiddling with the suspension is limited to dialing in more preload when I carry luggage or a passenger. What I can tell is that the AT suspension felt harsher than I expected on bumpy roads and broken tarmac, unlike the Super Ténéré, which had a very plush ride. I imagine that the AT is set up on the hard side to favour good on road behaviour, so I will have to experiment a bit with compression and rebound settings. The problem is, I do not really know where to start, so if anybody want to offer advice, leave a comment below.
Once we reached the town of Mequinenza we took better roads to Alcañiz, where the AT really shined. The weather was getting warmer, the wind that had been bother us since early morning had calmed a bit and we were heading towards one of my favourite rides – the road that crosses the Maestrazgo hill region (route description coming soon).
The roads on this route are a perfect combination of a complete lack of traffic, good road surface, mountain passes, slow and fast corners, and an absolutely stunning landscape. It provided the perfecto opportunity to run the bike in properly – lots of regime changes and working up and down the gearbox.
The only negative comment I have to make is that sometimes the bike did not go into 6th gear smoothly. On those occasions the gear lever would not click all the way in and the indicator on the dashboard would be slow to change from 5 to 6. Then, when opening the throttle again, the gearbox would jump into a false neutral. This happened several times and the only way to prevent it was to kick 6th gear in firmly when changing up. Hopefully it was just a run-in issue and it would get smoother after the first oil change. I made a mental note to point it out to the mechanics in the first service. Other than that, the bike was performing faultlessly and exceeding my expectations. Halfway through this part of the route it reached 500km and I started bringing the revs up to 5,000.
We reached our destination by early evening and after settling in and starting a good fire in the hearth we set about checking the bikes. Oil consumption had been negligible, chain tension was correct and all nuts and bolts were still tightly attached – I double-checked the ones on the front mudguard, as there have been several reports of people losing them.
For the ride back I was planning to take a more direct route on A-roads for the first half of the journey and then the motorway for the last 200km. We set off later to avoid the cold and the day rewarded us with glorious sunshine and little wind for the first half of the ride. My friend, who was still on the learning phase, was completely transformed, leaning more confidently into corners, braking later and keeping a faster pace. So much so that when we stopped for breakfast he suggested skipping the motorway altogether and continuing on A and B-roads, so we turned east on the N-420 and then north on the C-12B until we reached Flix, where we took a much narrower and deserted road. This leg was quite windy again, but the AT proved to be a very stable touring bike even in those circumstances.
We rode past the Montsant and Prades mountains, the AT happy to be revved a bit higher and my friend making incredible progress with his riding. This detour added a good two hours to our return journey, but it was most definitely worth it. We rejoined the motorway in la Panadella, where we had made our first stop on the outbound journey, and from there it was a relatively short stint back into the city, which cemented my decision to order a taller screen.
It was about 1,200km and the total fuel consumption came at 4.9l/100km (58mpg)
The only thing we did not do was go off road, partly because I wanted to be gentle on the AT for the run-in period, partly because my friend was on a road bike, but the AT proved to be a more than versatile bike in all other aspects of the trip. Well, it also proved to be an attention magnet… I had people walk up to me to chat about it every single time we stopped. There is no better way of meeting new friends!
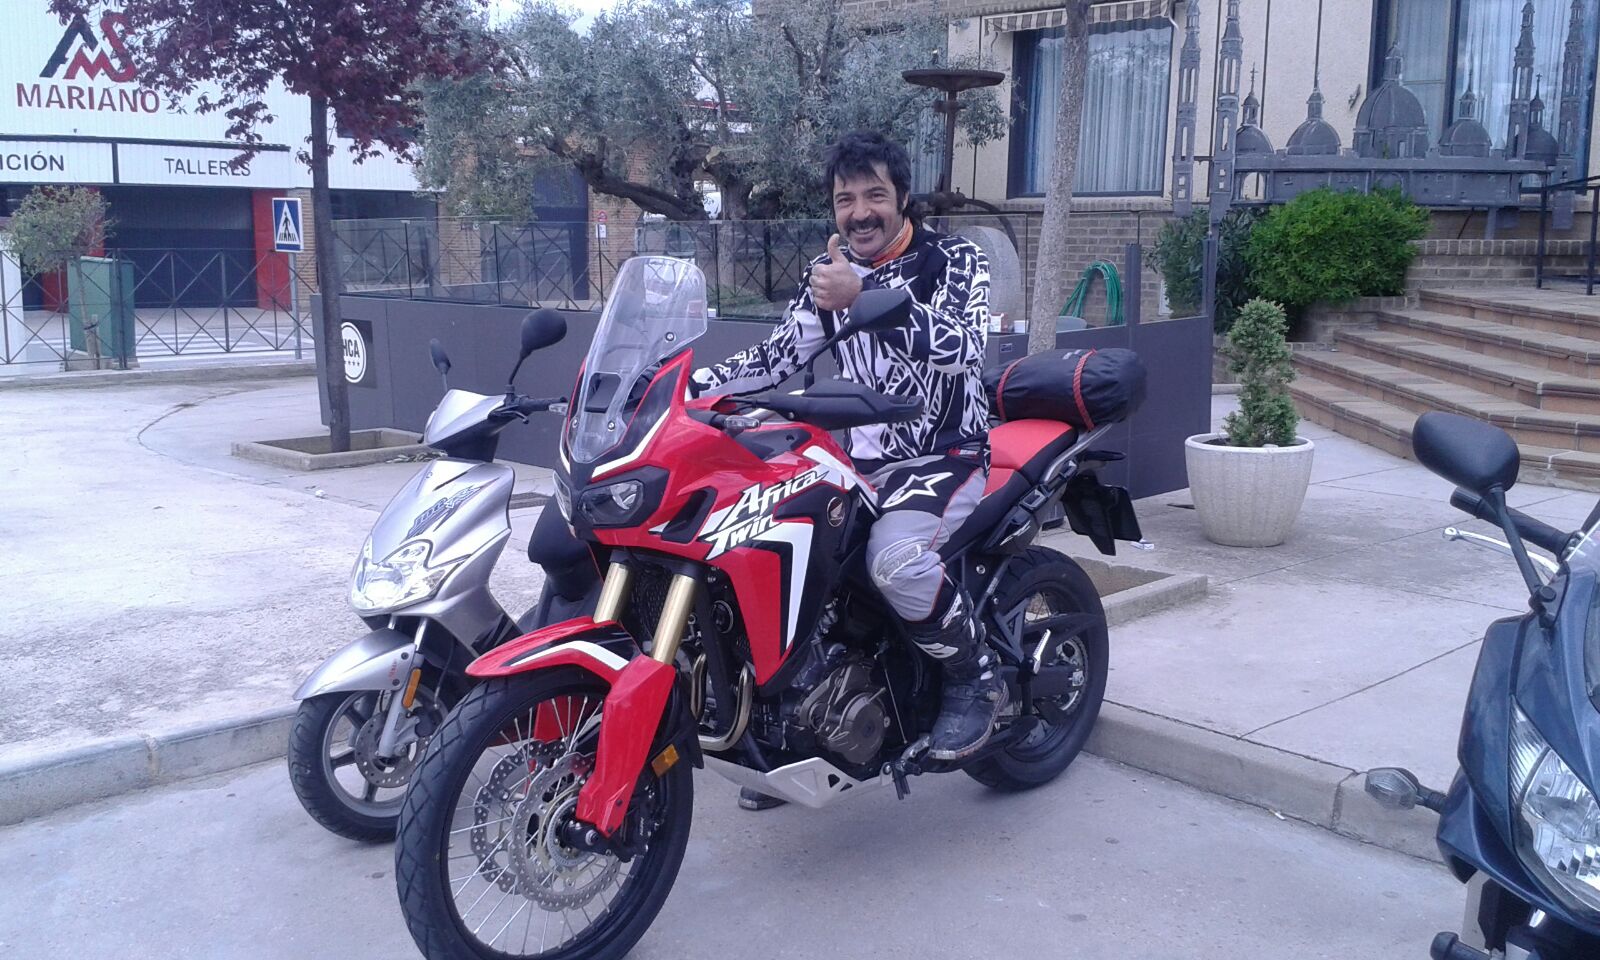
Life sometimes surprises you with little coincidences, and after picking up my new Africa Twin yesterday, today my old V-Strom reached the 150.000-kilometre mark while on duty. Best motorbike ever.
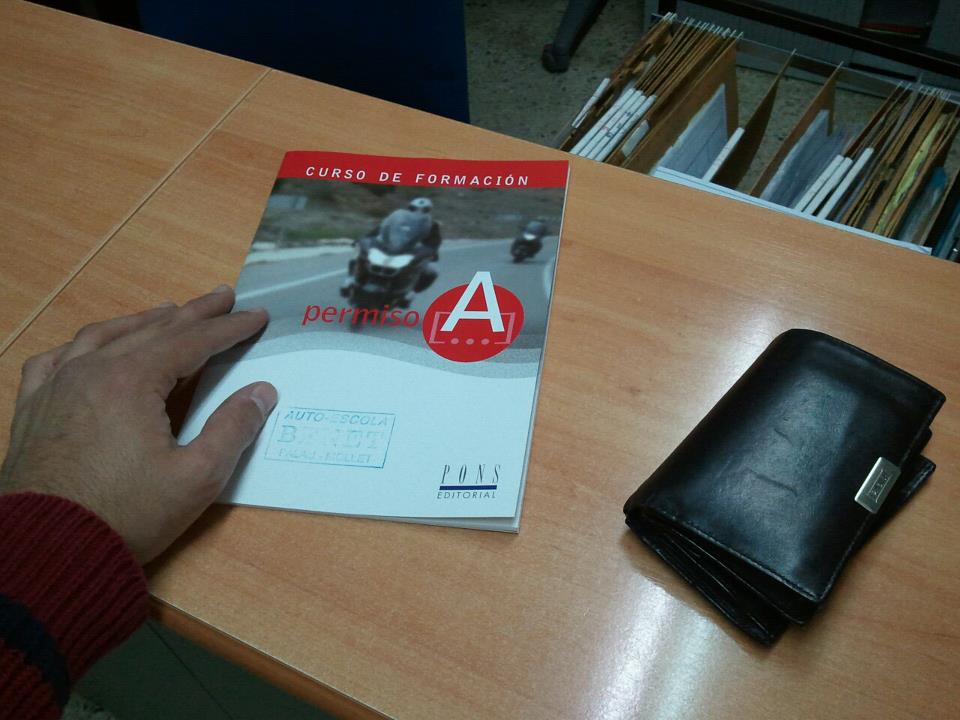
And as if the welcoming of the new machine with such an important milestone (no pun intended) was not enough, this morning my Facebook account had another suprise in store for me. Do you know how from time to time it suggests certain posts from X years ago? I got this one today:
Yep, it has been three years to the day since I signed in to the course to get my unrestricted motorbike license! To think it was just a few months before heading to Mongolia…

 I went for the black and white combination, as the OEM were also black and I was afraid the red ones might not match the shade of the bike. I got them in a week, and today I got down to fitting them, which is a very straightforward process.
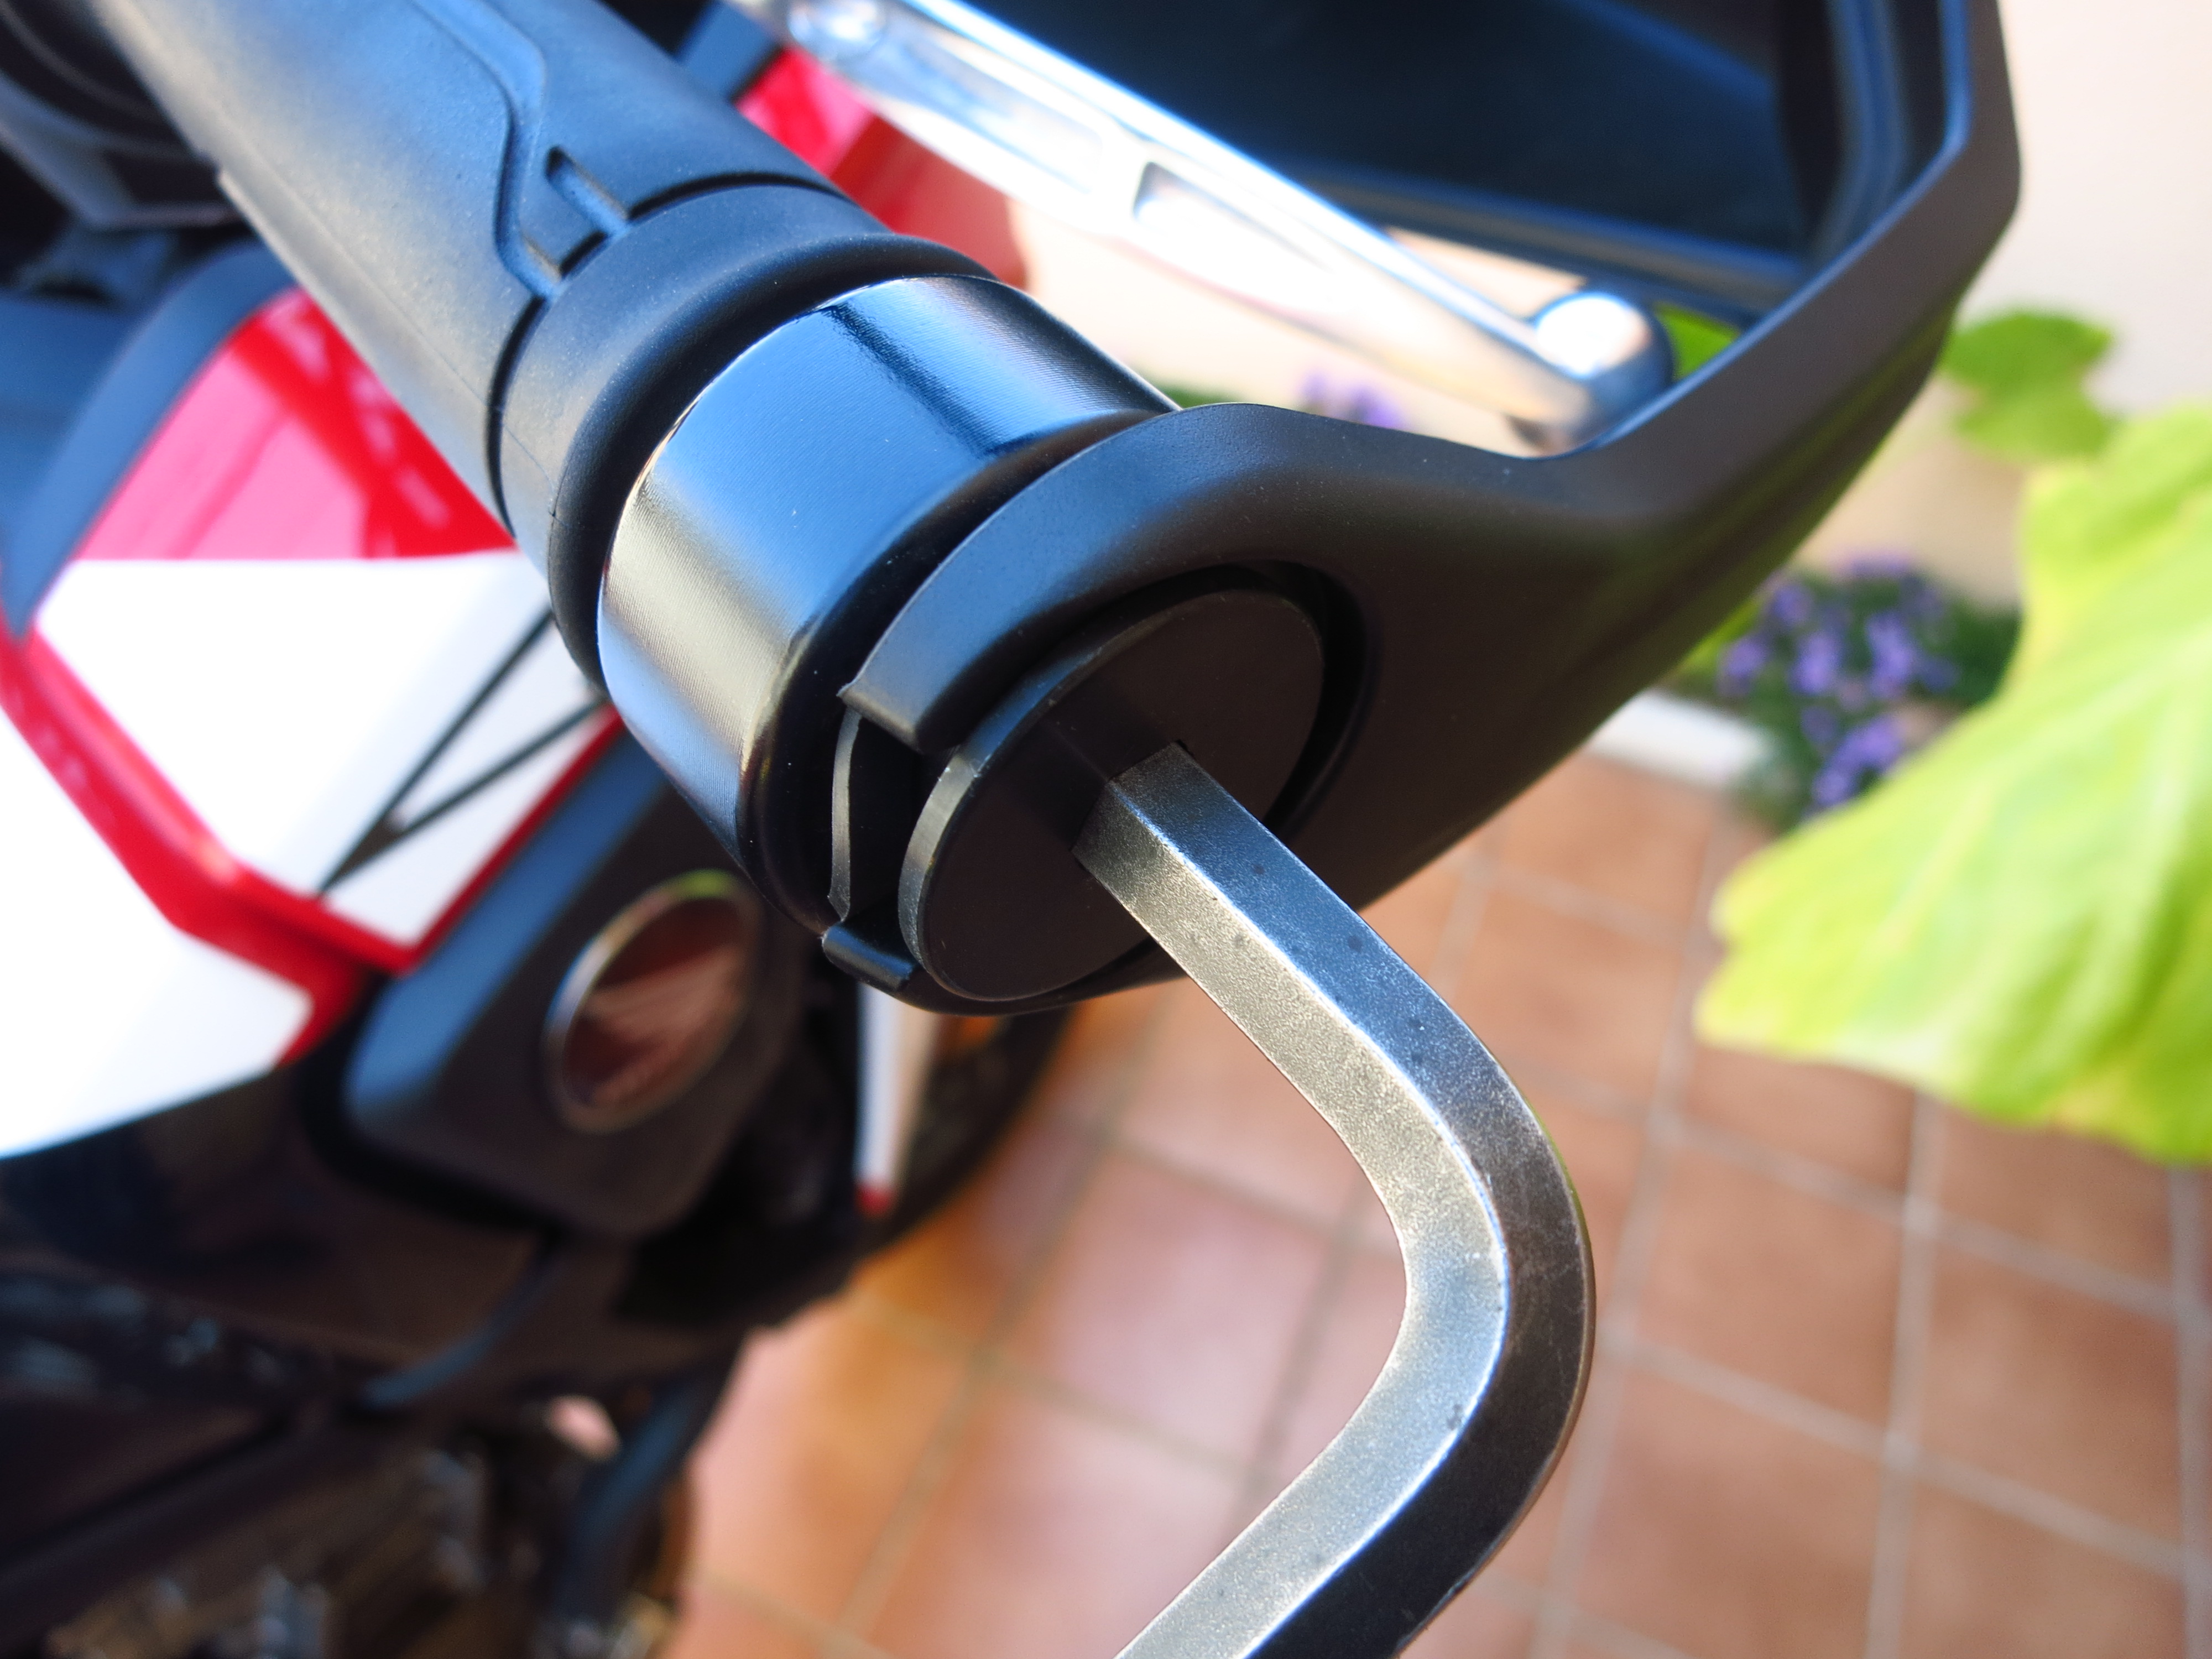 Remove the bolts that hold the handguards to the brake and clutch lever mounts. Both nuts and bolts are 10mm, except the brake bolt, which is 12mm, annoyingly.
 Remove the OEM handguards and put the lever bolts back in place. With the handguards removed they are a bit too long, but you can use the spacers that came with the handguards.
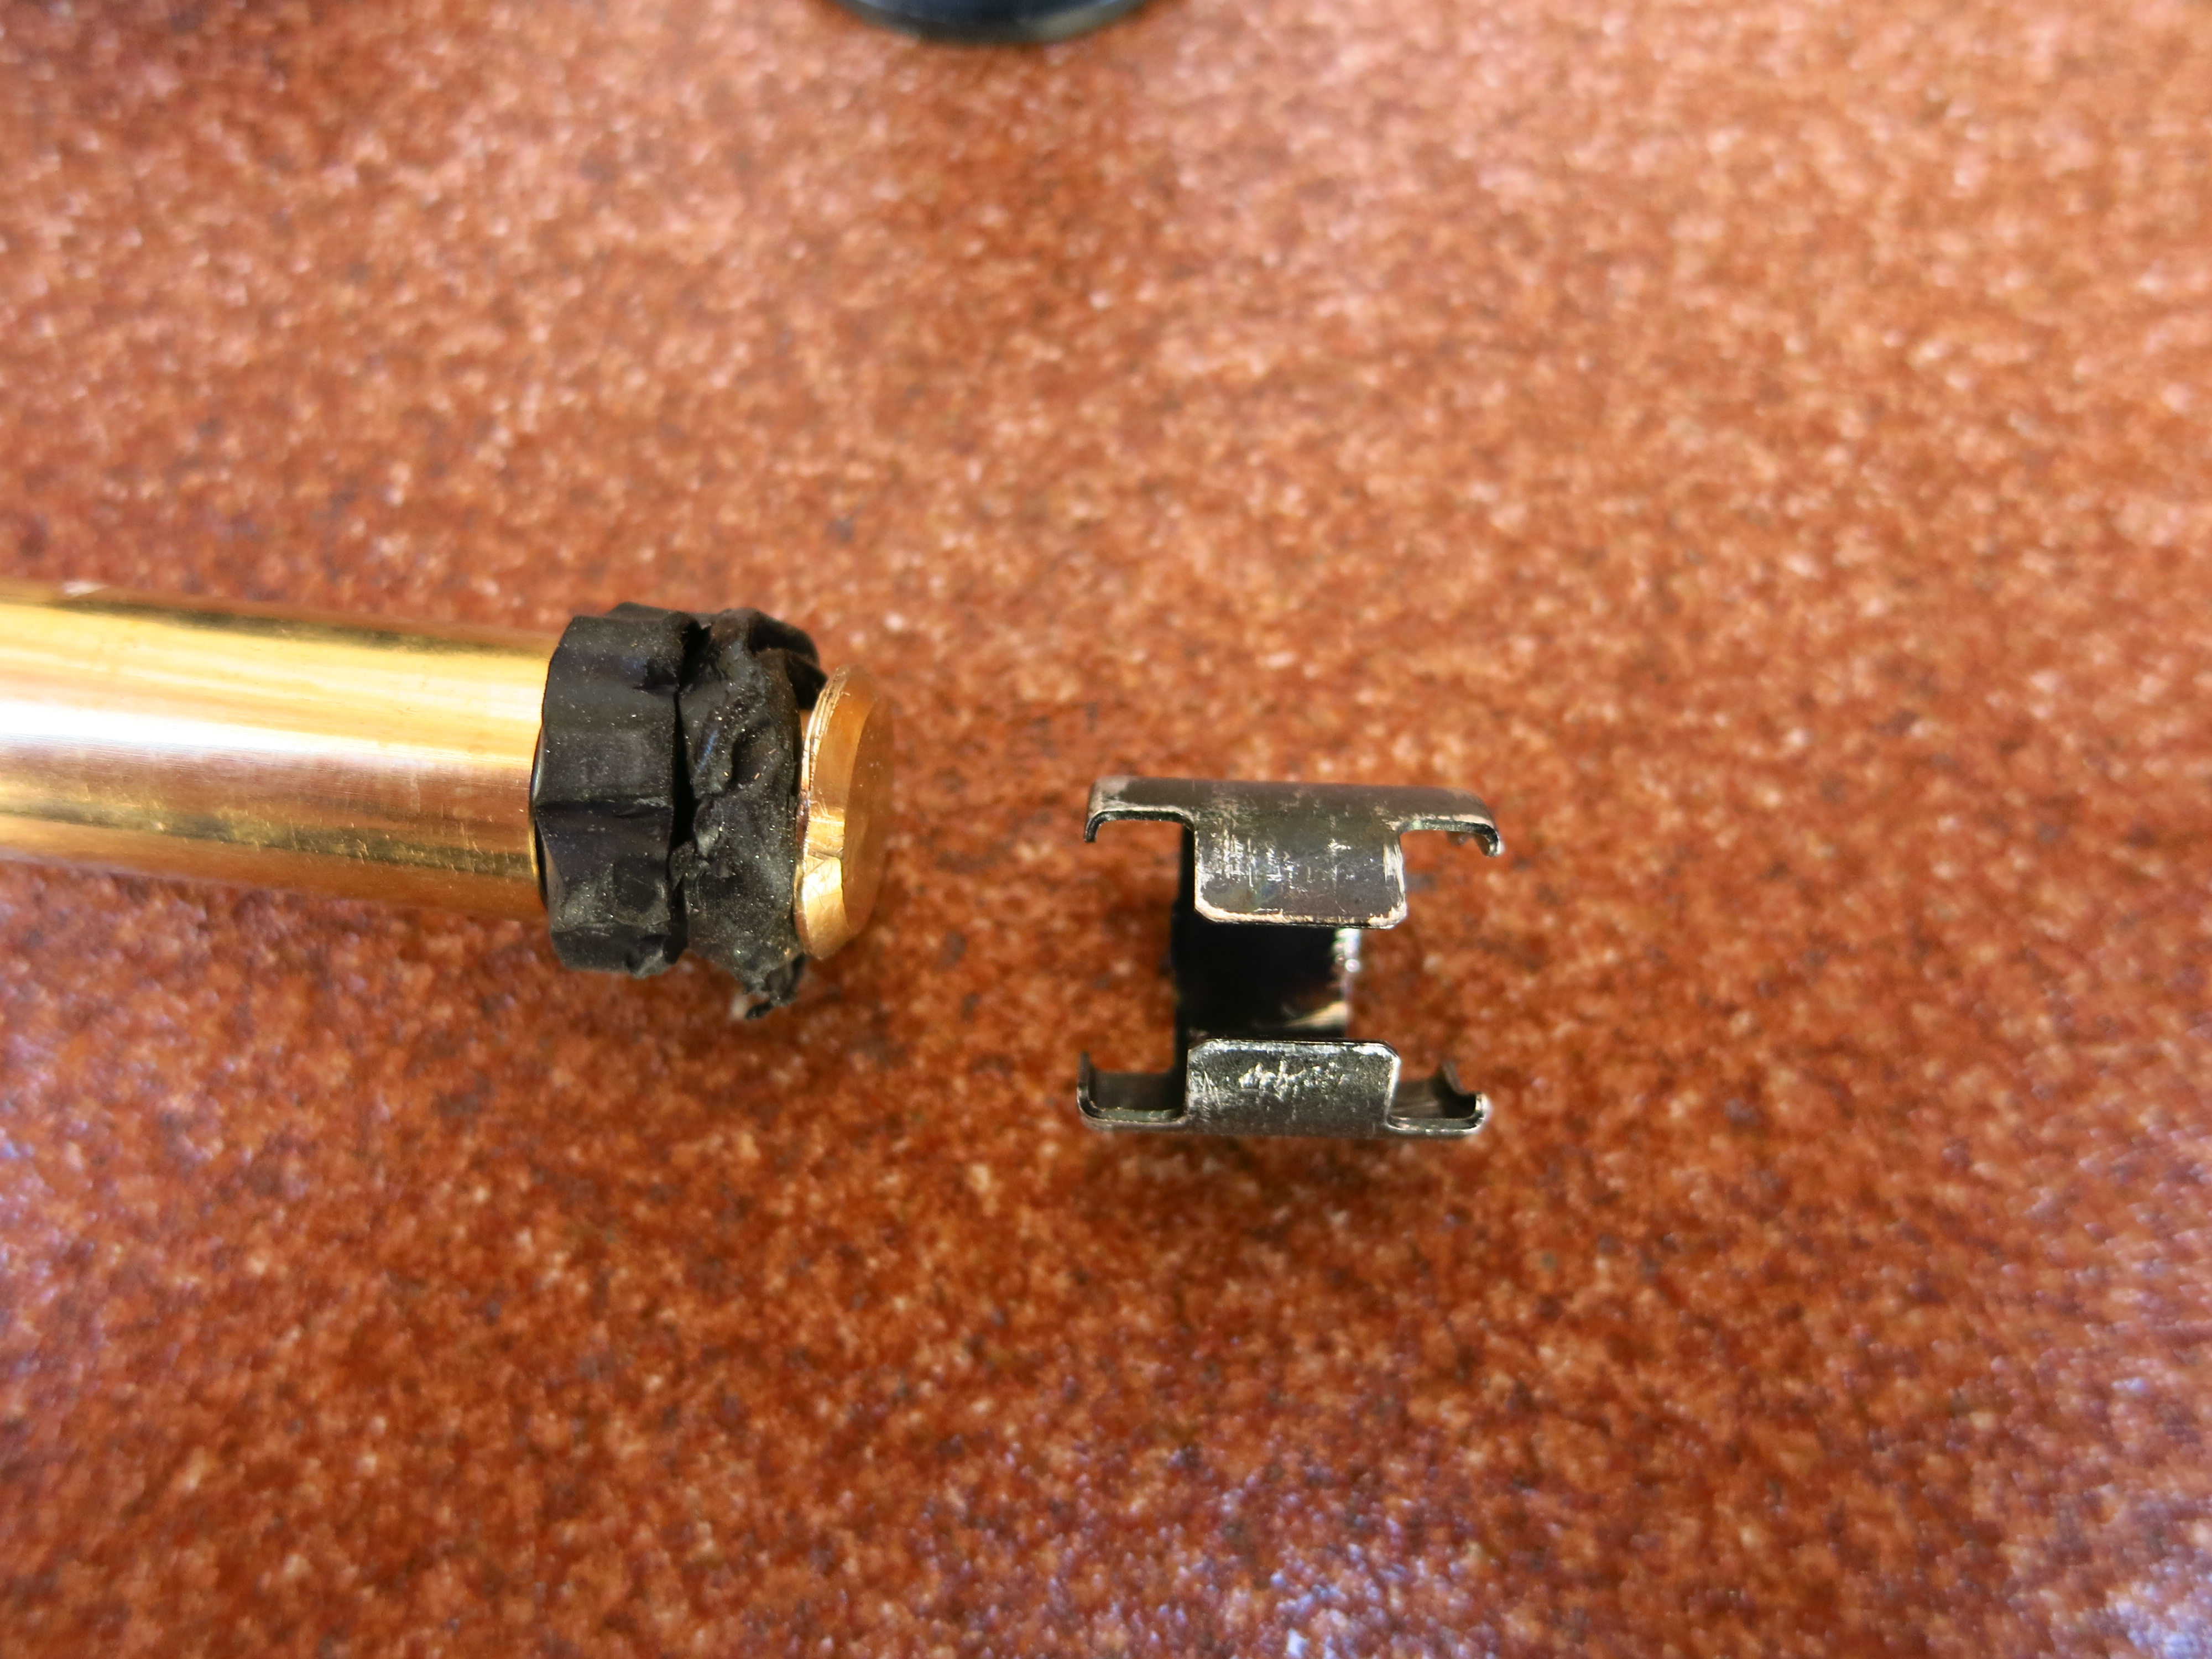
 These cylindrical plates are fragile and can come out easily, be careful with them because of they do come out it is practically impossible to grab hold of the inner weight to pull it out. Having suffered this, when I removed the second one I unscrewed the handlebar weight bolt, then pulled gently but firmly until about 1cm of the inner weight emerged and then pulled it out with a pair of pliers.
 Do not try to put the expansion shell directly into the handlebars first, as there is a risk that the nut at the end comes loose from the shell and then you might push it further inside when inserting the bolt, making it very difficult to recover. Fit the shell to the aluminum backbone and then insert it in the handlebar.
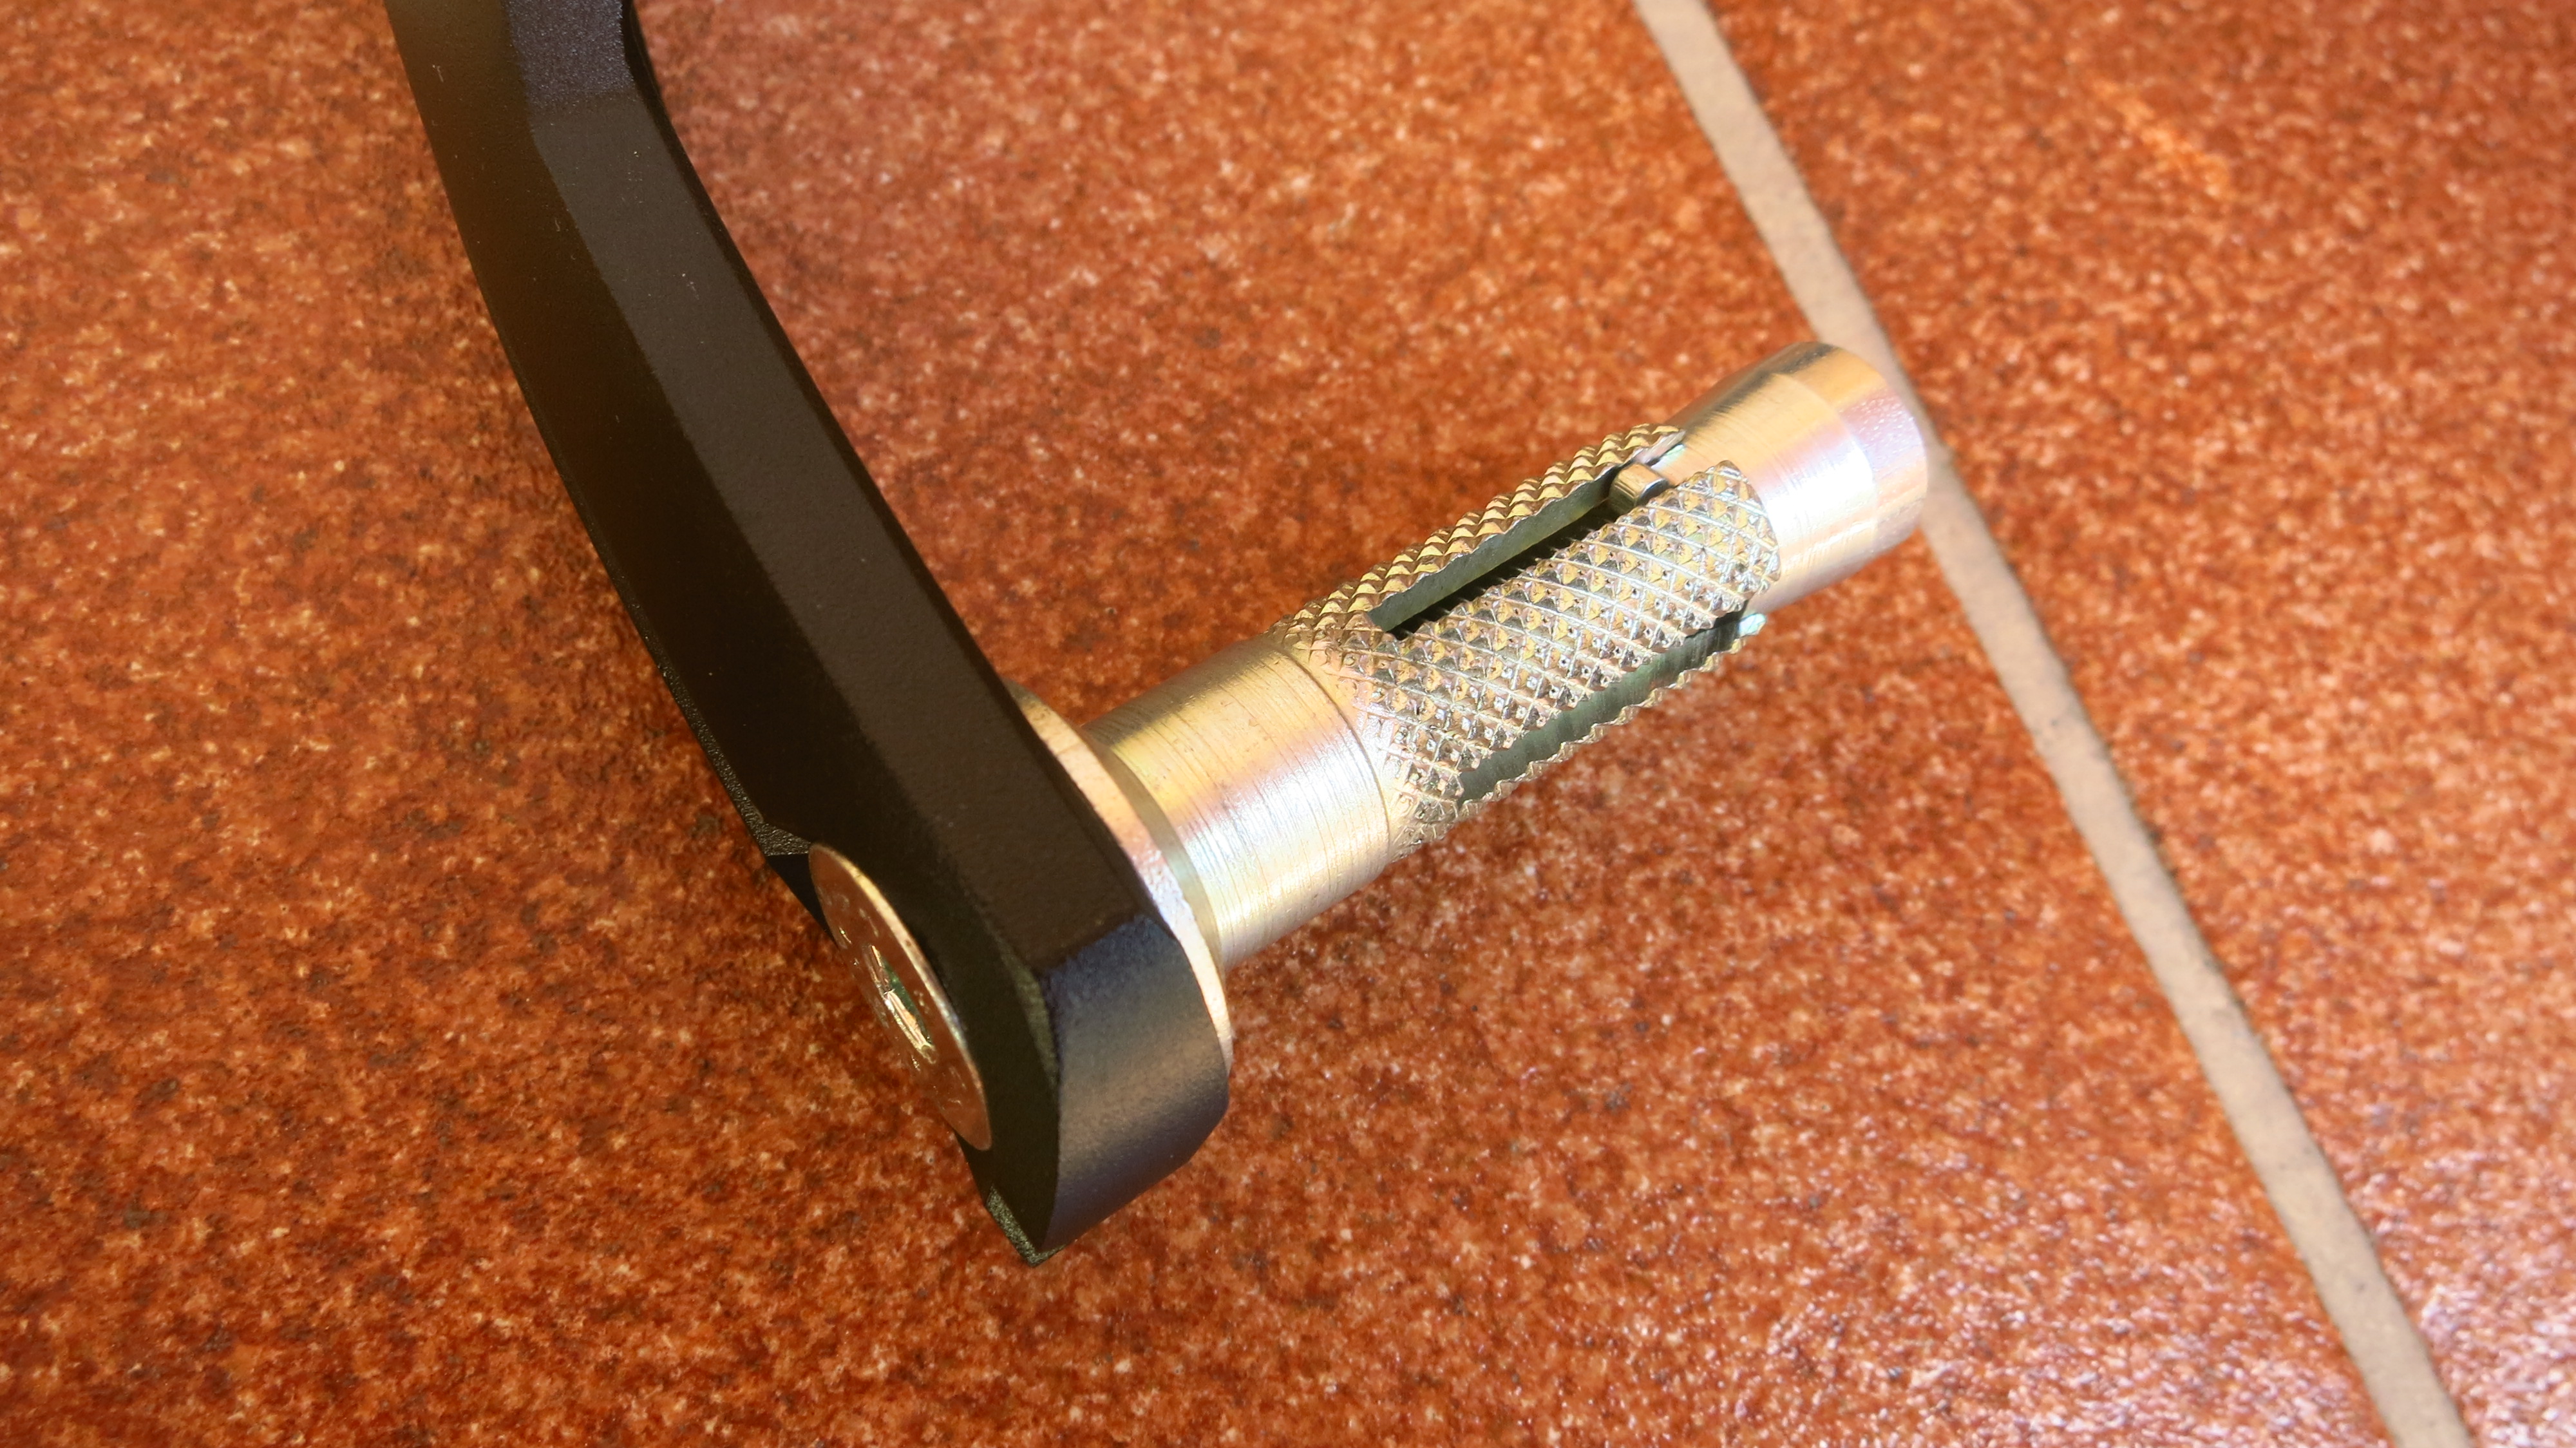 Then fit the support arms to the handlebar but do not tighten, as you’ll need to adjust the levers. It is necessary to move both brake and clutch lever assembly about 1.5cm to the inside to prevent them from touching the backbone when released. Be careful with the clutch lever, too far in and it will touch the switch assembly, too far out and it will touch the backbone. You need to find the sweet spot.
 Once everything is in the position and angle you want, start tightening first the mounting arms and then the expansion shells. The mounting arms come with two sets of brackets to fit handlebars of different diameters. In my case I did not need to use either of them.
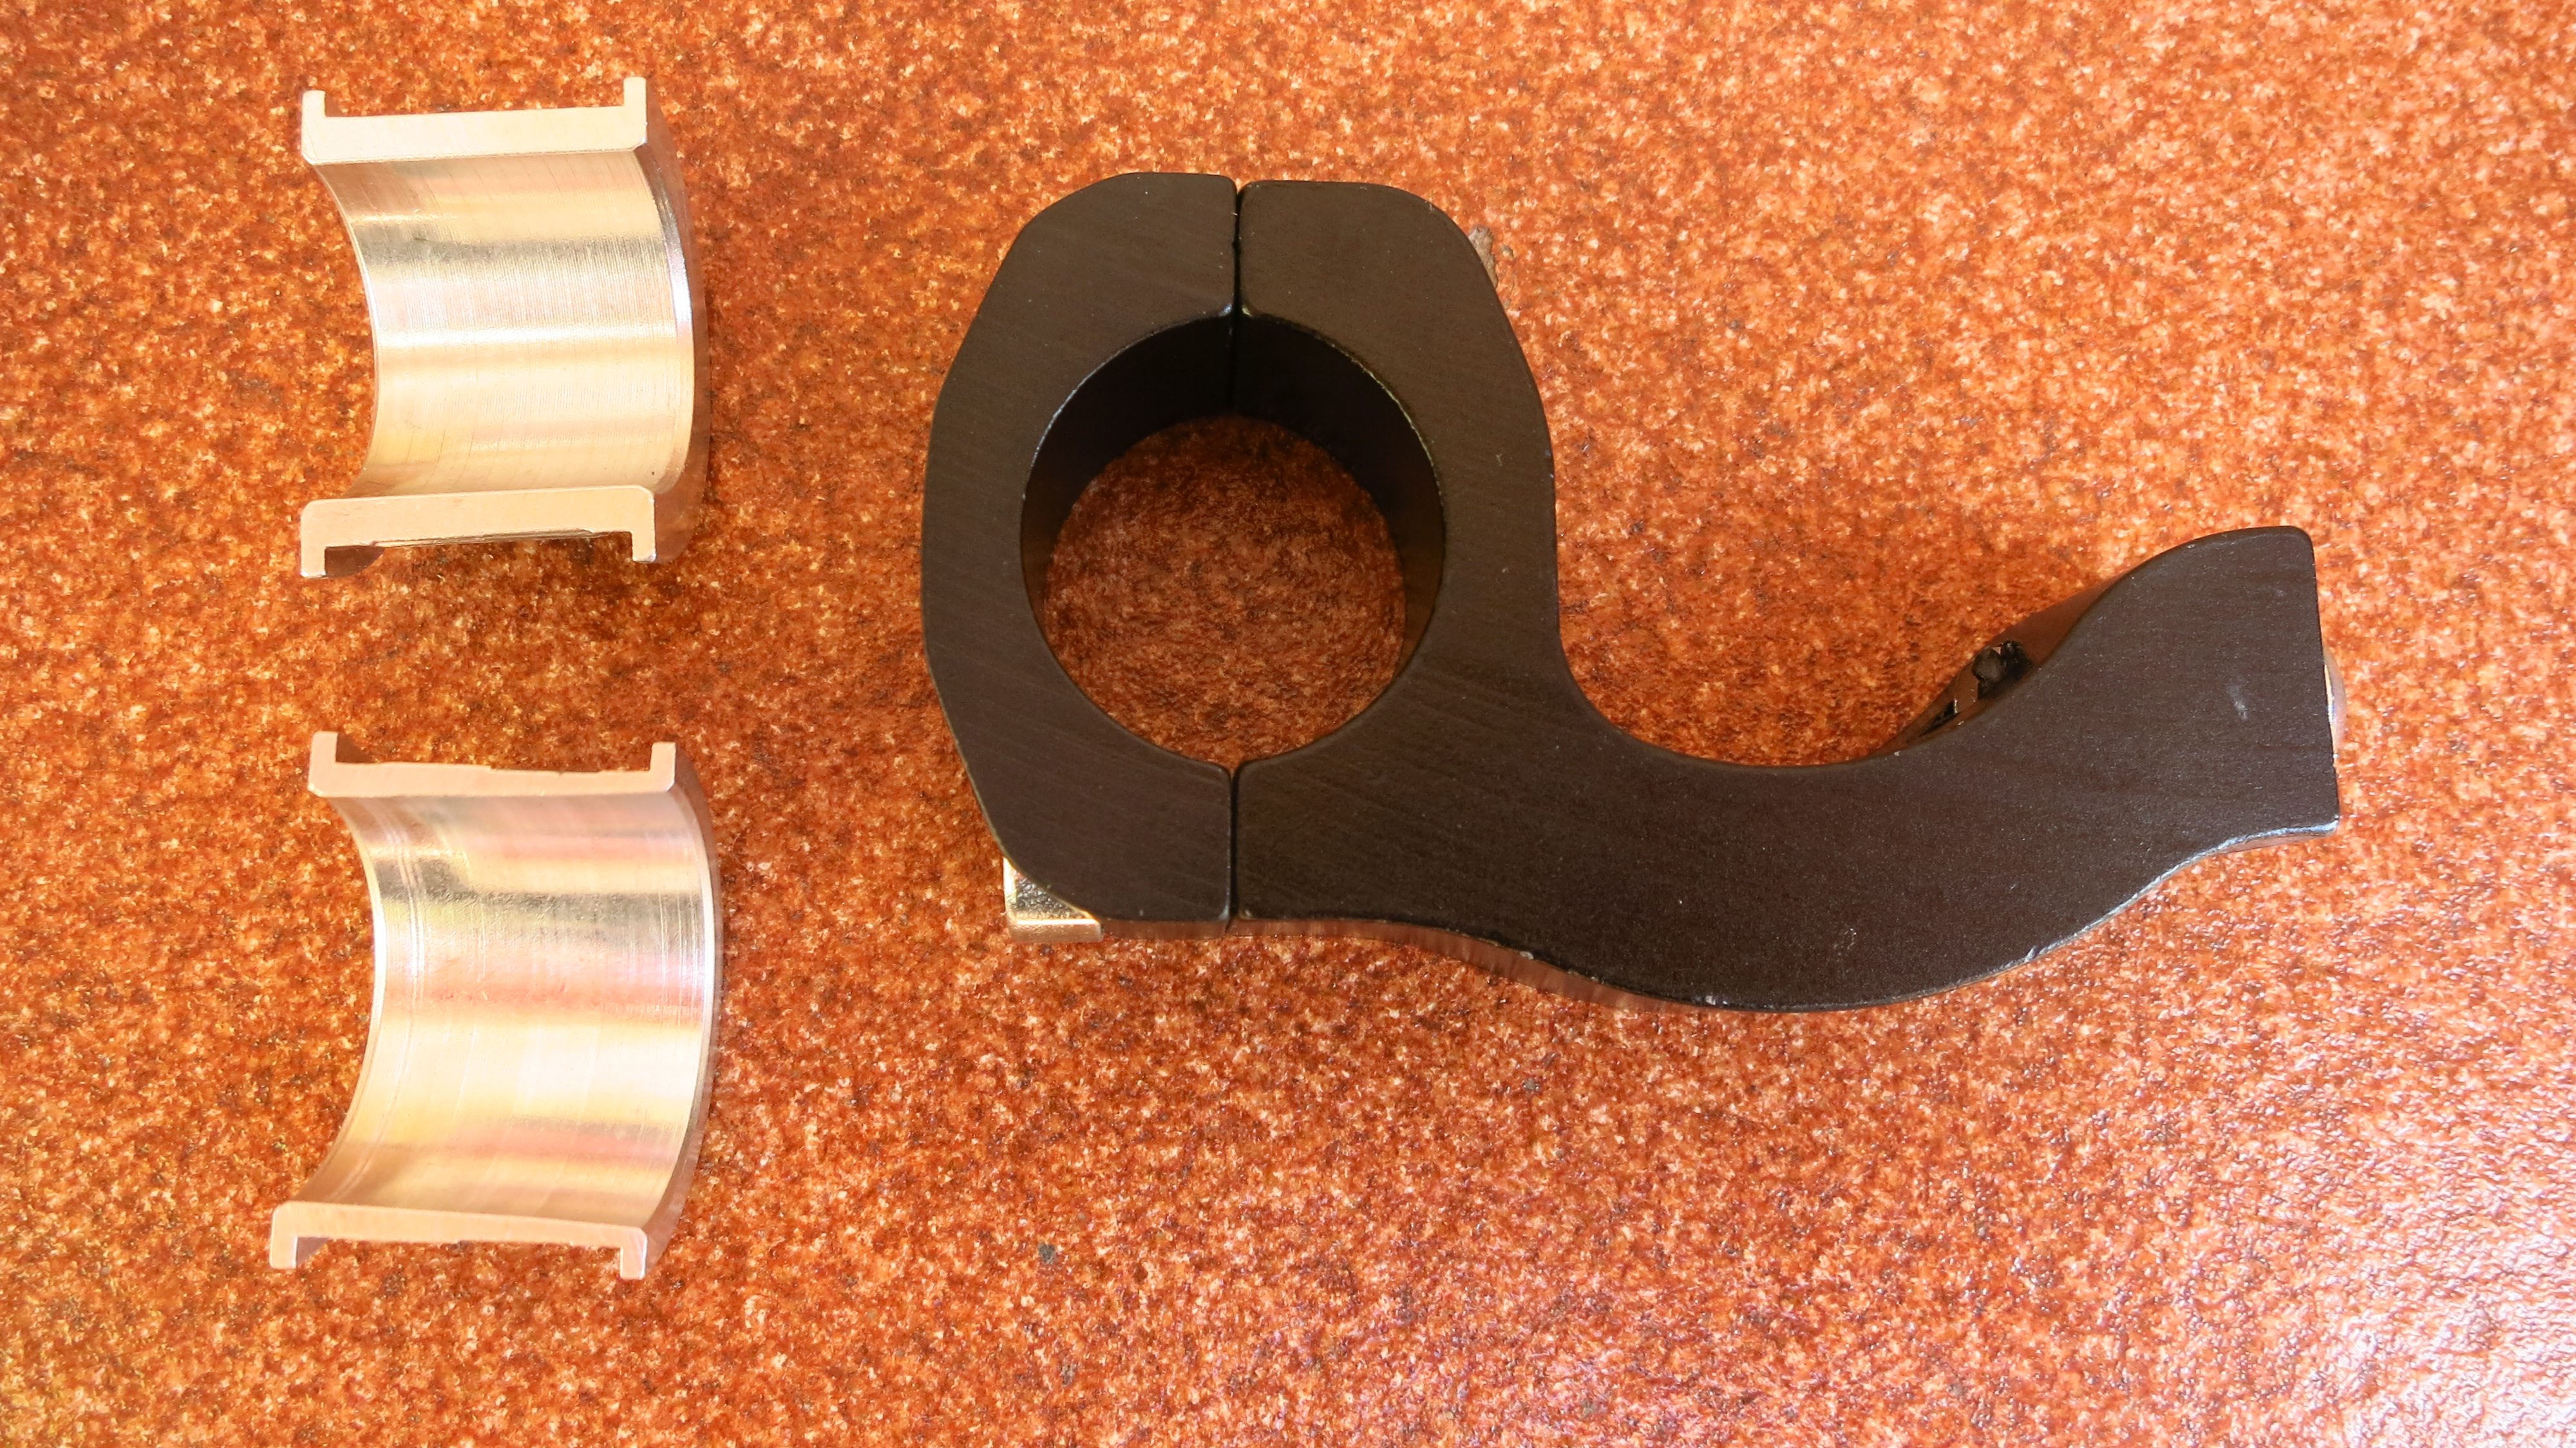

 The bike looks great with the backbones only and it is tempting to keep that look, but I want more protection, not less, so the last touch is to fit the plastic covers, which are attached with three Allen bolts each. Done!
 I know this is a matter of personal opinion, but I think the X-Factor handguards look great on the AT, particularly in black: